NL EN FR DE Gebruiksaanwijzing User manual Notice d'utilisation Benutzerinformation Koelkast Refrigerator Réfrigérateur Kühlschrank ZBA19020SA 2 12 22 33
Inhoud Veiligheidsinformatie _ _ _ _ _ _ _ _ _ _ _ _ _ _ _ _ Bediening _ _ _ _ _ _ _ _ _ _ _ _ _ _ _ _ _ _ _ _ _ _ Het eerste gebruik _ _ _ _ _ _ _ _ _ _ _ _ _ _ _ _ _ _ Dagelijks gebruik _ _ _ _ _ _ _ _ _ _ _ _ _ _ _ _ _ _ Nuttige aanwijzingen en tips _ _ _ _ _ _ _ _ _ _ _ _ _ 2 4 4 4 5 Reiniging en onderhoud _ _ _ _ _ _ _ _ _ _ _ _ _ _ _ 5 Problemen oplossen _ _ _ _ _ _ _ _ _ _ _ _ _ _ _ _ 6 Technische gegevens _ _ _ _ _ _ _ _ _ _ _ _ _ _ _ _ 8 Montage _ _ _ _ _ _ _ _ _ _ _ _ _ _ _ _ _ _ _ _ _ _ 8 Het m
Waarschuwing! Alle elektrische onderdelen (netsnoer, stekker, compressor) mogen om gevaar te voorkomen uitsluitend worden vervangen door een erkende onderhoudsdienst of gekwalificeerd onderhoudspersoneel. 1. 2. • • • • Het netsnoer mag niet verlengd worden. Verzeker u ervan dat de stekker niet platgedrukt of beschadigd wordt door de achterkant van het apparaat. Een platgedrukte of beschadigde stekker kan oververhit raken en brand veroorzaken. 3.
Bescherming van het milieu Dit apparaat bevat geen gassen die de ozonlaag kunnen beschadigen, niet in het koelcircuit en evenmin in de isolatiematerialen. Het apparaat mag niet worden weggegooid bij het normale huishoudelijke afval. Het isolatieschuim bevat ontvlambare gassen: het apparaat moet weggegooid worden conform de van toepassing zijnde regels die u bij de lokale overheidsinstanties kunt verkrijgen. Voorkom beschadiging aan de koeleenheid, vooral aan de achterkant bij de warmtewisselaar.
Het plaatsen van de deurschappen Om het bewaren van voedselpakketten van verschillende afmetingen mogelijk te maken, kunnen de schappen op verschillende hoogtes geplaatst worden. Trek het schap geleidelijk in de richting van de pijlen totdat het los komt en plaats op een andere gewenste hoogte terug. Nuttige aanwijzingen en tips Tips voor energiebesparing Nuttige tips voor het koelen • De deur niet vaker openen of open laten staan dan strikt noodzakelijk.
• spoel ze af en maak ze grondig droog. Belangrijk! Trek niet aan leidingen en/of kabels aan de binnenkant van de kast en verplaats of beschadig ze niet. Gebruik nooit schoonmaakmiddelen, schuurpoeders, erg geparfumeerde reinigingsproducten en waspolijstmiddelen om de binnenkant schoon te maken, aangezien deze het oppervlak beschadigen en een sterke geur achterlaten.
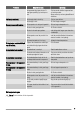
Probleem Het lampje werkt niet. De compressor werkt continu. Mogelijke oorzaak Oplossing Het apparaat krijgt geen stroom. Er staat geen spanning op het stopcontact. Sluit een ander elektrisch apparaat aan op het stopcontact. Neem contact op met een gekwalificeerd elektricien. Het lampje staat in stand-by. Sluit en open de deur. Het lampje is stuk. Zie 'Het lampje vervangen'. De temperatuur is niet goed ingesteld. Stel een hogere temperatuur in. De deur is niet goed gesloten.
De deur sluiten Verwijder de schroef van de afdekking van het lampje. Verwijder de afdekking van het lampje (raadpleeg de afbeelding). Vervang het kapotte lampje door een nieuw lampje met hetzelfde vermogen dat speciaal bedoeld is voor huishoudelijke apparaten (het maximumvermogen is vermeld op de afdekking van het lampje). Installeer de afdekking van het lampje. Draai de schroef van de afdekking van het lampje vast. Steek de stekker in het stopcontact. Open de deur. Controleer of het lampje gaat branden.
Klimaatklasse Omgevingstemperatuur SN +10°C tot + 32°C N +16°C tot + 32°C ST +16°C tot + 38°C T +16°C tot + 43°C Ventilatievereisten De luchtstroom achter het apparaat moet voldoende zijn. 5 cm min. 200cm2 min. 200cm2 Elektrische aansluiting Zorg er vóór het aansluiten voor dat het voltage en de frequentie op het typeplaatje overeenkomen met de stroomtoevoer in uw huis. Het apparaat moet geaard zijn. De netsnoerstekker is voorzien van een contact voor dit doel.
Ha ~50 mm 90o Hb 21 mm I 4mm ~50 mm 44mm I 3 Stel het apparaat in de 4 Bevestig het apparaat met 4 schroeven aan de nis af. Zorg ervoor dat de afstand nis. tussen het apparaat en de voorste rand van de kast 44 mm is. Het afdekplaatje voor het onderste scharnier (in de zak met accessoires) zorgt ervoor dat de afstand tussen het apparaat en het keukenmeubel correct is. Zorg ervoor dat er een ruimte van 4 mm tussen het apparaat en de kast aanwezig is. Open de deur.
Controleer goed en verzeker u ervan dat: • alle schroeven zijn aangehaald. • de magnetische afdichtstrip goed bevestigd is aan de kast. Hb Hd 13 Duw onderdeel (Hd) op onderdeel (Hb). Belangrijk! Als de omgevingstemperatuur laag is (bijv. in de winter), kan de omvang van de pakking kleiner worden. De omvang van de pakking neemt toe als de omgevingstemperatuur toeneemt.
Contents Safety information _ _ _ _ _ _ _ _ _ _ _ _ _ _ _ _ _ Operation _ _ _ _ _ _ _ _ _ _ _ _ _ _ _ _ _ _ _ _ _ First use _ _ _ _ _ _ _ _ _ _ _ _ _ _ _ _ _ _ _ _ _ _ Daily use _ _ _ _ _ _ _ _ _ _ _ _ _ _ _ _ _ _ _ _ _ Helpful hints and tips _ _ _ _ _ _ _ _ _ _ _ _ _ _ _ 12 14 14 14 15 Care and Cleaning _ _ _ _ _ _ _ _ _ _ _ _ _ _ _ _ _ What to do if… _ _ _ _ _ _ _ _ _ _ _ _ _ _ _ _ _ _ Technical data _ _ _ _ _ _ _ _ _ _ _ _ _ _ _ _ _ _ _ Installation _ _ _ _ _ _ _ _ _ _ _ _ _ _ _ _ _ _ _ _ Environmental
2. • • • • Make sure that the power plug is not squashed or damaged by the back of the appliance. A squashed or damaged power plug may overheat and cause a fire. 3. Make sure that you can come to the mains plug of the appliance. 4. Do not pull the mains cable. 5. If the power plug socket is loose, do not insert the power plug. There is a risk of electric shock or fire. 6. You must not operate the appliance without the lamp cover (if foreseen) of interior lighting. This appliance is heavy.
Operation Switching on Insert the plug into the wall socket. Turn the Temperature regulator clockwise to a medium setting. A medium setting is generally the most suitable. Temperature regulation However, the exact setting should be chosen keeping in mind that the temperature inside the appliance depends on: • room temperature • how often the door is opened • the quantity of food stored • the location of the appliance. The temperature is automatically regulated.
Helpful hints and tips Hints for energy saving Hints for refrigeration • Do not open the door frequently or leave it open longer than absolutely necessary. • If the ambient temperature is high and the Temperature Regulator is set to low temperature and the appliance is fully loaded, the compressor may run continuously, causing frost or ice on the evaporator. If this happens, set the Temperature Regulator toward warmer settings to allow automatic defrosting and so a saving in electricity consumption.
• disconnect the appliance from electricity supply • remove all food • defrost (if foreseen) and clean the appliance and all accessories • leave the door/doors ajar to prevent unpleasant smells. If the cabinet will be kept on, ask somebody to check it once in a while to prevent the food inside from spoiling in case of a power failure.
Problem Possible cause Solution Water flows on the ground. The melting water outlet does not flow in the evaporative tray above the compressor. Attach the melting water outlet to the evaporative tray. The temperature in the appliance is too low. The temperature regulator is not set correctly. Set a higher temperature. The temperature in the appliance is too high. The temperature regulator is not set correctly. Set a lower temperature. The door is not closed correctly.
Technical data Dimension of the recess Height 1030 mm Width 560 mm Depth 550 mm Voltage 230-240 V Frequency 50 Hz The technical information are situated in the rating plate on the internal left side of the appliance and in the energy label. Installation Caution! Read the "Safety Information" carefully for your safety and correct operation of the appliance before installing the appliance. Positioning Door reversibility The door of the appliance opens to the right.
Ventilation requirements The airflow behind the appliance must be sufficient. 5 cm min. 200cm2 I 4mm min. 200cm2 Installing the appliance Caution! Make sure that the mains cable can move freely. Do the following steps: x 2 x 1 If necessary cut the adhesive sealing strip and then apply it to the appliance as shown in figure. 1 2 Install the appliance in the niche. Push the appliance in the direction of the arrows (1) until the upper gap cover stops against the kitchen furniture.
Ha ~50 mm 90o Hb 21 mm ~50 mm Hc Hd 8 Install the part (Ha) on the inner side of the kitchen furniture. 8 mm Ha Hb Hc Ha 9 Push the part (Hc) on the part (Ha). 10 Open the appliance door and the kitchen furniture door at an angle of 90°. Insert the small square (Hb) into guide (Ha). Put together the appliance door and the furniture door and mark the holes. 8 mm K Ha Hb 11 Remove the brackets and mark a distance of 8 mm from the outer edge of the door where the nail must be fitted (K).
Environmental concerns The symbol on the product or on its packaging indicates that this product may not be treated as household waste. Instead it should be taken to the appropriate collection point for the recycling of electrical and electronic equipment. By ensuring this product is disposed of correctly, you will help prevent potential negative consequences for the environment and human health, which could otherwise be caused by inappropriate waste handling of this product.
Sommaire Consignes de sécurité _ _ _ _ _ _ _ _ _ _ _ _ _ _ _ Fonctionnement _ _ _ _ _ _ _ _ _ _ _ _ _ _ _ _ _ _ Première utilisation _ _ _ _ _ _ _ _ _ _ _ _ _ _ _ _ Utilisation quotidienne _ _ _ _ _ _ _ _ _ _ _ _ _ _ _ Conseils utiles _ _ _ _ _ _ _ _ _ _ _ _ _ _ _ _ _ _ _ 22 24 24 25 25 Entretien et nettoyage _ _ _ _ _ _ _ _ _ _ _ _ _ _ _ En cas d'anomalie de fonctionnement _ _ _ _ _ _ _ _ Caractéristiques techniques _ _ _ _ _ _ _ _ _ _ _ _ Installation _ _ _ _ _ _ _ _ _ _ _ _ _ _ _ _ _ _ _ _ En matière d
Avertissement Les éventuelles réparations ou interventions sur votre appareil, ainsi que le remplacement du câble d'alimentation, ne doivent être effectuées que par un professionnel qualifié. 1. • • • • Ne branchez pas le cordon d'alimentation à une rallonge. 2. Assurez-vous que la prise n'est pas écrasée ou endommagée par l'arrière de l'appareil. Une prise de courant écrasée ou endommagée peut s'échauffer et causer un incendie. 3. Vérifiez que la prise murale de l'appareil est accessible. 4.
Protection de l'environnement Le système frigorifique et l'isolation de votre appareil ne contiennent pas de C.F.C. contribuant ainsi à préserver l'environnement. L'appareil ne doit pas être mis au rebut avec les ordures ménagères et les déchets urbains. La mousse d'isolation contient des gaz inflamma- bles : l'appareil sera mis au rebut conformément aux règlements applicables disponibles auprès des autorités locales.
Utilisation quotidienne Clayettes amovibles Emplacement des balconnets de la porte Les parois du réfrigérateur sont équipées d'une série de glissières pour que les clayettes puissent être placées en fonction des besoins. Selon la taille des emballages des aliments conservés, les balconnets de la porte peuvent être positionnés à différentes hauteurs. Tirez progressivement dans le sens des flèches pour les dégager, puis repositionnez-les selon les besoins.
Nettoyage périodique Cet appareil doit être nettoyé régulièrement : • Nettoyez l'intérieur et tous les accessoires avec de l'eau tiède savonneuse. • Vérifiez régulièrement les joints de porte et nettoyez-les en les essuyant pour éviter toute accumulation de déchets. • Rincez et séchez soigneusement. Important Ne pas tirer, déplacer ou endommager les tuyaux et/ou câbles qui se trouvent à l'intérieur de l'appareil.
Anomalie Cause possible Remède La fiche n'est pas correctement branchée sur la prise de courant. Branchez correctement la fiche sur la prise de courant. Le courant n'arrive pas à l'appareil. La prise de courant n'est pas alimentée. Branchez un autre appareil électrique sur la prise de courant. Faites appel à un électricien qualifié. L'ampoule est en mode veille. Ouvrez et fermez la porte. L'ampoule est défectueuse. Consultez le paragraphe "Remplacement de l'ampoule".
Anomalie Cause possible Remède L'air froid ne circule pas dans l'appareil. Assurez-vous que l'air froid circule dans l'appareil. Remplacement de l'ampoule Fermeture de la porte Attention Débranchez l'appareil du secteur. Retirez la vis du diffuseur. Retirez le diffuseur (voir l'illustration). Remplacez l'ampoule défectueuse par une ampoule neuve de puissance identique, spécifiquement conçue pour les appareils électroménagers (la puissance maximale est indiquée sur le diffuseur).
Installation Attention Pour votre sécurité et le bon fonctionnement de l'appareil, veuillez lire attentivement les "Consignes de sécurité" avant d'installer l'appareil.
x 2 I x 1 4mm 44mm I 1 Si nécessaire, coupez la bande d'étanchéité adhésive et appliquez-la sur l'appareil, comme indiqué sur la figure. 2 Insérez l'appareil dans le meuble d'encastrement. Poussez l'appareil dans la direction indiquée par les flèches (1) jusqu'à ce que la partie couvrant l'interstice en haut de l'appareil butte contre le meuble de cuisine. Poussez l'appareil dans la direction indiquée par les flèches (2) contre le meuble, du côté opposé à la charnière.
Ha ~50 mm 90o Hb 21 mm ~50 mm Hc Hd 8 Installez la pièce (Ha) sur la face intérieure du meuble de cuisine. 8 mm Ha Hb Hc Ha 9 Poussez la pièce (Hc) sur la pièce (Ha). Hb 21 mm Hd 7 Détachez les pièces (Ha), (Hb), (Hc) et (Hd). 90o 10 Ouvrez la porte de l'appareil et la porte du meuble de cuisine à un angle de 90 °C. Insérez le petit carré (Hb) dans le guide (Ha). Joignez la porte de l'appareil et la porte du meuble et repérez les trous. 13 Appuyez la pièce (Hd) sur la pièce (Hb).
En matière de sauvegarde de l'environnement Le symbole sur le produit ou son emballage indique que ce produit ne peut être traité comme déchet ménager. Il doit être remis au point de collecte dédié à cet effet (collecte et recyclage du matériel électrique et électronique). En procédant à la mise au rebut de l'appareil dans les règles de l’art, nous préservons l'environnement et notre 32 sécurité, s’assurant ainsi que les déchets seront traités dans des conditions optimum.
Inhalt Sicherheitshinweise _ _ _ _ _ _ _ _ _ _ _ _ _ _ _ _ Betrieb _ _ _ _ _ _ _ _ _ _ _ _ _ _ _ _ _ _ _ _ _ _ Erste Inbetriebnahme _ _ _ _ _ _ _ _ _ _ _ _ _ _ _ _ Täglicher Gebrauch _ _ _ _ _ _ _ _ _ _ _ _ _ _ _ _ Praktische Tipps und Hinweise _ _ _ _ _ _ _ _ _ _ _ 33 35 35 35 36 Reinigung und Pflege _ _ _ _ _ _ _ _ _ _ _ _ _ _ _ Was tun, wenn … _ _ _ _ _ _ _ _ _ _ _ _ _ _ _ _ _ Technische Daten _ _ _ _ _ _ _ _ _ _ _ _ _ _ _ _ _ Montage _ _ _ _ _ _ _ _ _ _ _ _ _ _ _ _ _ _ _ _ _ _ Hinweise zum Umweltschut
Warnung! Elektrische Bauteile (Netzkabel, Stecker, Kompressor) dürfen zur Vermeidung von Gefahren nur vom Kundendienst oder einer Fachkraft ausgewechselt werden. 1. 2. • • • • Das Netzkabel darf nicht verlängert werden. Vergewissern Sie sich, dass der Netzstecker nicht von der Geräterückseite geklemmt oder beschädigt wird. Ein geklemmter oder beschädigter Netzstecker überhitzt und kann einen Brand verursachen. 3. Vergewissern Sie sich, dass der Netzstecker des Geräts frei zugänglich ist. 4.
Betrieb Einschalten des Geräts Stecken Sie den Stecker in die Wandsteckdose. Drehen Sie den Temperaturregler im Uhrzeigersinn auf eine mittlere Einstellung. Ausschalten des Geräts Drehen Sie den Temperaturregler zum Ausschalten des Geräts in die Position "O". Temperaturregelung Die Temperatur wird automatisch geregelt. Bedienen Sie das Gerät wie folgt: • drehen Sie den Temperaturregler auf eine niedrigere Einstellung, um die minimal mögliche Kühlung zu erreichen.
Positionierung der Türeinsätze Die Türeinsätze können in verschiedener Höhe positioniert werden; damit ermöglichen Sie das Lagern verschieden großer Lebensmittelpackungen. Ziehen Sie das Türabstellfach nach und nach in Pfeilrichtung, bis es sich herausheben lässt, dann setzen Sie es in die neue Position ein. Praktische Tipps und Hinweise Energiespartipps Hinweise für die Kühlung • Öffnen Sie die Tür nicht zu häufig, und lassen Sie diese nicht länger offen als unbedingt notwendig.
Regelmäßige Reinigung Der gesamte Kühlschrank muss regelmäßig gereinigt werden: • Reinigen Sie die Innenseiten und die Zubehörteile mit lauwarmem Wasser und etwas Neutralseife. • Prüfen und säubern Sie die Türdichtungen in regelmäßigen Abständen und kontrollieren Sie, dass diese sauber und frei von Verunreinigungen sind. • Spülen und trocknen Sie diese sorgfältig ab.
Störung Die Lampe funktioniert nicht. Der Kompressor arbeitet ständig. Mögliche Ursache Abhilfe Der Netzstecker steckt nicht richtig in der Steckdose. Stecken Sie den Netzstecker richtig in die Steckdose. Das Gerät bekommt keinen Strom. Es liegt keine Spannung an der Netzsteckdose an. Testen Sie bitte, ob ein anderes Gerät an dieser Steckdose funktioniert. Kontaktieren Sie gegebenenfalls einen qualifizierten Elektriker. Die Lampe befindet sich im StandbyModus. Schließen und öffnen Sie die Tür.
Störung Mögliche Ursache Abhilfe Die Kaltluft kann nicht im Gerät zirkulieren. Lampe wechseln Stellen Sie sicher, dass die Kaltluft im Gerät zirkulieren kann. Schließen der Tür Vorsicht! Trennen Sie den Netzstecker von der Netzversorgung. Lösen Sie die Schraube an der Lampenabdeckung. Nehmen Sie die Lampenabdeckung ab (siehe hierzu die Abbildung).
Montage Vorsicht! Lesen Sie bitte die "Sicherheitshinweise" sorgfältig vor der Aufstellung des Geräts durch, um Gefahren für Sie selbst zu vermeiden und einen korrekten Betrieb des Geräts zu gewährleisten.
x 2 I x 1 4mm 44mm I 1 Schneiden Sie bei Bedarf den Dichtungsstreifen zu und bringen Sie ihn, wie in der Abbildung gezeigt, am Gerät an. 2 Installieren Sie das Gerät in der Einbaunische. Schieben Sie das Gerät in Pfeilrichtung (1), bis die obere Lückenblende am Küchenmöbel anliegt. Schieben Sie das Gerät auf der den Scharnieren gegenüberliegenden Seite in Pfeilrichtung (2) so weit wie möglich gegen die Seitenwand des Küchenmöbels.
Ha ~50 mm 90o Hb 8 mm K Ha 21 mm ~50 mm Hc 21 mm Hd 7 Trennen Sie die Teile (Ha), (Hb), (Hc) und (Hd) ab. 90o 8 Montieren Sie das Teil (Ha) an der Innenseite der Tür des Küchenmöbels. 8 mm Ha Hb 11 Nehmen Sie die Halterungen wieder ab. Markieren Sie 8 mm von der Außenkante die Stelle, an der der Nagel (K) eingeschlagen werden muss. Hb Hc 9 Drücken Sie das Teil (Hc) auf das Teil (Ha).
222354762-A-302011 www.zanussi.