User Manual GETTING STARTED? EASY.
SAFETY INFORMATION Before the installation and use of the appliance, carefully read the supplied instructions. The manufacturer is not responsible if an incorrect installation and use causes injuries and damages. Always keep the instructions with the appliance for future reference.
• • • Clean the appliance with a moist soft cloth. Only use neutral detergents. Do not use abrasive products, abrasive cleaning pads, solvents or metal objects. Do not store explosive substances such as aerosol cans with a flammable propellant in this appliance. If the supply cord is damaged, it must be replaced by the manufacturer, its Authorised Service Centre or similarly qualified persons in order to avoid a hazard.
• • • • Do not touch the compressor or the condenser. They are hot. Do not remove or touch items from the freezer compartment if your hands are wet or damp. Do not freeze again food that has been thawed. Obey the storage instructions on the packaging of frozen food. INTERNAL LIGHT • The type of lamp used for this appliance is not suitable for household room illumination CARE AND CLEANING WARNING! Risk of injury or damage to the appliance.
CAUTION! Do not use detergents or abrasive powders, as these will damage the finish. DAILY USE WARNING! Refer to Safety chapters. POSITIONING THE DOOR SHELVES To permit storage of food packages of various sizes, the door shelves can be placed at different heights. 1. Gradually pull the shelf in the direction of the arrows until it comes free. 2. Reposition as required.
HINTS AND TIPS NORMAL OPERATING SOUNDS The following sounds are normal during operation: • A faint gurgling and bubbling sound from coils sound when refrigerant is pumped. • A whirring and pulsating sound from the compressor when refrigerant is pumped. • A sudden cracking noise from inside appliance caused by thermic dilatation (a natural and not dangerous physical phenomenon). • A faint click noise from the temperature regulator when the compressor switches on or off.
CARE AND CLEANING WARNING! Refer to Safety chapters. compartment channel to prevent the water overflowing and dripping onto the food inside. GENERAL WARNINGS CAUTION! Unplug the appliance before carrying out any maintenance operation. This appliance contains hydrocarbons in its cooling unit; maintenance and recharging must therefore only be carried out by authorized technicians. The accessories and parts of the appliance are not suitable for washing in a dishwasher.
PERIODS OF NON-OPERATION When the appliance is not in use for long periods, take the following precautions: 1. Disconnect the appliance from electricity supply. 2. Remove all food. 3. Defrost (if necessary) and clean the appliance and all accessories. 4. Clean the appliance and all accessories. 5. Leave the door/doors open to prevent unpleasant smells.
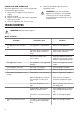
Problem Possible cause Solution The water drainage plug is not correctly positioned. Position the water drainage plug in the correct way. Food products are not wrapped properly. Wrap the food products better. Temperature is set incorrectly. Refer to "Operation" chapter. The compressor does not start immediately after pressing the , or after changing the temperature. This is normal, no error has occurred. The compressor starts after a period of time.
1 2 1 2. Replace the lamp with one of the same power and shape, specifically designed for household appliances. The maximum power is shown on the light bulb cover. 3. Reassemble the lamp cover. 4. Connect the plug to the mains socket. 5. Open the door. Make sure that the light comes on. CLOSING THE DOOR 1. Clean the door gaskets. 2. If necessary, adjust the door. Refer to "Installation". 3. If necessary, replace the defective door gaskets. Contact the Authorised Service Centre.
by the earth symbol or coloured green and yellow. 2. Connect the wire coloured blue to the terminal either marked with the letter “N“ or coloured black. 3. Connect the wire coloured brown to the terminal either marked with the “L“ or coloured red. 4. Check that no cut, or stray strands of wire is present and the cord clamp (E) is secure over the outer sheath. Make sure the electricity supply voltage is the same as that indicated on the appliance rating plate. 5. Switch on the appliance.
x I x I 2. Install the appliance in the niche. 3. Push the appliance in the direction of the arrows (1) until the upper gap cover stops against the kitchen furniture. 8. Remove the correct part from the hinge cover (E). Make sure to remove the part DX, in the case of right hinge, SX in opposite case. 2 1 4. Push the appliance in the direction of the arrows (2) against the cupboard on the opposite side of the hinge. 5. Adjust the appliance in the niche.
Ha Hb 22. Remove the brackets and mark a distance of 8 mm from the outer edge of the door where the nail must be fitted (K). 8 mm K Ha Hc Hd 17. Install the part (Ha) on the inner side of the kitchen furniture. ~50 mm 90o 21 mm 90o 23. Place the small square on the guide again and fix it with the screws supplied. 24. Align the kitchen furniture door and the appliance door by adjusting the part (Hb). ~50 mm 21 mm 18. Push the part (Hc) on the part (Ha). Ha Hb 25.
Height mm 1780 Width mm 560 Depth mm 550 Rising time Hours 22 Voltage Volts 230 - 240 Frequency Hz 50 The technical information are situated in the rating plate, on the external or internal side of the appliance and in the energy label. ENVIRONMENT CONCERNS the symbol with the household waste. Return the product to your local recycling facility or contact your municipal office. Recycle the materials with the symbol . Put the packaging in applicable containers to recycle it.
222372164-A-252015 WWW.ZANUSSI.