ES Manual de instrucciones Cocina ZCG212G1XA ES
Contenido Información sobre seguridad Instrucciones de seguridad Descripción del producto Antes del primer uso Placa - Uso diario Placa - Consejos Placa - Mantenimiento y limpieza 2 3 7 8 8 9 10 Horno - Uso diario Horno - Funciones de reloj Horno - Uso de los accesorios Horno - Consejos Horno - Mantenimiento y limpieza Solución de problemas Instalación 11 13 13 14 18 20 21 Salvo modificaciones.
Seguridad general • • • • • • • • • • • • • Solo un electricista cualificado puede instalar este aparato y sustituir el cable. No accione el aparato con un temporizador externo ni con un sistema de mando a distancia independiente. Cocinar con grasa o aceite sin estar presente puede resultar peligroso, ya que podría ocasionarse un incendio. Nunca intente apagar un fuego con agua; apague el aparato y cubra la llama con una tapa o una manta ignífuga.
Instalación • ADVERTENCIA! Solo un electricista cualificado puede instalar este aparato. • • • • • • • • • • • • Retire todo el embalaje No instale ni utilice un aparato dañado. Siga las instrucciones de instalación suministradas con el aparato. El aparato es pesado, tenga cuidado siempre cuando lo mueva. Utilice siempre guantes de protección. No tire nunca del aparato sujetando el asa. El armario de la cocina y el hueco deben tener las dimensiones adecuadas.
• • • • • • • • Utilice este aparato en entornos domésticos solamente. No cambie las especificaciones de este aparato. Cerciórese de que los orificios de ventilación no están obstruidos. No deje nunca el aparato desatendido mientras está en funcionamiento. Desactive el aparato después de cada uso. Tenga cuidado al abrir la puerta del aparato cuando éste esté en funcionamiento. Pueden liberarse vapores calientes. No utilice el aparato con las manos mojadas ni cuando entre en contacto con el agua.
• • • • • Los restos de comida o grasa en el interior del aparato podrían provocar un incendio. Limpie el aparato con un paño suave humedecido. Utilice solo detergentes neutros. No utilice productos abrasivos, estropajos duros, disolventes ni objetos metálicos. Si utiliza aerosoles de limpieza para hornos, siga las instrucciones del envase. No limpie el esmalte catalítico (en su caso) con ningún tipo de detergente. No lave los quemadores en el lavavajillas.
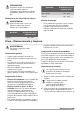
Descripción del producto Descripción general 1 2 3 4 5 6 7 4 9 3 8 2 1 1 2 3 4 5 6 7 8 9 Mandos de la placa Tecla del generador de chispas Botón para la bombilla y el asador Mando del Avisador Mando de las funciones del horno Grill Lámpara Orificio del asador rotativo Posiciones de los estantes Disposición de las zonas de cocción 1 2 5 3 1 Quemador semi rápido 2 Salida de vapor - el número y la posición dependen del modelo 3 Quemador auxiliar 4 Quemador rápido 5 Quemador semi rápido 4 Acceso
Antes del primer uso ADVERTENCIA! Consulte los capítulos sobre seguridad. Limpieza inicial Retire todos los accesorios del aparato. Consulte el capítulo "Mantenimiento y limpieza". El aire caliente expulsado por la salida de vapor puede causar decoloración de la tapa blanca de la placa. Esta área se vuelve amarilla. Para evitarlo, coloque la tapa de la salida de vapor. 1. Coloque los ganchos de la tapa bajo el borde frontal de los orificios de salida del vapor. 2.
de gas y púlselo para encender el quemador. 3. Suelte el botón del generador de chispas cuando se encienda el quemador pero mantenga presionado el mando en esta posición durante 10 segundos como máximo; de esta forma el termopar se calentará. De lo contrario, el suministro de gas se interrumpirá. 4. Ajuste la llama después de que se normalice.
PRECAUCIÓN! Asegúrese de que los recipientes están centrados sobre los quemadores para obtener la máxima estabilidad y reducir el consumo de gas. Diámetro de los utensilios de cocina ADVERTENCIA! Utilice utensilios de cocina con diámetros adecuados para el tamaño de los quemadores.
fuera necesario, elimine las manchas difíciles con un limpiador en pasta. 3. Después de limpiar los soportes para sartenes, asegúrese de colocarlos en la posición correcta. 4. A fin de que los quemadores funcionen correctamente, asegúrese de que los brazos de las rejillas están alineados con el centro del quemador. Mantenimiento periódico Haga revisar la instalación de gas y el ajustador de presión, si lo hubiera, regularmente y por el Centro de servicio autorizado.
unos 15 segundos como máximo para que el termopar se caliente. No mantenga pulsado el mando de las funciones del horno durante más de 15 segundos. Si el quemador del horno no se enciende al cabo de 15 segundos, suelte el mando de las funciones del horno, gírelo hasta la posición de apagado, abra la puerta del horno y espere al menos 1 minuto antes de volver a intentar encender el quemador. A Después del encendido del quemador a gas del horno 1. Libere el mando de las funciones del horno. 2.
Horno - Funciones de reloj Avisador Utilícelo para programar una cuenta atrás. Esta función no influye en el funcionamiento del horno. Gire el mando del temporizador hasta el máximo y a continuación al período de tiempo necesario. Transcurrido el período de tiempo, suena una señal. Horno - Uso de los accesorios ADVERTENCIA! Consulte los capítulos sobre seguridad. Inserción de los accesorios Parrilla: La parrilla tiene una forma especial en la parte posterior que permite la circulación del calor.
A B C D A) B) C) D) Gancho de soporte Horquillas Espadín Asa 1. Abra la puerta del horno. 2. Coloque el asa del asador rotativo en el espadín. 3. Coloque la bandeja de asar en el nivel más bajo. 4. Coloque el gancho del soporte en el orificio en la cavidad superior del horno. 5. Coloque la primera horquilla en el espadín, ponga luego la carne en el asador rotativo y, finalmente, coloque la segunda horquilla. Asegúrese de que la carne está en el medio del rustepollos. 6.
Horneado • • El comportamiento de su horno puede ser diferente al de su aparato antiguo. Adapte sus ajustes normales (temperatura y tiempos de cocción) y posiciones de la parrilla a los valores indicados en las tablas. • El fabricante recomienda utilizar la temperatura más baja al principio. • Si no encuentra los datos exactos para una receta concreta, siga los de una preparación similar. • El tiempo de cocción puede ampliarse unos 10-15 minutos cuando se hornea repostería en más de una posición.
Alimento Cantidad (gramos) Bizcocho de leva- 2000 dura con manzana Posición del termostato Tiempo (min) Posición de la parrilla Accesorios 5 50 - 60 3 bandeja de repostería de aluminio 1200 + 1200 6 55 - 65 3 2 bandeja de aluminio redonda (diámetro: 20 cm) Pastelillos 1) 500 2-3 25 - 30 3 bandeja de repostería de aluminio bandeja Bizcocho sin gra- 350 3 30 - 35 3 1 bandeja redonda (diámetro: 26 cm) Bandeja recogegotas, bizcocho 1500 2-3 45 - 55 2) 3 bandeja de repostería de
Alimento Cantidad (gramos) Pastel de Navidad 2400 Posición del termostato Accesorios 60 7) 3 bandeja de repostería de aluminio 3-4 60 3) 3 bandeja 5-6 50 - 60 3 1 bandeja redonda (diámetro: 26 cm) 6) Quiche Lorraine 5) 1000 Posición de la parrilla 3-4 6) Pastel de Navidad 2400 Tiempo (min) Pan de pueblo 6) 750 + 750 4-5 50 - 60 3 2 bandeja de aluminio redonda (diámetro: 20 cm) Bizcocho rumano 600 + 600 2-3 50 - 60 3 2 bandejas de aluminio redondas (diámetro: 25 cm) 600 + 6
Alimento Tarta de mante- Cantidad (gramos) 600 Posición del termostato 3 Tiempo (min) 20 - 25 Posición de la parrilla 3 Accesorios bandeja quilla 5) 1) Precaliente el horno durante 10 minutos. 2) Después de apagar el aparato, deje el bizcocho en el horno unos 7 minutos. 3) Después de apagar el aparato, deje el bizcocho en el horno unos 5 minutos. 4) Precaliente el horno durante 20 minutos. 5) Precaliente el horno durante 15 minutos.
Aparatos de acero inoxidable o aluminio Limpie la puerta del horno únicamente con una esponja húmeda. Séquela con un paño suave. No utilice productos abrasivos, ácidos ni estropajos de acero, ya que pueden dañar la superficie del horno. Limpie el panel de control del horno teniendo en cuenta las mismas precauciones. Retirar y colocar los paneles de cristal del horno Los paneles de cristal internos se pueden retirar para limpiarlos. El número de paneles de cristal es diferente según el modelo.
La bombilla trasera ADVERTENCIA! Hay peligro de electrocución. Desconecte el fusible antes de cambiar la bombilla. La lámpara del horno y la tapa de cristal pueden estar calientes. 1. Apague el aparato. 2. Retire los fusibles de la caja de fusibles o desconecte el disyuntor. 1. Gire la tapa de cristal hacia la izquierda para extraerla. 2. Limpie la tapa de vidrio. 3. Cambie la bombilla por otra apropiada termorresistente hasta 300 °C. 4. Coloque la tapa de cristal.
Problema Posible causa Solución El color de la llama es naranja o amarillo. La bombilla no funciona. La llama puede parecer naranja o amarilla en algunas zonas del quemador. Esto es totalmente normal. La bombilla es defectuosa. Sustituya la bombilla. Se acumula vapor y condensaEl plato ha permanecido en el ción en los alimentos y en la cavi- horno demasiado tiempo. dad del horno. No deje los platos en el horno más de 15 a 20 minutos tras finalizar el proceso de cocción. El horno no calienta.
Medidas B C A mm B 650 C 150 D 20 E 540 Datos técnicos E D Medidas D Distancias mínimas Medidas mm A 400 mm Alto 850 Ancho 500 Fondo 535 Consumo eléctrico total 20 W Clase de aparato 1 Otros datos técnicos Categoría de aparato: II2H3+ Gas original: G20 (2H) 20 mbares Sustitución de gas: G30/G31 (3+) 30/37 mbares Diámetros de derivación QUEMADOR Ø DERIVACIÓN1) 1/100 mm Auxiliar 29 / 30 Semi rápido 32 Rápido 42 Horno 44 1) Tipo de derivación en función del modelo.
QUEMADOR POTENCIA NORMAL kW POTENCIA REDUCIDA kW MARCA DE INYECTOR 1/100 mm 2.0 / 1.91) 0.43 / 0.451) 96 Auxiliar 1.0 0.35 70 Horno 2.7 0.90 120 Grill 1.9 - 108 Semi rápido 1) Tipo de derivación en función del modelo. Quemadores de gas para LPG G30 28-30 mbares QUEMADOR POTENCIA NORMAL kW POTENCIA REDUCIDA kW MARCA DE INYECTOR 1/100 mm CAUDAL DE GAS NOMINAL g/h Rápido 2.5 0.72 77 181.78 Semi rápido 2.0 0.43 71 145.43 Auxiliar 1.0 0.35 50 72.71 Horno 2.7 0.
ADVERTENCIA! El tubo de conexión del gas no debe tocar la parte del aparato que se muestra en la ilustración. Conexión con tubos flexibles no metálicos Si tiene fácil acceso a la conexión, puede usar un tubo flexible. El tubo flexible debe estar firmemente sujeto con abrazaderas. En la instalación, use siempre el soporte de tubo y la junta. El tubo flexible se puede aplicar cuando: • la temperatura que alcance no supere la temperatura ambiente (más de 30 °C); • no tenga una longitud superior a 1.
Sustitución de los inyectores de la placa Cambie los inyectores cuando cambie el tipo de gas. 1. Retire los soportes para sartenes. 2. Retire las tapas y las coronas del quemador. 3. Retire los inyectores con una llave tubular del 7. 4. Cambie los inyectores por los que necesite para el tipo de gas que use. 5. Sustituya la placa de características (situada cerca del tubo de suministro de gas) por la correspondiente al nuevo tipo de suministro de gas. Encontrará esta placa en la bolsa del aparato.
Cambio de gas natural a gas líquido 1. Apriete hasta el tope el tornillo de derivación. 2. Vuelva a colocar el mando. C Cambio de gas líquido a gas natural 3. Extraiga con cuidado el quemador del soporte del inyector (D). D E 4. Desplácelo suavemente hacia la izquierda. Asegúrese de que el casquillo del quemador permanece en la boquilla. No aplique fuerza en el cable del conductor del termopar (E). 5. Afloje el inyector del quemador (D) con una llave tubular de 7 mm y cámbielo por otro diferente.
El aparato se suministra con enchufe y cable de red. ADVERTENCIA! El cable de alimentación no debe tocar la parte del aparato que se muestra en la ilustración. 3. Monte el quemador en el orden inverso. Antes de apretar el tornillo, asegúrese de que el quemador se presiona correctamente contra el panel posterior. Pruebe los inyectores del grill.
867306437-A-352014 www.zanussi.