EN User manual Cooker ZCG551 GB IE
Contents Safety information _ _ _ _ _ _ _ _ _ _ _ _ _ _ 2 Product description _ _ _ _ _ _ _ _ _ _ _ _ _ 5 Before first use _ _ _ _ _ _ _ _ _ _ _ _ _ _ _ _ 6 Hob - Daily use _ _ _ _ _ _ _ _ _ _ _ _ _ _ _ _ 7 Hob - Helpful hints and tips _ _ _ _ _ _ _ _ _ 8 Hob - Care and cleaning _ _ _ _ _ _ _ _ _ _ _ 8 Oven - Daily use _ _ _ _ _ _ _ _ _ _ _ _ _ _ _ 8 Oven - Clock functions _ _ _ _ _ _ _ _ _ _ _ 10 Oven - Using the accessories _ _ _ _ _ _ _ 11 Oven - Helpful hints and tips _ _ _ _ _ _ _ _ Oven - Care and cl
• Make sure that the appliance is disconnected from the power supply during the installation (if applicable). • Keep the minimum distances to the other appliances and units. • Do not put the appliance on a base. Electrical connection • The appliance must be earthed. • Make sure that the electrical data on the rating plate agree with your domestic power supply. • Information on the voltage is on the rating plate.
• The interior of the appliance becomes hot during use. There is a risk of burns. Use gloves when you insert or remove the accessories or pots. • The appliance and its accessible parts become hot during use. Take care to avoid touching the heating elements. Young children must be kept away unless continuously supervised. • Open the door carefully. The use of ingredients with alcohol can cause a mixture of alcohol and air. There is the risk of fire.
• • • • • • anything on the heating elements and the thermostat sensor (if applicable). Do not clean the glass door with abrasive cleaning agents or metal scraper. Heat resistant surface of the inner glass can break and shatter. When the door glass panels are damaged they become weak and can break. You must replace them. Contact the service centre. Be careful when you remove the door from the appliance. The door is heavy.
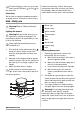
Cooking surface layout 1 2 5 1 Steam outlet 2 Semi-rapid burner 3 Auxiliary burner 4 Rapid burner 4 3 5 Semi-rapid burner Control panel 1 2 3 4 1 1 Knobs for the hob 2 Knob for the main oven 3 Electronic programmer 4 Knob for the top oven / Grill Accessories • Oven shelf For cookware, cake tins, roasts. • Deep grill roasting pan To bake and roast or as pan to collect fat. • The roasting pan grid To put in the deep roasting pan. Before first use Warning! Refer to "Safety information" chapter.
For time change you must not set an autoor End ) at matic function (Duration the same time. Preheating Set an oven to maximum temperature and run an empty oven for 45 minutes, to burn off any residue from the cavity surface. Accessories can become hotter than in normal use. During this period an odour can be emitted. This is normal. Make sure the room is well ventilated. Hob - Daily use Warning! Refer to "Safety information" chapter.
If the burner accidentally goes out, turn the control knob to the off position and try to light the burner again after minimum 1 minute. Warning! Always turn the flame down or switch it off before you remove the pans from the burner. The spark generator can start automatically when you switch on the mains, after installation or a power cut. It is normal. Lid Safety Device Lid has safety device, which cut off gas supply for hob. It works only when lid is closed.
pliance, the cooling fan continues to operate until the appliance cools down. 1. Switching the top oven, top oven grill or the main oven on and off Ignition of top oven gas burner: Push the gas oven control knob and turn it to . Keep it pushed for some seconds, but no more than 15 seconds. Do not release it until the flame comes on. Ignition of top oven grill burner: Push the gas oven control knob and turn it to . Keep it pushed for some seconds, but no more than 15 seconds.
Oven function Application The appliance is off. Off position Gas mark 1 - 9 Range of temperature adjustment Range of temperature adjustment for conventional cooking. To prepare very lean, tender roasted food. Slow Cook Oven - Clock functions Display 1 Function Indicators 2 Time display 2 1 3 3 Function Indicators 4 Button "+" 5 Selector Button 6 Button "-" 6 5 4 Clock function Time of day Minute Minder Duration End Application To set, change or check the time of day. To set a countdown time.
Cancelling the clock functions 1. Push the Selection button again and again until necessary function indicator flashes. 2. Push and hold button "- ". After some seconds the clock function goes out. Oven - Using the accessories Warning! Refer to "Safety information" chapter. Installing the oven accessories Put the slide-in accessories between the guide bars of one of the oven levels. Important! The flame protection on the shelf must point up.
Baking General instructions • Your new oven may bake or roast differently to the appliance you had before. Adapt your usual settings (temperature, cooking times) and shelf levels to the values in the tables. • With longer baking times, the oven can be switched off about 10 minutes before the end of baking time, to use the residual heat. • Use deep roasting pan in middle or top shelf level of top oven. • To brown pastry dishes on the bottom, cook on metal plate or put on a baking tray.
Food Shelf position Gas mark Cooking Time (Total Hours) Sponge 1-2 4 0:18 - 0:20 Victoria Sandwich 1-2 4 0:18 - 0:25 Gingerbread 1-2 2 1:15 - 1:30 Meringues 1-2 1 2:30 - 3:00 Flapjack 1-2 5 0:25 - 0:30 Shortbread 1-2 3 0:45 - 1:05 Fruit Pies, Crumbles 1-2 6 0:40 - 0:50 Milk Puddings 1-2 3 1:30 - 2:00 Scones 1-2 7 0:08 - 0:12 Choux Pastry 1-2 6 0:30 - 0:35 Éclairs / Profiteroles 1-2 5 0:20 - 0:30 Flaky Pastry 1-2 6 0:25 - 0:40 Mince Pies 1-2 5 0:15 - 0:2
Food Shelf position Gas mark Cooking Time (Total Hours) Sponge 1+4 4 0:20 - 0:30 Victoria Sandwich 1+4 4 0:18 - 0:25 Madeira Cake 2-3 4 1:15 - 1:30 Rich Fruit Cake 2-3 2 2:15 - 2:30 Christmas Cake 2-3 2 3:00 - 4:30 Gingerbread 2-3 2 1:15 - 1:30 Meringues 3-4 1 2:30 - 3:00 Flapjack 3 5 0:25 - 0:30 Shortbread 3 3 0:45 - 1:05 Fruit Pies, Crumbles 3 6 0:40 - 0:60 Milk Puddings 3 3 1:30 - 2:00 1+4 7 0:08 - 0:12 Choux Pastry 3 6 0:30 - 0:35 Éclairs / Profiter
• Roast lean meats in a roasting tin with a lid. This well keep the meat more succulent. • All types of meat, that can be browned or have crackling, can be roasted in the roasting tin without the lid. • Use deep roasting pan in middle or top shelf level of top oven and in two or higher level of main oven.
Grilling chart Shelf position Grilling Time (Total Hours) Bacon Rashers Food 2-3 0:05 - 0:06 Beef Burgers (home-made) 2-3 0:20 - 0:30 Chicken Joints 2-3 0:30 - 0:40 Lamb Chops 2-3 0:15 - 0:20 Pork Chops 2-3 0:20 - 0:30 Whole Trout/Mackerel 2-3 0:15 - 0:25 Plaice/Cod Fillets 2-3 0:10 - 0:15 Kebabs 2-3 0:20 - 0:30 Kidneys – Lamb/Pig 2-3 0:08 - 0:12 Liver – Lamb/Pig 2-3 0:10 - 0:20 Sausages 2-3 0:20 - 0:30 Steak – Rare 2-3 0:06 - 0:12 Steak – Medium 2-3 0:12 - 0:16 Ste
Liquid • Use less liquid as there is small evaporation during cooking. Always add milk and milk products, for example cream to the end of cooking to prevent them from curdling. Reheating • Do not reheat food with the slow cook setting. Joints of meat and poultry • Do not cook meat joints which are more then 2,7kg (6lb). • Do not cook poultry which is more then 2 kg (4lb eight oz). • Cook on or above the middle shelf of the oven. • Cook the stuffing separately. • Cook for minimum six hours.
Stainless steel or aluminium appliances: Clean the oven door with a wet sponge only. Dry it with a soft cloth. Do not use steel wool, acids or abrasive materials as they can damage the oven surface. Clean the oven control panel with the same precautions 1 Catalytic walls - main oven The main oven walls with a catalytic coating are self-cleaning. They absorb fat which collects on walls while the oven operates. To support this self-cleaning process heat the oven without any food regularly: 1.
To replace the glass panels obey the procedure in opposite sequence. Before you lower the trim attach the A trim part to the door. Refer to picture. Oven lamp Warning! There is a danger of electrical shock! Before you change the oven lamp: • Switch off the oven. • Remove the fuses in the fuse box or switch off the circuit breaker. Replacing the oven lamp 1. You can find the lamp glass cover at the back of the cavity. Turn the lamp glass cover counterclockwise to remove it. 2. Clean the glass cover. 3.
Problem Possible cause Remedy The gas ring burns unevenly. Burner crown is blocked with food residue. Make sure that the injector is not blocked and the burner crown is clear of food particles or cleaning fluids. Dry them with a cloth and clean stubborn marks away with a dry nylon brush (for example an old toothbrush). The oven does not heat up. The oven is not switched on. Switch on the oven. The oven does not heat up. The necessary settings are not set. Control the settings.
Installation Warning! Refer to "Safety information" chapter. Dimension mm F less than 400 Technical data Dimensions Height 894 - 912 mm Width 600 mm Depth 600 mm Top oven capacity 34 l Main oven capacity 79 l Levelling Use small feet on the bottom of appliance to set same level of cooker top surface with other surfaces Location of the appliance You can fit your freestanding appliance with cabinets on one or both sides and in the corner.
Gas burners BURNER NORMAL POWER NATURAL GAS kW inj. 100/mm Btu/h Auxiliary burner 1,0 70 3412 Semi-rapid burner 2,0 96 6483 Rapid burner 2,9 119 10236 Grill 2,7 120 9212 Top Oven 1,9 99 6483 Main Oven 1,9 99 6483 Gas Connection Use a flexible pipe in compliance with the regulation in force. Be careful they do not come in touch with mobile parts or they are not squeezed. A Warning! Only a qualified and competent person must do the gas installation.
2. Examine the supply pressure by turning the Rapid burner and one other burner fully on, and lighting them. The pressure must be: a) 20 mbar for Natural Gas b) 29 mbar for LPG, butane only c) 37 mbar for LPG, propane only. 3. Turn the taps off and disconnect the pressure gauge. 4. Make sure that all burners work correctly. Checking the grill 1. Put in the grill pan containing the grid. 2. Light the grill burner by turning the grill con. trol knob to the symbol 3. Release the knob when the burner comes on.
Packaging material The packaging material is environmentallyfriendly and recyclable. Plastic parts are marked with international abbreviations such as PE, PS, GB IE etc. Dispose of the packaging material in the containers provided for this purpose at your local waste management facility.
GB European Guarantee: This appliance is guaranteed by Electrolux in each of the countries listed at the back of this user manual, for the period specified in the appliance guarantee or otherwise by law.
Österreich +43 18 66 400 Herziggasse 9, 1230 Wien Polska +48 22 43 47 300 ul. Kolejowa 5/7, Warszawa Portugal +35 12 14 40 39 39 Quinta da Fonte - Edificio Gonçalves Zarco Q 35 -2774-518 Paço de Arcos Romania +40 21 451 20 30 Str. Garii Progresului 2, S4, 040671 RO Schweiz - Suisse - Svizzera +41 62 88 99 111 Industriestrasse 10, CH-5506 Mägenwil Slovenija +38 61 24 25 731 Gerbičeva ulica 110, 1000 Ljubljana Slovensko +421 2 32 14 13 34-5 Electrolux Slovakia s.r.o.
www.zanussi.
892950449-C-162012 www.zanussi.