User manual EN Cooker ZCG551 GB IE
Contents Safety information _ _ _ _ _ _ _ _ _ _ _ _ _ _ _ _ _ _ 2 Product description _ _ _ _ _ _ _ _ _ _ _ _ _ _ _ _ _ 5 Before first use _ _ _ _ _ _ _ _ _ _ _ _ _ _ _ _ _ _ _ 6 Hob - Daily use _ _ _ _ _ _ _ _ _ _ _ _ _ _ _ _ _ _ _ 6 Hob - Helpful hints and tips _ _ _ _ _ _ _ _ _ _ _ _ _ 8 Hob - Care and cleaning _ _ _ _ _ _ _ _ _ _ _ _ _ _ _ 8 Oven - Daily use _ _ _ _ _ _ _ _ _ _ _ _ _ _ _ _ _ _ 8 Oven - Clock functions _ _ _ _ _ _ _ _ _ _ _ _ _ _ _ 10 Oven - Using the accessories _ _ _ _ _ _ _ _ _ _ _ _
• The electrical installation must have an isolation device which lets you disconnect the appliance from the mains at all poles. The isolation device must have a contact opening width of minimum 3 mm. • The shock protection parts must be fixed in such a way that they cannot be undone without tools. • Always use a correctly installed shockproof socket. • When you connect electrical appliances to mains sockets, do not let cables touch or come near the hot appliance door.
• Do not apply pressure on the open door. • Do not put flammable materials in the compartment below the oven. Keep there only heat-resistant accessories (if applicable). • Do not cover oven steam outlets. They are at the rear side of the top surface (if applicable). • This appliance is for cooking purposes only. It must not be used for other purposes, for example room heating. • Use only stable cookware with the correct shape and diameter to prevent accidental tilting or spilling. There is a risk of burns.
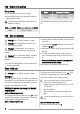
Product description General overview 7 3 2 1 1 1 Hob 2 Grill 2 3 Rating plate 4 Top oven lamp 3 5 Main oven lamp 6 Shelf positions 4 7 Shelf positions 6 5 4 5 3 2 1 Cooking surface layout 1 5 2 1 Steam outlet 2 Semi-rapid burner 3 Auxiliary burner 4 Rapid burner 4 3 5 Semi-rapid burner 5
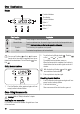
Control panel 1 2 1 Hob control knobs 2 Main oven temperature control 3 Electronic programmer 4 Top oven / Grill control 3 4 1 For cookware, cake tins, roasts. • Deep grill roasting pan To bake and roast or as pan to collect fat. • The roasting pan grid To put in the deep roasting pan. Accessories • Oven shelf Before first use Warning! Refer to "Safety information" chapter. Remove all packaging, both inside and outside the oven, before using the appliance. Do not remove the rating plate.
Ignition of the burner a) Warning! Be very careful when you use open fire in kitchen environment. Manufacturer decline any responsibility in case misuse of the flame Always light the burner before you put cookware. To light the burner: 1. Turn the control knob counterclockwise to the maxi) and push it down. mum position ( 2. Keep the control knob pushed for approximately 5 seconds; this will let thermocouple to warm up. If not, the gas supply will be interrupted. 3. Adjust the flame after it is regular.
Hob - Helpful hints and tips Energy savings • If possible, always put the lids on the pans. • When the liquid starts to boil, turn down the flame to barely simmer the liquid. Use pots and pans with diameter applicable to the dimension of burner. Burner Diameters of cookware Rapid 180 mm - 260 mm Burner Diameters of cookware Semi-rapid 120 mm - 220 mm Auxiliary 80 mm - 160 mm Use cookware with the bottom as thick and flat as possible.
1. 2. 3. If the oven gas burner does not come on or if it accidentally goes out: Turn the gas oven control knob to the “ Off“ position. Open the oven door. After one minute, try to light the oven gas burner again. After ignition: 1. Release the gas oven control knob. 2. Close the oven door. 3. Turn the gas oven control knob to the necessary temperature setting. Ovens safety device: The top oven has a thermocouple. It stops the gas flow, if the flame goes out. The main oven has a FSD system.
Oven - Clock functions Display 1 Function Indicators 2 Time display 2 1 3 3 Function Indicators 4 Button "+" 5 Selector Button 6 Button "-" 6 5 4 Clock function Time of day Minute Minder Duration End Application To set, change or check the time of day. To set a countdown time. An acoustic signal sounds after the time period is completed. This function has no effect on the operation of the oven. To set how long the appliance must operate. To set when the appliance must be deactivated.
You can use the grilling set to roast larger pieces of meat or poultry on one level: You can use the grilling set to grill flat dishes in large quantities and to toast: Put the roasting pan grid inside the deep roasting pan so that the supports of the oven shelf point upwards. Put the roasting pan grid inside the deep roasting pan so that the supports of the oven shelf point downwards. Important! The flame protection on the shelf must point up.
Tips on baking Baking results Possible cause Remedy The cake is not browned sufficiently below Incorrect oven level Put the cake on a lower oven level The cake sinks (becomes soggy, lumpy, streaky) Oven temperature too high Use a lower setting The cake sinks (becomes soggy, lumpy, streaky) Baking time is too short Set a longer baking time Do not set higher temperatures to decrease baking times The cake sinks (becomes soggy, lumpy, streaky) Too much liquid in the mixture Use less liquid.
Food Shelf position Gas mark Cooking Time (Total Hours) Mince Pies 1-2 5 0:15 - 0:20 Pasta Lasagne etc.
Food Fruit Pies, Crumbles Milk Puddings Shelf position Gas mark Cooking Time (Total Hours) 3 6 0:40 - 0:60 3 3 1:30 - 2:00 1+4 7 0:08 - 0:12 Choux Pastry 3 6 0:30 - 0:35 Éclairs / Profiteroles 3 5 0:20 - 0:30 Flaky Pastry 3 6 0:25 - 0:40 Mince Pies 1+4 5 0:15 - 0:20 Pasta Lasagne etc.
Roasting chart Meat Shelf Level Gas Mark Cooking time Beef/ Beef boned 2 5 20-35 minutes per 500g (1lb) and 20-35 minutes over Mutton/Lamb 2 5 25-35 minutes per 500g (1lb) and 25-35 minutes over Pork/Veal/Ham 2 5 30-40 minutes per 500g (1lb) Chicken 2 5 15-20 minutes per 500g (1lb) and 20 minutes over Turkey/Goose 2 5 15-20 minutes per 500g (1lb) up to 3500g (7lb) then 10 minutes per 500g (1lb) over 3500g (7lb) Duck 2 5 25-35 minutes per 500g (1lb) and 25-30 minutes over Pheasant
Food Shelf position Grilling Time (Total Hours) Whole Trout/Mackerel 2-3 0:15 - 0:25 Plaice/Cod Fillets 2-3 0:10 - 0:15 Kebabs 2-3 0:20 - 0:30 Kidneys – Lamb/Pig 2-3 0:08 - 0:12 Liver – Lamb/Pig 2-3 0:10 - 0:20 Sausages 2-3 0:20 - 0:30 Steak – Rare 2-3 0:06 - 0:12 Steak – Medium 2-3 0:12 - 0:16 Steak – Well Done 2-3 0:14 - 0:20 Toasted Sandwiches 2-3 0:01 - 0:03 Slow Cook Use the function to prepare soups stews, casseroles or lean, tender pieces of meat and fish.
• For good air circulation always put the joints on a rack in a roasting tin or casserole. • Thaw all frozen meat and poultry before you cook it. • Remove unwanted fat and skin unless it is browned first. Soups, casseroles and stews • Do not cook casseroles which are more than 2,7 (6lb). • Let the dish boil on the hob and then cook it on the slow cook setting. • Cook on or above the middle shelf of the oven. • Use a lid or tin foil when you use slow cook setting.
Cleaning the top oven glass panels 3. Remove the glass panels. The door glass on your product can be different in type and shape from what you see in diagrams. The number of glasses can be different. Removing the glass: 1. Open the door. 2. Push the door trim at both sides to release the clips. Refer to the picture. 3. Remove the glass panels. A 2 1 1 To replace the glass panels obey the procedure in opposite sequence. Before you lower the trim attach the A trim part to the door. Refer to picture.
Problem The appliance does not operate. Possible cause The appliance is too hot. Remedy Cool down the appliance for some hours The grill, burners, ovens and timer do There is no electrical supply. not work. Make sure that the unit is connected and the electrical supply is switched on. The grill, burners, ovens and timer do There is no electrical supply. not work. Examine the house electrical installation fuse. The grill, burners, ovens and timer do There is no gas supply. not work.
Problem Possible cause Remedy The flame colour is orange or yellow. The flame can look orange or yellow (flame disturbance) in some areas of the burner because of how the burner is made. This is normal. If you cannot find a solution to the problem yourself, contact your dealer or the service centre. The necessary data for the service centre is on the rating plate. The rating plate is on the front frame of the oven cavity. We recommend that you write the data here: Model (MOD.) ......................
Dimension mm F less then 400 Measure down 180 mm from the appliance top surface, then measure right 30 mm (See picture). Mark the position of the wall and this gives anchor point for the stability chain. Levelling Use small feet on the bottom of appliance to set same level of cooker top surface with other surfaces 180 mm 30 mm Warning! These instructions are only valid in the countries whose symbols appear on this booklet's cover. The stability chain Caution! You must install the stability chain.
Important! Use flexible tubing, which comply with BS.669 current edition. A E 3. Release the knob when the burner comes on. Checking the hob burners 1. Lift the lid. 2. Put in the burner crowns and caps. Make sure that they are correctly seated. 3. Put in the pan supports. 4. Check each of the burners in turn by turning the burner control knob to the symbol . 5. Release the knob when the burners come on. Checking the lid shut-off device D B C C Warning! The gas bayonet must be in mark area.
MANUFACTURER: ELECTROLUX POLAND Sp.z o.o.. ul.Kazimierza Odnowiciela 28 58-100 Świdnica - POLAND Environment concerns The symbol on the product or on its packaging indicates that this product may not be treated as household waste. Instead it should be taken to the appropriate collection point for the recycling of electrical and electronic equipment.
Customer Care Department, Tel: (Calls may be recorded for training purposes) Electrolux 08445 613 613 AEG-Electrolux 08445 611 611 Zanussi-Electrolux 08445 612 612 GB European Guarantee: This appliance is guaranteed by Electrolux in each of the countries listed at the back of this user manual, for the period specified in the appliance guarantee or otherwise by law.
Italia +39 (0) 434 558500 C.so Lino Zanussi, 26 - 33080 Porcia (PN) Latvija +371 67313626 Kr. Barona iela 130/2, LV-1012, Riga Lietuva +370 5 278 06 03 Ozo 10a, LT-08200 Vilnius Luxembourg +352 42 431 301 Rue de Bitbourg, 7, L-1273 Hamm Magyarország +36 1 252 1773 H-1142 Budapest XIV, Erzsébet királyné útja 87 Nederland +31 17 24 68 300 Vennootsweg 1, 2404 CG - Alphen aan den Rijn Norge +47 81 5 30 222 Risløkkvn.
892937876-N-422010 www.zanussi.