EN User manual Cooker ZCG55 GB IE
Contents Safety information _ _ _ _ _ _ _ _ _ _ _ _ _ _ Safety instructions _ _ _ _ _ _ _ _ _ _ _ _ _ _ Product description _ _ _ _ _ _ _ _ _ _ _ _ _ Before first use _ _ _ _ _ _ _ _ _ _ _ _ _ _ _ Hob - Daily use _ _ _ _ _ _ _ _ _ _ _ _ _ _ _ Hob - Helpful hints and tips _ _ _ _ _ _ _ _ _ Hob - Care and cleaning _ _ _ _ _ _ _ _ _ _ 2 3 7 8 8 9 9 Oven - Daily use _ _ _ _ _ _ _ _ _ _ _ _ _ _ Oven - Helpful hints and tips _ _ _ _ _ _ _ Oven - Care and cleaning _ _ _ _ _ _ _ _ _ What to do if… _ _ _ _ _ _ _ _
• Do not operate the appliance by means of an external timer or separate remote-control system. • Unattended cooking on a hob with fat or oil can be dangerous and may result in fire. • Never try to extinguish a fire with water, but switch off the appliance and then cover flame e.g. with a lid or a fire blanket. • Do not store items on the cooking surfaces. • Do not use a steam cleaner to clean the appliance.
• All electrical connections should be made by a qualified electrician. • The appliance must be earthed. • Make sure that the electrical information on the rating plate agrees with the power supply. If not, contact an electrician. • Always use a correctly installed shockproof socket. • Do not use multi-plug adapters and extension cables. • Make sure not to cause damage to the mains plug and to the mains cable. Contact the Service or an electrician to change a damaged mains cable.
• Use only stable cookware with the correct shape and diameter larger than the dimensions of the burners. • Make sure the flame does not go out when you quickly turn the knob from the maximum to the minimum position. • Make sure pots are centrally positioned on the rings and do not stick out over edges of the cooking surface. • Use only the accessories supplied with the appliance. • Do not install a flame diffuser on the burner. • This appliance is for cooking purposes only.
• If you use an oven spray, obey the safety instructions on the packaging. • Do not clean the catalytic enamel (if applicable) with any kind of detergent. • Do not clean the burners in the dishwasher. Care and Cleaning Warning! Risk of injury, fire or damage to the appliance. • Before maintenance, deactivate the appliance and disconnect the mains plug from the mains socket. • Make sure the appliance is cold. There is the risk that the glass panels can break.
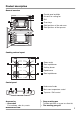
Product description General overview 3 2 1 6 3 Grill 4 Oven lamp 5 Shelf positions of the main oven 6 Shelf positions of the top oven 5 4 3 2 1 5 1 Control panel and hob 2 Air vents for cooling fan 1 2 3 4 Cooking surface layout 1 2 5 1 Steam outlet 2 Semi-rapid burner 3 Auxiliary burner 4 Rapid burner 4 3 5 Semi-rapid burner Control panel 1 2 3 1 1 Hob control knobs 2 Main oven temperature control 3 Top oven / Grill control Accessories • Oven shelf For cookware, cake tins, roasts. www.
To put in the deep roasting pan. Before first use Warning! Refer to the Safety chapters. Initial Cleaning • Remove all accessories and removable shelf supports (if applicable). • Clean the appliance before first use. Important! Refer to the chapter "Care and cleaning". Setting the time You must set the time before you operate the oven. When you connect the appliance to the electrical supply or after a power cut, the indicator for the Time of Day function flashes.
Replacing burner parts 1. Carefully put the burner crown on the burner body. Do not use force. a) Make sure that the hole in the crown is above the ignition candle. b) Make sure that the location pegs are in the slots in the burner body. c) Let the crown fall freely onto the body. d) Make sure that you can move the crown a small distance from side to side. 2. Put the burner cap centrally on top of the crown (enamel side up).
• Be very careful when you replace the pan supports to prevent the hob top from damage. After cleaning, dry the appliance with a soft cloth. Oven - Daily use Warning! Refer to the Safety chapters. Cooling fan When the appliance operates, the cooling fan activates automatically to keep the surfaces of the appliance cool. If you deactivate the appliance, the cooling fan continues to operate until the temperature in the appliance cools down.
Oven function Application To grill flat food in the middle of the shelf. To make toast. To activate the grill, turn the knob clockwise. Grill Main Oven Functions The oven has these functions: Oven function Off position Gas mark 1 - 9 Range of temperature adjustment Ignition Minimum temperature Application The appliance is off. Range of temperature adjustment for conventional cooking. To activate the oven. To set the minimum temperature.
Oven - Helpful hints and tips Warning! Refer to the Safety chapters. The temperature and baking times in the tables are guidelines only. They depend on the recipes, quality and quantity of the ingredients used. Top oven The top oven is the smaller of the two ovens. It has 3 shelf levels. Use is to cook smaller quantities of food. It gives especially good results when used to cook fruitcakes, sweets and savoury flants or quiche.
Baking results Possible cause Remedy Cake does not brown equally No equal mixture Put the mixture equally on the baking tray Cake does not cook in the baking time set Temperature too low Use a slightly higher oven temperature setting Top oven cooking chart Food Shelf position Gas mark Cooking Time (Total Hours) Biscuits 1-2 4 0:10 - 0:20 Small / Queen Cake 1-2 5 0:18 - 0:25 Sponge 1-2 4 0:18 - 0:20 Victoria Sandwich 1-2 4 0:18 - 0:25 Gingerbread 1-2 2 1:15 - 1:30 Flapjack 1
Main oven cooking chart Food Shelf position Gas mark Cooking Time (Total Hours) Biscuits 1+4 4 0:10 - 0:20 Bread 2-3 81) 0:25 - 0:30 Bread rolls/buns 3-4 81) 0:15 - 0:20 Small / Queen Cake 1+4 5 0:18 - 0:25 Sponge 1+4 4 0:20 - 0:30 Victoria Sandwich 1+4 4 0:18 - 0:25 Madeira Cake 2-3 4 1:15 - 1:30 Rich Fruit Cake 2-3 2 2:15 - 2:30 Christmas Cake 2-3 2 3:00 - 4:30 Gingerbread 2-3 2 1:15 - 1:30 Flapjack 3 5 0:25 - 0:30 Shortbread 3 3 0:45 - 1:05 Fruit Pies,
Roasting Roasting dishes • Use heat-resistant ovenware to roast (please read the instructions of the manufacturer). • Large roasting joints can be roasted directly in the deep roasting pan or on the oven shelf above the deep roasting pan. (If present) • Roast lean meats in a roasting tin with a lid. This well keep the meat more succulent. • All types of meat, that can be browned or have crackling, can be roasted in the roasting tin without the lid.
Always pre-heat the empty oven with the grill functions for 5 minutes. • Set the shelf in the shelf level as recommended in the grilling table. • When use grilling set in top oven, always remove the oven shelf. • Grill only flat pieces of meat or fish.
Removing the glass: 1. Open the door. 2. Push the door trim at both sides to release the clips. Refer to the picture. 3. Remove the glass panels. A 2 1 1 2 1 To replace the glass panels obey the procedure in opposite sequence. Before you lower the trim attach the A trim part to the door. Refer to picture. Oven lamp Warning! There is a danger of electrical shock! To replace the glass obey the procedure in opposite sequence.
What to do if… Warning! Refer to the Safety chapters. Problem Possible cause Remedy The appliance does not operate. The fuse in the fuse box is released. Control the fuse. If the fuse is released more than one time, refer to a qualified electrician. The appliance does not operate. The appliance is too hot. Cool down the appliance for some hours. The grill, burners, ovens do not work. There is no electrical supply. Make sure that the unit is connected and the electrical supply is switched on.
Problem Possible cause Remedy The appliance makes noises or popping sounds. When the gas is drawn through the burner, it can compress as they heat up. Some metal parts of the appliance expand and contract when they heat up or cool down. The noises are normal. The flame colour is orange or yellow. The flame can look orange or yellow (flame disturbance) in some areas of the burner because of how the burner is made. This is normal.
Before you install stability chain, adjust the appliance to the correct height. Minimal distances Dimension mm A 650 B 150 C 2 D 400 E 450 F less than 400 Measure down 180 mm from the appliance top surface, then measure right 30 mm (See picture). Mark the position of the wall and this gives anchor point for the stability chain.
Warning! Before gas connection disconnect the mains plug from the mains socket or switch off the fuse in the fuse box. Close the primary valve of the gas supply. Supply piping should not be less than R3/8. Connection is made to the Rc ½ (1/2 “ B.S.P.) female threaded. Entry pipe located just below the hob level on the rear left hand side of the appliance. The gas supply ramp is on the rear side of the appliance. Warning! Only liquid sealants to be used when inlet gas pipe is fitted i.e.: do not use P.T.F.E.
Electrical installation The manufacturer is not responsible if you do not follow the safety precautions from the chapter "Safety information". MANUFACTURER: ELECTROLUX POLAND Sp.z o.o.. ul.Kazimierza Odnowiciela 28 58-100 Świdnica - POLAND This appliance is supplied with a main plug and a main cable. Connect the phases correctly, if you do not connect, spark generator will work all the time. Environment concerns Recycle the materials with the symbol .
www.zanussi.
892957667-B-472013 www.zanussi.