User manual EN Cooker ZCG621 GB IE
Contents Safety information _ _ _ _ _ _ _ _ _ _ _ _ _ _ _ _ _ _ Product description _ _ _ _ _ _ _ _ _ _ _ _ _ _ _ _ _ Before first use _ _ _ _ _ _ _ _ _ _ _ _ _ _ _ _ _ _ _ Hob - Daily use _ _ _ _ _ _ _ _ _ _ _ _ _ _ _ _ _ _ _ Hob - Helpful hints and tips _ _ _ _ _ _ _ _ _ _ _ _ _ Hob - Care and cleaning _ _ _ _ _ _ _ _ _ _ _ _ _ _ _ Oven - Daily use _ _ _ _ _ _ _ _ _ _ _ _ _ _ _ _ _ _ Oven - Using the accessories _ _ _ _ _ _ _ _ _ _ _ _ 2 5 6 6 7 7 8 9 Oven - Helpful hints and tips _ _ _ _ _ _ _ _ _ _ _
• The electrical installation must have an isolation device which lets you disconnect the appliance from the mains at all poles. The isolation device must have a contact opening width of minimum 3 mm. • The shock protection parts must be fixed in such a way that they cannot be undone without tools. • Always use a correctly installed shockproof socket. • When you connect electrical appliances to mains sockets, do not let cables touch or come near the hot appliance door.
• • • • • • • – do not put any objects directly on the appliance floor and do not cover it with aluminium foil; – do not put hot water directly into the appliance; – do not keep moist dishes and food in the appliance after you finish the cooking. Do not apply pressure on the open door. Do not put flammable materials in the compartment below the oven. Keep there only heat-resistant accessories (if applicable). Do not cover oven steam outlets. They are at the rear side of the top surface (if applicable).
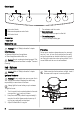
Product description General overview 6 3 2 1 1 Hob 2 Grill 2 3 Rating plate 4 Oven lamp 3 5 Shelf positions of the main oven 6 Shelf positions of the grill 1 5 5 4 4 3 2 1 Cooking surface layout 1 5 2 1 Steam outlet 2 Semi-rapid burner 3 Auxiliary burner 4 Rapid burner 4 www.zanussi.
Control panel 1 2 1 Hob control knobs 2 Main oven temperature control knob 3 Grill control knob Accessories 3 1 For cookware, cake tins, roasts. • Deep roasting pan To bake and roast or as pan to collect fat. • The roasting pan grid To put in the deep roasting pan. • Oven shelf Before first use Warning! Refer to "Safety information" chapter. Initial Cleaning • Remove all parts from the appliance. • Clean the appliance before first use.
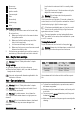
1 Burner cap 2 Burner crown 3 Ignition candle 4 Thermocouple 5 Slots 6 Burner body 7 Location peg 8 Hole Replacing burner parts 1. 2. Carefully put the burner crown on the burner body. Do not use force. a) Make sure that the hole in the crown is above the ignition candle. b) Make sure that the location pegs are in the slots in the burner body. c) Let the crown fall freely onto the body. d) Make sure that you can move the crown a small distance from side to side.
• To make burners work correctly, make sure that the arms of the pan supports are in the centre of the burner. • Be very careful when you replace the pan supports to prevent the hob top from damage. After cleaning, dry the appliance with a soft cloth. Oven - Daily use Warning! Refer to "Safety information" chapter. Cooling fan When the appliance operates, the cooling fan switches on automatically to keep the surfaces of the appliance cool.
Oven function Gas mark 1 - 9 Range of temperature adjustment Slow Cook Application Range of temperature adjustment for conventional cooking. To prepare very lean, tender roasted food. Oven - Using the accessories Warning! Refer to "Safety information" chapter. Installing the oven accessories Put the slide-in accessories between the guide bars of one of the oven levels. Important! The flame protection on the shelf must point up.
Main oven The main oven is particularly suitable for cooking larger quantities of food. Baking General instructions • Your new oven may bake or roast differently to the appliance you had before. Adapt your usual settings (temperature, cooking times) and shelf levels to the values in the tables. • With longer baking times, the oven can be switched off about 10 minutes before the end of baking time, to use the residual heat. • Use deep roasting pan in middle or top shelf level of grill.
Food Shelf position Gas mark Cooking Time (Total Hours) Bread 2-3 81) 0:25 - 0:30 Bread rolls/buns 3-4 81) 0:15 - 0:20 Small / Queen Cake 1+4 5 0:18 - 0:25 Sponge 1+4 4 0:20 - 0:30 Victoria Sandwich 1+4 4 0:18 - 0:25 Madeira Cake 2-3 4 1:15 - 1:30 Rich Fruit Cake 2-3 2 2:15 - 2:30 Christmas Cake 2-3 2 3:00 - 4:30 Gingerbread 2-3 2 1:15 - 1:30 Meringues 3-4 1 2:30 - 3:00 Flapjack 3 5 0:25 - 0:30 Shortbread 3 3 0:45 - 1:05 Fruit Pies, Crumbles 3 6 0:40 -
Food Shelf position Gas mark Cooking Time (Total Hours) 3-4 7 0:15 - 0:25 Individual Yorkshire Puddings 1) When baking bread cook for 10 minutes at gas mark 8 then reduce to mark 6 for the remaining cook time. Roasting Roasting dishes • Use heat-resistant ovenware to roast (please read the instructions of the manufacturer). • Large roasting joints can be roasted directly in the deep roasting pan or on the oven shelf above the deep roasting pan.
• Make sure that the grilling set or roasting pan is set in middle of shelf between front and rear of the grill cavity Caution! Accessible parts may be hot when grill is in use. Young children should be kept away. • Set the shelf in the shelf level as recommended in the grilling table. • When use grilling set in grill, always remove the oven shelf. • Grill only flat pieces of meat or fish. Always pre-heat the empty oven with the grill functions for 5 minutes.
Frozen Foods • Fully thaw the food before cooking. Thickening • Cover the meat with the flour for casseroles or mix the cornflour with the water and add it at the end of cooking Flavouring • Flavours are held in the food because there is small evaporation. Adjust flavouring at the end of the cooking time. Liquid • Use less liquid as there is small evaporation during cooking. Always add milk and milk products, for example cream to the end of cooking to prevent them from curdling.
Catalytic walls The walls with a catalytic coating are self-cleaning. They absorb fat which collects on walls while the oven operates. To support this self-cleaning process heat the oven without any food regularly: 1. Open the oven door. 2. Remove all accessories from the oven. 3. Close the door. 4. Set the maximum oven temperature and let the oven operate for 1 hour. 5. Clean the oven cavity with a soft and damp sponge. To replace the glass obey the procedure in opposite sequence.
2. 3. Turn the lamp glass cover counterclockwise to remove it. Clean the glass cover. Replace the oven lamp with applicable 300°C heatresistant oven lamp. Important! Use the same oven lamp type. 4. Replacing the oven light bulb/cleaning the glass cover 1. Turn the glass cover anti-clockwise to remove it. 2. Clean the glass cover. 3. Replace the oven light bulb with applicable 300°C heat-resistant oven light bulb. 4. Install the glass cover. Install the glass cover.
Problem Possible cause The oven does not cook evenly. Remedy Check that the appliance is correctly installed and levelled, and that you use the recommended temperatures and shelf positions. The oven lamp does not operate. The oven lamp is defective. Replace the oven lamp. Steam and condensation settle on the food and in the oven cavity. You left the dish in the oven for too long. Do not leave the dishes in the oven for longer than 15-20 minutes after the cooking process ends.
The stability chain A D B A C Caution! You must install the stability chain. If you do not install it the appliance can tilt. Before you install stability chain, adjust the appliance to the correct height. E Measure down 180 mm from the appliance top surface, then measure right 30 mm (See picture). Mark the position of the wall and this gives anchor point for the stability chain.
BURNER NORMAL POWER NATURAL GAS kW inj. 100/mm Btu/h Semi-rapid burner 1,9 96 6483 Rapid burner 3,0 119 10236 Grill 2,7 120 9212 Main Oven 1,9 99 6483 Gas Connection Use a flexible pipe in compliance with the regulation in force. Be careful they do not come in touch with mobile parts or they are not squeezed. Warning! Only a qualified and competent person must do the gas installation.
4. Make sure that all burners work correctly. 1. Put in the grill pan containing the grid. 2. Light the grill burner by turning the grill control knob . to the symbol 3. Release the knob when the burner comes on. 4. After 1 minute make sure that the flame covers the full width of the burner and is stable. 5. Set the oven control knob to and close the oven door. After about 10 minutes the flame size should decrease. 6. Turn the control knob off and check that the oven flames go out.
• Appliance has been used for normal domestic purposes only, in accordance with manufacturer's instructions. • Appliance hasn't been serviced, maintained, repaired, taken apart or tampered with by person not authorised by us. • Electrolux Service Force Centre must undertake all service work under this guarantee • Any appliance or defective part replaced shall become the Company's property. • This guarantee is in addition to your statutory and other legal rights.
www.electrolux.com Albania +35 5 4 261 450 Rr. Pjeter Bogdani Nr. 7 Tirane Belgique/België/Belgien ++32-2-7162444 Raketstraat 40, 1130 Brussel/Bruxelles Česká republika +420 261 302 261 Budějovická 3, Praha 4, 140 21 Danmark +45 70 11 74 00 Strevelinsvej 38-40, 7000 Fredericia Deutschland +49 180 32 26 622 Fürther Str. 246, 90429 Nürnberg Eesti +37 2 66 50 030 Pärnu mnt. 153, 11624 Tallinn España +34 902 11 63 88 Carretera M-300, Km.
Sverige +46 (0)771 76 76 76 Electrolux Service, S:t Göransgatan 143, S-105 45 Stockholm Türkiye +90 21 22 93 10 25 Tarlabaşı caddesi no : 35 Taksim İstanbul Россия 8-800-200-3589 129090 Москва, Олимпийский проспект, 16, БЦ "Олимпик" Україна +380 44 586 20 60 04074 Київ, вул.Автозаводська, 2а, БЦ "Алкон" www.zanussi.
892937881-O-422011 www.zanussi.