EN User manual Cooker ZCG621 GB IE
Contents Safety information _ _ _ _ _ _ _ _ _ _ _ _ _ _ Product description _ _ _ _ _ _ _ _ _ _ _ _ _ Before first use _ _ _ _ _ _ _ _ _ _ _ _ _ _ _ _ Hob - Daily use _ _ _ _ _ _ _ _ _ _ _ _ _ _ _ _ Hob - Helpful hints and tips _ _ _ _ _ _ _ _ _ Hob - Care and cleaning _ _ _ _ _ _ _ _ _ _ _ Oven - Daily use _ _ _ _ _ _ _ _ _ _ _ _ _ _ _ Oven - Using the accessories _ _ _ _ _ _ _ _ 2 5 6 6 8 8 8 9 Oven - Helpful hints and tips _ _ _ _ _ _ _ _ Oven - Care and cleaning _ _ _ _ _ _ _ _ _ What to do if… _ _ _
• Make sure that the appliance is disconnected from the power supply during the installation (if applicable). • Keep the minimum distances to the other appliances and units. • Do not put the appliance on a base. Electrical connection • The appliance must be earthed. • Make sure that the electrical data on the rating plate agree with your domestic power supply. • Information on the voltage is on the rating plate.
• The interior of the appliance becomes hot during use. There is a risk of burns. Use gloves when you insert or remove the accessories or pots. • The appliance and its accessible parts become hot during use. Take care to avoid touching the heating elements. Young children must be kept away unless continuously supervised. • Open the door carefully. The use of ingredients with alcohol can cause a mixture of alcohol and air. There is the risk of fire.
• Bulb lamps used in this appliance are special lamps selected for household appliances use only. They cannot be used for the full or partial illumination of a household room. • If it becomes necessary to replace the lamp use one of the same power and specifically designed for household appliances only. • Disconnect the appliance from the power supply before the replacement of the oven lamp. There is the risk of electrical shock. Cool down the appliance. There is a risk of burns.
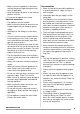
Cooking surface layout 1 2 5 1 Steam outlet 2 Semi-rapid burner 3 Auxiliary burner 4 Rapid burner 4 3 5 Semi-rapid burner Control panel 1 2 1 Hob control knobs 2 Main oven temperature control knob 3 Grill control knob Accessories • Oven shelf 3 1 For cookware, cake tins, roasts. • Deep roasting pan To bake and roast or as pan to collect fat. • The roasting pan grid To put in the deep roasting pan. Before first use Warning! Refer to "Safety information" chapter.
Lighting the burners Warning! Be very careful when you use open fire in a kitchen environment. The manufacturer declines all responsibility in case of misuse of the flame. Always light the burner before you put cookware on it. 1. 2. 3. Turn the knob to the maximum position and push it down. When you push the knob, the spark generator activates automatically. Keep the control knob pushed for approximately 5 seconds. This lets the thermocouple warm up. If not, the gas supply is interrupted.
Hob - Helpful hints and tips Warning! Refer to "Safety information" chapter. Energy savings • If possible, always put the lids on the pans. • When the liquid starts to boil, turn down the flame to barely simmer the liquid. Use pots and pans with diameter applicable to the dimension of burner. Burner Diameters of cookware Rapid 180 mm - 260 mm Semi-rapid 120 mm - 220 mm Auxiliary 80 mm - 160 mm Use cookware with the bottom as thick and flat as possible.
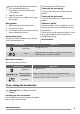
1. 2. 3. If the oven gas burner does not come on or if it accidentally goes out: Turn the gas oven control knob to the “ Off“ position. Open the oven door. After one minute, try to light the oven gas burner again. After ignition: 1. Release the gas oven control knob. 2. Close the oven door. 3. Turn the gas oven control knob to the necessary temperature setting. Ovens safety device: The grill has a thermocouple. It stops the gas flow, if the flame goes out. The main oven has a FSD system.
Warning! Risk of burns when removing the accessories from a hot oven. Important! The flame protection on the shelf must point up. Use the shelf with flame protection only on the first and second level in the grill, and on all the levels in the main oven. Grilling set The grilling set includes the roasting pan grid and the deep roasting pan. You can use the roasting pan grid on the two sides.
• If you cannot find the settings for a special recipe, look for the one that is almost the same. • Baking time can be extended by 10-15 minutes, if you bake cakes on more than one level. • Cakes and pastries at different heights do not always brown equally at first. If this occurs, do not change the temperature setting. The differences equalize during the baking procedure.
Food Shelf position Gas mark Cooking Time (Total Hours) Shortbread 3 3 0:45 - 1:05 Fruit Pies, Crumbles 3 6 0:40 - 0:60 Milk Puddings 3 3 1:30 - 2:00 1+4 7 0:08 - 0:12 Choux Pastry 3 6 0:30 - 0:35 Éclairs / Profiteroles 3 5 0:20 - 0:30 Flaky Pastry 3 6 0:25 - 0:40 Mince Pies Scones 1+4 5 0:15 - 0:20 Pasta Lasagne etc.
Roasting chart Shelf Level Gas Mark Cooking time Beef/ Beef boned Meat 2 5 20 - 35 minutes per 500g (1lb) and 20 - 35 minutes over Mutton/Lamb 2 5 25 - 35 minutes per 500g (1lb) and 25 - 35 minutes over Pork/Veal/Ham 2 5 30 - 40 minutes per 500g (1lb) Chicken 2 5 15 - 20 minutes per 500g (1lb) and 20 minutes over Turkey/Goose 2 5 15 - 20 minutes per 500g (1lb) up to 3500g (7lb) then 10 minutes per 500g (1lb) over 3500g (7lb) Duck 2 5 25 - 35 minutes per 500g (1lb) and 25 - 30 minu
Food Shelf position Grilling Time (Total Hours) Whole Trout/Mackerel 2-3 0:15 - 0:25 Plaice/Cod Fillets 2-3 0:10 - 0:15 Kebabs 2-3 0:20 - 0:30 Kidneys – Lamb/Pig 2-3 0:08 - 0:12 Liver – Lamb/Pig 2-3 0:10 - 0:20 Sausages 2-3 0:20 - 0:30 Steak – Rare 2-3 0:06 - 0:12 Steak – Medium 2-3 0:12 - 0:16 Steak – Well Done 2-3 0:14 - 0:20 Toasted Sandwiches 2-3 0:01 - 0:03 Slow Cook Use the function to prepare soups stews, casseroles or lean, tender pieces of meat and fish.
• Cook on or above the middle shelf of the oven. • Cook the stuffing separately. • Cook for minimum six hours. • Only cook joints of pork if the temperature inside the joint is minimum 88°C. Use a meat thermometer to examine the temperature. • For good air circulation always put the joints on a rack in a roasting tin or casserole. • Thaw all frozen meat and poultry before you cook it. • Remove unwanted fat and skin unless it is browned first. • Use a lid or tin foil when you use slow cook setting.
Discolouration of the catalytic surface has no effect on catalytic properties. A Cleaning the grill glass panels The door glass on your product can be different in type and shape from what you see in diagrams. The number of glasses can be different. 2 1 Removing the glass: 1. Open the door. 2. Push the door trim at both sides to release the clips. Refer to the picture. 3. Remove the glass panels. 1 To replace the glass panels obey the procedure in opposite sequence.
What to do if… Warning! Refer to "Safety information" chapter. Problem Possible cause Remedy The appliance does not operate. The fuse in the fuse box is released. Control the fuse. If the fuse is released more than one time, refer to a qualified electrician. The appliance does not operate. The appliance is too hot. Cool down the appliance for some hours. The grill, burners, ovens do not work. There is no electrical supply.
Problem Possible cause Remedy The appliance makes noises or popping sounds. When the gas is drawn through the burner, it can compress as they heat up. Some metal parts of the appliance expand and contract when they heat up or cool down. The noises are normal. The flame colour is orange or yellow. The flame can look orange or yellow (flame disturbance) in some areas of the burner because of how the burner is made. This is normal.
Dimension mm A 650 B 150 C 2 D 400 E 450 F less than 400 Before you install stability chain, adjust the appliance to the correct height. Measure down 180 mm from the appliance top surface, then measure right 30 mm (See picture). Mark the position of the wall and this gives anchor point for the stability chain.
Supply piping should not be less than R3/8. Connection is made to the Rc ½ (1/2 “ B.S.P.) female threaded. Entry pipe located just below the hob level on the rear left hand side of the appliance. The gas supply ramp is on the rear side of the appliance. Warning! Only liquid sealants to be used when inlet gas pipe is fitted i.e.: do not use P.T.F.E. sealant tape. When installation is complete. Carry out a gas tightness test and make sure that the seal of each pipe fitting is correct.
6. Turn the control knob off and check that the oven flames go out. Electrical installation The manufacturer is not responsible if you do not follow the safety precautions from the chapter "Safety information". This appliance is supplied with a main plug and a main cable. Connect the phases correctly, if you do not connect, spark generator will work all the time. MANUFACTURER: ELECTROLUX POLAND Sp.z o.o.. ul.
covering your postcode area). For address of local Service Force Centre and further information, please visit: www.serviceforce.co.uk Before calling out an engineer, please ensure you have read the details under the heading "What to do if... / Troubleshooting".
Eesti +37 2 66 50 030 Pärnu mnt. 153, 11624 Tallinn España +34 902 11 63 88 Carretera M-300, Km. 29,900 Alcalá de Henares Madrid France 08 44 62 26 53 www.electrolux.fr Great Britain +44 8445 616 616 Addington Way, Luton, Bedfordshire LU4 9QQ Hellas +30 23 10 56 19 70 4, Limnou Str., 54627 Thessaloniki Hrvatska +385 1 63 23 338 Slavonska avenija 3, 10000 Zagreb Ireland +353 1 40 90 753 Long Mile Road Dublin 12 Italia +39 (0) 434 558500 C.
892950451-B-162012 www.zanussi.