User Manual GETTING STARTED? EASY.
SAFETY INFORMATION Before the installation and use of the appliance, carefully read the supplied instructions. The manufacturer is not responsible for any injuries or damages that are the result of incorrect installation or usage. Always keep the instructions in a safe and accessible location for future reference. CHILDREN AND VULNERABLE PEOPLE SAFETY WARNING! Risk of suffocation, injury or permanent disability.
• • • • • • • • • • • • • • • • • Do not install the appliance behind a decorative door in order to avoid overheating. Do not install the appliance on a platform. Do not operate the appliance by means of an external timer or separate remote-control system. WARNING: Unattended cooking on a hob with fat or oil can be dangerous and may result in fire. NEVER try to extinguish a fire with water, but switch off the appliance and then cover flame e.g. with a lid or a fire blanket.
guards incorporated in the appliance. The use of inappropriate guards can cause accidents. SAFETY INSTRUCTIONS This appliance is suitable for the following markets: • EG INSTALLATION WARNING! Only a qualified person must install this appliance. • • • • • • • • • • • Remove all the packaging. Do not install or use a damaged appliance. Follow the installation instructions supplied with the appliance. Always take care when moving the appliance as it is heavy. Always use safety gloves and enclosed footwear.
• • • • • Do not let the appliance stay unattended during operation. Deactivate the appliance after each use. Be careful when you open the appliance door while the appliance is in operation. Hot air can release. Do not operate the appliance with wet hands or when it has contact with water. Do not use the appliance as a work surface or as a storage surface. • • • • WARNING! Risk of fire and explosion • • • • • • • Fats and oil when heated can release flammable vapours.
• • • Glass lid can shatter, when heated (if applicable). • • Keep the lid glass open, while the oven is in operation (if applicable). SERVICE • To repair the appliance contact an Authorised Service Centre. • Use original spare parts only. DISPOSAL INTERNAL LIGHTING WARNING! Risk of injury or suffocation. WARNING! Risk of electric shock. • • • Do not leave the appliance unattended during grilling. Accessible parts become hot. Keep children away when the grill is in use.
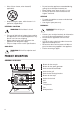
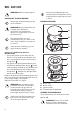
COOKING SURFACE LAYOUT 1 2 3 1 Auxiliary burner 2 Steam outlet - number and position depend on the model 3 Semi-rapid burner 4 Semi-rapid burner 5 Triple Crown burner 5 4 ACCESSORIES • Wire shelf For cookware, cake tins, roasts. • Baking tray For cakes and biscuits. • Turnspit For roasting larger joints of meat and poultry. • Storage compartment The storage compartment is below the oven cavity. To use the compartment, lift the lower front door then pull it down.
HOB - DAILY USE If the burner accidentally goes out, turn the knob to the off position and try to light the burner again after minimum 1 minute. WARNING! Refer to Safety chapters. IGNITION OF THE HOB BURNER Always light the burner before you put on the cookware. BURNER OVERVIEW WARNING! Be very careful when you use open fire in the kitchen environment. The manufacturer declines any responsibility in case of the flame misuse.
HOB - HINTS AND TIPS WARNING! Refer to Safety chapters. COOKWARE WARNING! Do not put the same pan on two burners. WARNING! Do not put unstable or damaged pots on the burner to prevent spills and injuries. CAUTION! Make sure that pot handles are not above the front edge of the cooktop. CAUTION! Make sure that the pots are placed centrally on the burner in order to get the maximum stability and a lower gas consumption.
PERIODIC MAINTENANCE Speak to your local Authorised Service Centre periodically to check the conditions of the gas supply pipe and the pressure adjuster, if fitted. OVEN - DAILY USE WARNING! Refer to Safety chapters. OVEN FUNCTIONS Oven function MIN 240°C MIN 240°C Off position The oven is off. Heat settings Range of temperature adjustment. Grilling To grill flat food in the middle of the grill. To make toast. Oven fan To thaw frozen food.
In case of absence of the electricity you can ignite the oven burner without an electrical device. 1. Open the oven door. 2. Hold the flame near the hole in the bottom of the oven cavity. Do not put the meat directly on the tray or pan. CAUTION! Do not put the meat on the highest shelf level. There is a risk of fire. AFTER IGNITING THE OVEN GAS BURNER 1. Release the knob for the oven functions. 2. Close the oven door. 3. Turn the knob for the oven functions to set the necessary heat setting.
OVEN - CLOCK FUNCTIONS MINUTE MINDER This function has no effect on the operation of the appliance. Turn the knob for the timer as far as it goes, then turn it to necessary time period. After the time period is completed, an acoustic signal sounds. OVEN - USING THE ACCESSORIES WARNING! Refer to Safety chapters. WARNING! Use oven gloves when you remove the turnspit. The turnspit and the grill are hot. There is a risk of burns.
5. Install the first fork on the spit, then put the meat on the turnspit and install the second fork. Make sure that the meat is in the middle of the spit. 7. Put the tip of the spit into the turnspit hole. Refer to "Product description" chapter. 8. Put the front part of the spit on the support hook. 9. Remove the turnspit handle. 10. Light the grill. Refer to "Oven - Daily use" chapter. 11. Press the turnspit button . 12. Make sure that turnspit rotates. 13. Close the oven door.
etc.) for your cookware, recipes and quantities when you use this appliance. COOKING TABLES Casseroles Food Quantity (kg) Temperature (°C) Time (min) Shelf position Lasagna1) 1.5 - 2.5 180 45 - 50 2 Cannelloni 1.5 - 2.5 180 45 - 50 2 1.5 - 2.5 180 33 - 40 2 1.5 - 2.5 180 45 - 50 2 1.5 - 2.5 195 35 - 40 2 1) Potato gratin 1) Macaroni oven 1) Kebab Hala 1) Preheat the oven for 10 minutes. Meat & Poultry Food Quantity (kg) Temperature (°C) Time (min) Shelf position Sheep 1.
Pizza Food Thin Quantity (kg) Temperature (°C) Time (min) Shelf position 1.0 - 1.2 240 20 - 30 1 1.4 - 1.5 240 25 - 30 1 1.4 - 1.5 210 30 - 35 1 1) Thick 1) Calzone 1) 1) Preheat the oven for 10 minutes. Cakes Food Flat cake Quantity (kg) Temperature (°C) Time (min) Shelf position 0.6 - 1.0 180 25 - 35 2 Sponge cake 1.0 - 1.5 165 60 - 85 2 Feter Mshalted 1.2 - 1.5 195 40 - 45 1 1.0 - 1.2 195 50 - 60 2 1.0 - 1.
Food Toast Hawai Quantity (kg) 0.5 - 1.0 Grill position max. Time (min) 15 - 20 Shelf position 3 1) 1) Preheat the oven for 5 minutes. Revolving frying Food Quantity (kg) Grill position Time (min) Shelf position Sheep on skewer 1.5 - 2.0 max. 100 - 120 Turnspit Chicken on skewer 1.2 - 1.8 max. 120 - 140 Turnspit OVEN - CARE AND CLEANING WARNING! Refer to Safety chapters. NOTES ON CLEANING Clean the front of the oven with a soft cloth with warm water and a mild cleaning agent.
Avoid placing the levers in the vertical position and make sure both of them are pulled maximally towards you. 4. Put the door on a soft cloth on a stable surface. 5. Use a screwdriver to remove the 2 screws from the bottom edge of the door. 1 1 6. Use a spatula made of wood or plastic (or equivalent) to open the inner door. Hold the outer door, and push the inner door against the top edge of the door. Lift the inner door. 3. Close the oven door to the first opening position (halfway).
When the cleaning is completed, install the glass panels and the oven door. To install the oven door, do the above steps in the opposite sequence. Make sure the levers are in their original position before closing the door. 4 4 5 6 6 Make sure the slot in the hinge A rests on the edge of the hinge support B before releasing the oven door. REPLACING THE LAMP WARNING! Risk of electric shock. The lamp can be hot. A B TROUBLESHOOTING WARNING! Refer to Safety chapters. 18 1. Turn off the oven.
WHAT TO DO IF... Problem Possible cause Remedy There is no spark when you try to activate the spark generator. The hob is not connected to an electrical supply or it is connected incorrectly. Check if the hob is correctly connected to the electrical supply. Refer to the connection diagram. There is no spark when you try to activate the spark generator. The fuse is blown. Make sure that the fuse is the cause of the malfunction. If the fuse is blown again and again, contact a qualified electrician.
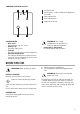
We recommend that you write the data here: Model (MOD.) ......................................... Product number (PNC) ......................................... Serial number (S.N.) ......................................... INSTALLATION WARNING! Refer to Safety chapters. LOCATION OF THE APPLIANCE You can install your freestanding appliance with cabinets on one or two sides and in the corner. Keep a distance of about 1 cm between the appliance and the back wall to make sure that the lid opens.
BYPASS DIAMETERS BURNER Ø BYPASS 1/100 mm Auxiliary 29 / 30 Semi-rapid 32 Triple Crown 67 Oven 50 Grill 59 GAS BURNERS FOR NATURAL GAS G20 20 mbar BURNER Triple Crown NORMAL POWER kW REDUCED POWER kW 4.0 INJECTOR MARK 1/100 mm 1.80 146 Semi-rapid 2.0 0.45 96 Auxiliary 1.0 0.35 70 Oven 2.25 1.0 108 Grill 2.0 1.5 108 GAS BURNERS FOR LPG G30 28-30 mbar BURNER NORMAL POWER kW REDUCED POWER kW INJECTOR MARK 1/100 mm Triple Crown 4.0 1.80 101 Semi-rapid 2.0 0.
The appliance is set for liquid gas. You can change it to natural gas, with the correct injectors. The gas rate is adjusted to suit. WARNING! Before you replace the injectors, make sure that the gas knobs are in the Off position. Disconnect the appliance from the electrical supply. Let the appliance cool down. There is a risk of injury. WARNING! When installation is complete, make sure that the seal of each pipe fitting does not leak. To check the seal use a soap solution, not a flame.
4. 5. 6. 7. 8. WARNING! Put the mains plug into the mains socket only if all parts are back into their initial position. There is a risk of injury. Light the burner. Refer to "Hob - Daily use" chapter. Turn the knob for the hob to the minimum position. Remove the knob for the hob again. Screw on slowly the bypass screw till the flame becomes minimum and stable. Put the knob for the hob back on. OVEN INJECTOR REPLACEMENT 5.
A 1 2 4. Release the burner injector with a 7 mm socket spanner and replace it with a right one. Changing from natural gas to liquid gas 1. Fully tighten the bypass screw. 2. Put the knob back. 3. Connect the appliance to the electricity. Changing from liquid gas to natural gas 1. Unscrew approximately one turn the bypass screw position A. 2. Put the knob for the oven functions back. 3. Connect the appliance to the electricity. Assemble the burner in a revers sequence.
A 2. Release the burner injector with a 7 mm socket spanner and replace it with a right one. 3. Put the appliance on the sidewall on a clean and smooth surface. Place each foot into a separate hole, in the plinth, and rotate it clockwise. 3. Assemble the burner in a reverse sequence. Before you fix the screw, make sure that the burner is pushed correctly to the back panel. Test the grill injectors. LEVELLING CAUTION! Remove all the accessories from the oven. 1.
This appliance is supplied with a main plug and a main cable. WARNING! The power cable must not touch the part of the appliance shaded in the illustration. To install all the accessories, do the first step in an opposite sequence. ELECTRICAL INSTALLATION WARNING! The manufacturer is not responsible if you do not follow the safety precautions from Safety chapters. ENVIRONMENTAL CONCERNS with the symbol with the household waste.
867342080-A-072018 WWW.ZANUSSI.