EN User Manual Cooker ZCI660EXC
Contents Safety information Safety instructions Product description Before first use Hob - Daily use Hob - Hints and tips Hob - Care and cleaning 2 4 6 7 8 12 14 Oven - Daily use Oven - Hints and tips Oven - Care and cleaning Troubleshooting Installation Energy efficiency 14 16 21 24 25 27 Subject to change without notice. Safety information Before the installation and use of the appliance, carefully read the supplied instructions.
• • • • • • • • • • • • • • • • • • This appliance must be connected to the mains with a H05VVF type cable to withstand the temperature of the rear panel. This appliance is intended for use up to an altitude of 2000 m above sea level. This appliance is not intended to be used on a ships, boats or vessels. Do not install the appliance behind a decorative door in order to avoid overheating. Do not install the appliance on a platform.
• • • • • Ensure that the appliance is switched off before replacing the lamp to avoid the possibility of electric shock. If the mains power supply cable is damaged, it must be replaced by the manufacturer, its Authorised Service Centre or similarly qualified persons to avoid an electrical hazard. To remove the shelf supports first pull the front of the shelf support and then the rear end away from the side walls. Install the shelf supports in the opposite sequence.
• • • • Do not pull the mains cable to disconnect the appliance. Always pull the mains plug. Use only correct isolation devices: line protecting cut-outs, fuses (screw type fuses removed from the holder), earth leakage trips and contactors. The electrical installation must have an isolation device which lets you disconnect the appliance from the mains at all poles. The isolation device must have a contact opening width of minimum 3 mm.
• • • • • • • • Replace immediately the door glass panels when they are damaged. Contact the Authorised Service Centre. Be careful when you remove the door from the appliance. The door is heavy! Fat and food remaining in the appliance can cause fire. Clean regularly the appliance to prevent the deterioration of the surface material. Make sure the cavity and the door are wiped dry after each use. Steam produced during the operation of the appliance condensates on cavity walls and can cause corrosion.
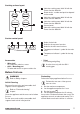
Cooking surface layout 2 1 140 mm 3 180 mm 180 mm 210 mm 4 1 Induction cooking zone 1400 W with the Power function 2500 W 2 Steam outlet - number and position depend on the model 3 Induction cooking zone 1800 W with the Power function 2800 W 4 Induction cooking zone 1800 W with the Power function 2800 W 5 Control panel 6 Induction cooking zone 2300 W with the Power function 3600 W 5 6 Cooker control panel 1 2 3 5 1 4 Accessories • • Wire shelf For cookware, cake tins, roasts.
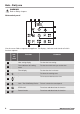
Hob - Daily use WARNING! Refer to Safety chapters. Hob control panel 1 2 3 4 5 6 8 7 Use the sensor fields to operate the appliance. The displays, indicators and sounds tell which functions operate. Sensor field 1 Comment - Heat setting display To show the heat setting. - Timer indicators of cooking zones To show for which zone you set the time. - Timer display To show the time in minutes. - To select the cooking zone. - To increase or decrease the time.
Heat setting displays Display Description The cooking zone is deactivated. - / - The cooking zone operates. The dot means a change by half of a heating level. STOP+GO function operates. Automatic Heat Up function operates. Power function operates. + digit There is a malfunction. / OptiHeat Control (3 step Residual heat indicator): continue cooking / keep warm / residual heat. / Lock / The Child Safety Device function operates. Incorrect or too small cookware or no cookware on the cooking zone.
Automatic Heat Up If you activate this function you can get a necessary heat setting in a shorter time. The function sets the highest heat setting for some time and then decreases to the correct heat setting. To activate the function the cooking zone must be cold. To change the time: set the cooking zone with To deactivate the function: turn the knob to the off position. Power function This function makes more power available to the induction cooking zones.
OffSound Control (Deactivation and activation of the sounds) The function has no effect on the operation of the cooking zones. Deactivate the hob. Touch STOP+GO This function sets all cooking zones that operate to the lowest heat setting. The function does not stop the timer functions. To activate the function: touch comes on. . To deactivate the function: touch previous heat setting comes on. . The If you change the heat setting, the function stops and the display shows the new heat setting.
Hob - Hints and tips WARNING! Refer to Safety chapters. Cookware For induction cooking zones a strong electro-magnetic field creates the heat in the cookware very quickly. Use the induction cooking zones with correct cookware. Induction cooking zones adapt to the dimension of the bottom of the cookware automatically to some limit. The cooking zone efficiency is related to the diameter of the cookware.
• hissing, buzzing: the fan operates. The noises are normal and do not refer to hob malfunction. Öko Timer (Eco Timer) linear. When you increase the heat setting, it is not proportional to the increase of the cooking zone consumption of power. It means that the cooking zone with the medium heat setting uses less than a half of its power. To save energy, the heater of the cooking zone deactivates before the count down timer sounds.
Hob - Care and cleaning WARNING! Refer to Safety chapters. General information • • • Clean the hob after each use. Always use cookware with clean bottom. Scratches or dark stains on the surface have no effect on how the hob operates. Use a special cleaner applicable for the surface of the hob. Use a special scraper for the glass. • • Cleaning the hob • • • the dirt can cause damage to the hob. Take care to avoid burns.
Symbol 100 - 250 Oven function Application Defrost This function can be used for defrosting frozen foods, such as vegetables and fruits. The defrosting time depends on the amount and size of the frozen food. Thermaflow® To bake on up to two shelf positions at the same time and to dry food. Set the temperature 20 - 40 °C lower than for Conventional Cooking.
2. Put the deep pan into the oven on the necessary shelf position. You can use the trivet to grill flat dishes in large quantities and to toast. 2. Put the deep pan into the oven on the necessary shelf position. 1. Put the trivet into the deep pan so that the supports of the wire shelf point down. Oven - Hints and tips Baking WARNING! Refer to Safety chapters. • The temperature and baking times in the tables are guidelines only.
Baking results Possible cause Remedy The cake sinks and becomes soggy, lumpy or streaky. The baking time is too short. Set a longer baking time. You cannot decrease baking times by setting higher temperatures. The cake sinks and becomes soggy, lumpy or streaky. There is too much liquid in the mixture. Use less liquid. Be careful with mixing times, especially if you use a mixing machine. The cake is too dry. The oven temperature is too low. The next time you bake, set a higher oven temperature.
Food Temperature (°C) Time (min) Shelf position Casseroles: Chicken 160 - 180 80 - 90 2 Convenience Foods Follow manufacturer`s instructions. 2 Fish 170 - 190 20 - 30 2 Fish Pie (Potato Topped) 190 - 200 20 - 30 2 Fruit Pies, Crumbles 190 - 200 30 - 50 2 Milk Puddings 150 - 170 90 - 120 2 Pasta Lasagne etc.
Food Temperature (°C) 150 - 170 18 - 25 1–3 Cakes: Sponges 160 - 170 20 - 25 3 Cakes: Madeira 140 - 160 60 - 80 3 Cakes: Rich Fruit 130 - 140 120 - 150 3 Cakes: Christmas 130 - 140 180 - 270 3 Cakes: Apple Pie 160 - 170 50 - 60 3 - Shortbread 130 - 150 45 - 60 1–3 Fish 160 - 180 30 - 40 3 Fruit Pies, Crumbles 170 - 180 30 - 50 3 Milk Puddings 140 - 160 60 - 90 3 Pastry: Choux 180 - 190 30 - 40 3 Pastry: Shortcrust 180 - 190 25 - 35 3 Pastry: Flaky 180 - 190
Thermaflow® - Main Oven Roasting Food Temperature (°C) Time (min) Beef / Beef boned 170 - 190 20 - 35 minutes per 0.5 kg (1 lb) and 20 - 30 minutes over Mutton / Lamb 170 - 190 20 - 35 minutes per 0.5 kg (1 lb) and 25 - 35 minutes over Pork / Veal / Ham 170 - 190 30 - 40 minutes per 0.5 kg (1 lb) and 30 - 40 minutes over Chicken 180 - 200 20 - 25 minutes per 0.5 kg (1 lb) and 20 minutes over Turkey / Goose 170 - 190 15 - 20 minutes per 0.5 kg (1 lb) up to 3.
Food Time (min) Fillets - Plaice / Cod 4-6 2 Kebabs 12 - 18 2-3 Kidneys - Lamb / Pig 6 - 10 2-3 Sausages 20 - 30 3 Steaks: Rare 4-6 3 Steaks: Medium 6-8 3 Steaks: Well Done 12 - 15 3 Toasted Sandwiches 3-4 3 Defrost • • Shelf position Remove the food packaging. Put the food on a plate. Do not cover it with a bowl or a plate. This can extend the defrost time. • Use the first shelf position. The one on the bottom. Oven - Care and cleaning WARNING! Refer to Safety chapters.
WARNING! Keep children away when you clean the oven at a high temperature. The oven surface becomes very hot and there is a risk of burns. CAUTION! Always turn the oven light on while using the catalytic cleaning (if applicable). Before activating the catalytic cleaning remove all the accessories from the oven. 1 2 The walls with a catalytic coating are selfcleaning. They absorb fat which collects on the walls while the appliance operates.
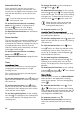
2. Pull up the trim. 3. Remove the glass panels. To replace the glass panels, do the same steps in reverse. Before you lower the trim, attach the A trim part to the door. Refer to the image. 1 Replacing the lamp Put a cloth on the bottom of the interior of the appliance. It prevents damage to the lamp glass cover and the cavity. 2 1 3. Pull the door trim to the front to remove it. 4. Remove the glass panels. To install the panels, do the same steps in reverse.
Troubleshooting WARNING! Refer to Safety chapters. What to do if... Problem Possible cause Remedy You cannot activate the appliance. The appliance is not connected to an electrical supply or it is connected incorrectly. Check if the appliance is correctly connected to the electrical supply. You cannot activate the appliance. The fuse is blown. Make sure that the fuse is the cause of the malfunction. If the fuse is blown again and again, contact a qualified electrician.
Problem Possible cause Remedy comes on the hob display. There is no cookware on the zone. Put cookware on the zone. comes on the hob display. The cookware is incorrect. Use the correct cookware. Refer to "Hob - Hints and tips" chapter. comes on the hob display. The diameter of the bottom of the Use cookware with correct dicookware is too small for the mensions. zone. Refer to "Hob - Hints and tips" chapter. The oven does not heat up. The oven is deactivated. Activate the oven.
Applicable types of cables for different phases: Phase Min. size cable 1 3x6.0 mm² 3 with neutral 5x1.5 mm² WARNING! The power cable must not touch the part of the appliance shaded in the illustration. B A A Minimum distances Dimension mm A 2 B 685 Covering terminal board Levelling of the appliance • • Use small feet on the bottom of appliance to set the appliance top surface level with other surfaces.
L L N N N Energy efficiency Product information for hob according to EU 66/2014 Model identification ZCI660EXC Type of hob Hob inside Freestanding Cooker Number of cooking zones 4 Heating technology Induction Diameter of circular cooking zones (Ø) Left front Left rear Right front Right rear 21.0 cm 14.0 cm 18.0 cm 18.0 cm Energy consumption per cooking zone (EC electric cooking) Left front Left rear Right front Right rear 171.4 Wh/kg 176.4 Wh/kg 171.2 Wh/kg 166.
Energy consumption with a standard load, conventional mode Top oven: 0.75 kWh/cycle Main oven: not applicable Energy consumption with a standard load, fan-forced mode Top oven: not applicable Main oven: 0.91 kWh/cycle Number of cavities 2 Heat source Electricity Volume Top oven: 39 l Main oven: 77 l Type of oven Oven inside Freestanding Cooker Mass 61.2 kg EN 60350-1 - Household electric cooking appliances - Part 1: Ranges, ovens, steam ovens and grills - Methods for measuring performance.
www.zanussi.
www.zanussi.
www.zanussi.
867337135-B-152017 www.zanussi.