EN User Manual Cooker ZCI68330BA ZCI68330WA ZCI68330XA
Contents Safety information Safety instructions Product description Before first use Hob - Daily use Hob - Hints and tips Hob - Care and cleaning 2 3 6 7 7 11 13 Oven - Daily use Oven - Clock functions Oven - Hints and tips Oven - Care and cleaning Troubleshooting Installation Energy efficiency 13 15 16 21 23 24 26 Subject to change without notice. Safety information Before the installation and use of the appliance, carefully read the supplied instructions.
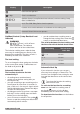
• • • • • • • • • • • • • • Do not operate the appliance by means of an external timer or separate remote-control system. Unattended cooking on a hob with fat or oil can be dangerous and may result in fire. Never try to extinguish a fire with water, but switch off the appliance and then cover flame e.g. with a lid or a fire blanket. Do not store items on the cooking surfaces. Do not use a steam cleaner to clean the appliance.
• • • • • Parts of the appliance carry current. Close the appliance with furniture to prevent touching the dangerous parts. The sides of the appliance must stay adjacent to appliances or to units with the same height. Do not install the appliance on a platform. Do not install the appliance adjacent to a door or under a window. This prevents hot cookware to fall from the appliance when the door or the window is opened. Make sure to install a stabilizing means in order to prevent tipping of the appliance.
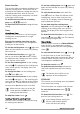
• • • • • • • • • – do not keep moist dishes and food in the appliance after you finish the cooking. – be careful when you remove or install the accessories. Discoloration of the enamel has no effect on the performance of the appliance. It is not a defect in the sense of the warranty law. Use a deep pan for moist cakes. Fruit juices cause stains that can be permanent. Do not keep hot cookware on the control panel. Do not let cookware boil dry.
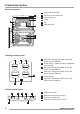
Product description General overview 1 2 3 6 3 2 1 4 5 4 3 2 1 1 2 3 4 5 6 Control panel and hob Air vents for the cooling fan Heating element Lamp Fan Shelf positions 4 5 Cooking surface layout 2 1 3 140 mm 180 mm 180 mm 210 mm 4 1 Induction cooking zone 1400 W with the Power function 2500 W 2 Steam outlet - number and position depend on the model 3 Induction cooking zone 1800 W with the Power function 2800 W 4 Induction cooking zone 1800 W with the Power function 2800 W 5 Control panel 6 I
5 Temperature lamp / symbol / indicator for the main oven 6 Temperature lamp / symbol / indicator for the top oven Accessories • • • Wire shelf For cookware, cake tins, roasts. Grill- / Roasting pan To bake and roast or as pan to collect fat. Trivet For roasting and grilling. Use the trivet only with the Grill- / roasting pan. Before first use WARNING! Refer to Safety chapters. Initial Cleaning Remove all accessories from the appliance. Refer to "Care and cleaning" chapter.
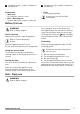
Hob control panel 1 2 3 4 5 6 8 7 Use the sensor fields to operate the appliance. The displays, indicators and sounds tell which functions operate. Sensor field 1 Function Comment - Heat setting display To show the heat setting. - Timer indicators of cooking zones To show for which zone you set the time. - Timer display To show the time in minutes. - To select the cooking zone. - To increase or decrease the time. 6 Lock / The Child Safety Device To lock / unlock the control panel.
Display Description Power function operates. + digit There is a malfunction. / OptiHeat Control (3 step Residual heat indicator): continue cooking / keep warm / residual heat. / Lock / The Child Safety Device function operates. Incorrect or too small cookware or no cookware on the cooking zone. Automatic Switch Off function operates. OptiHeat Control (3 step Residual heat indicator) WARNING! / / There is a risk of burns from residual heat. The indicator shows the level of the residual heat.
Power function This function makes more power available to the induction cooking zones. The function can be activated for the induction cooking zone only for a limited period of time. After this time the induction cooking zone automatically sets back to the highest heat setting. To activate the function for a cooking zone: touch . comes on. To deactivate the function: change the heat setting.
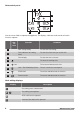
Lock Power management function You can lock the sensors on the hob while cooking zones operate. • Set the heat setting first. • • To activate the function: touch . comes on for 4 seconds. The Timer stays on. • To deactivate the function: touch previous heat setting comes on. • . The When you change the heat setting or deactivate the hob, you also deactivate this function. • All cooking zones are connected to one phase. See the illustration. The phase has a maximum electricity load.
The cooking zone efficiency is related to the diameter of the cookware. The cookware with a smaller diameter than the minimum receives only a part of the power generated by the cooking zone. Minimum cookware diameter Cooking zone Cookware diameter (mm) Left rear 125 - 140 Right rear 145 - 180 Right front 145 - 180 Left front 180 - 210 The noises during operation • whistle sound: you the cooking zone with high power level and the cookware is made of different materials (sandwich construction).
Heat setting Use to: Time (min) 5 - 15 Hints 7-8 Heavy fry, hash browns, loin steaks, steaks. Turn halfway through. 9 Boil water, cook pasta, sear meat (goulash, pot roast), deep-fry chips. Boil large quantities of water. Power function is activated. Hob - Care and cleaning WARNING! Refer to Safety chapters. General information • • • • • Clean the hob after each use. Always use cookware with clean bottom. Scratches or dark stains on the surface have no effect on how the hob operates.
Top oven functions Symbol 100 - 250 Oven function Application Off position The appliance is off. Oven Lamp To activate the lamp without a cooking function. Conventional Cooking To bake and roast food on 1 shelf position. Dual Circuit Grill To grill food items in medium quantities in the middle of the shelf. To make toasts. Full Grill To grill flat food and to toast bread. Main oven functions Symbol 100 - 250 Oven function Application Off position The appliance is off.
2. Put the deep pan into the oven on the necessary shelf position. Oven - Clock functions Display A B C A. Minute minder indicator B. Time display C. Time of day indicator Buttons Button Function MINUS To set the time. CLOCK To set a clock function. PLUS To set the time. Setting the Minute Minder Use this function to set a countdown time. The maximum time you can set is 2 hours 30 minutes. This function has no effect on the operation of the oven. 1.
Oven - Hints and tips WARNING! Refer to Safety chapters. The temperature and baking times in the tables are guidelines only. They depend on the recipes and the quality and quantity of the ingredients used. Top oven The top oven is the smaller of the two ovens. It has 3 shelf positions. Use it to cook smaller quantities of food. It gives especially good results when used to cook fruitcakes, sweets and savoury flants or quiche.
Baking results Possible cause Remedy The cake browns unevenly. The mixture is unevenly distributed. Spread the mixture evenly on the baking tray. The cake is not ready in the baking time given. The oven temperature is too low. The next time you bake, set a slightly higher oven temperature.
Food Temperature (°C) Time (min) Shelf position Shortcrusts: Mince Pies 190 - 200 15 - 20 2 Shortcrusts: Meat Pies 190 - 210 25 - 35 2 Shortcrusts: Quiche, Tarts, Flans 180 - 200 25 - 50 2 Scones 220 - 230 8 - 12 3 Shepard`s Pie 190 - 200 30 - 40 2 Souffles 170 - 180 20 - 30 2 Vegetables: Baked Jacket Potatos 180 - 190 60 - 90 2 Vegetables: Roast Potatos 180 - 190 60 - 90 2 Yorkshire Pudding Large 220 - 210 25 - 40 2 Yorkshire Pudding Individual 210 - 220 15 - 25 2
Food Temperature (°C) • • • • Shelf position Pastry: Choux 180 - 190 30 - 40 3 Pastry: Shortcrust 180 - 190 25 - 35 3 Pastry: Flaky 180 - 190 30 - 40 3 Pastry: Puff Follow manufacturer`s instructions. Reduce the temperature for Fan oven by 20 °C. 3 Plate Tarts 180 - 190 25 - 45 3 Quiches / Flans 170 - 180 25 - 45 3 Scones 210 - 230 8 - 12 1–3 Roasting: Meat, Poultry 160 - 180 Refer to the Roasting 2 table.
Food Temperature (°C) Time (min) Duck 180 - 200 25 - 35 minutes per 0.5 kb (1 lb) and 25 - 30 minutes over Pheasant 170 - 190 35 - 40 minutes per 0.5 kb (1 lb) and 35 - 40 minutes over Rabbit 170 - 190 20 minutes per 0.5 kb (1 lb) and 20 minutes over Grilling in general • WARNING! Always preheat an empty oven with the grill functions for 5 minutes. Always grill with the oven door closed. • Always grill with the maximum temperature setting.
Defrost • • Remove the food packaging. Put the food on a plate. Do not cover it with a bowl or a plate. This can extend the defrost time. • Use the first shelf position. The one on the bottom. Oven - Care and cleaning WARNING! Refer to Safety chapters. Notes on cleaning • • • • • • Clean the front of the appliance with a soft cloth with warm water and a cleaning agent. To clean metal surfaces, use a usual cleaning agent. Clean the appliance interior after each use.
2. Pull up the trim. 3. Remove the glass panels. To replace the glass panels, do the same steps in reverse. Before you lower the trim, attach the A trim part to the door. Refer to the image. 1 Replacing the lamp Put a cloth on the bottom of the interior of the appliance. It prevents damage to the lamp glass cover and the cavity. 2 1 3. Pull the door trim to the front to remove it. 4. Remove the glass panels. To install the panels, do the same steps in reverse.
Troubleshooting WARNING! Refer to Safety chapters. What to do if... Problem Possible cause Remedy You cannot activate the appliance. The appliance is not connected to an electrical supply or it is connected incorrectly. Check if the appliance is correctly connected to the electrical supply. You cannot activate the appliance. The fuse is released. Make sure that the fuse is the cause of the malfunction. If the fuse releases again and again, contact a qualified electrician.
Problem Possible cause Remedy comes on the hob display. The cookware is incorrect. Use the correct cookware. Refer to "Hob - Hints and tips" chapter. comes on the hob display. The diameter of the bottom of the Use cookware with correct dicookware is too small for the mensions. zone. Refer to "Hob - Hints and tips" chapter. The oven does not heat up. The oven is deactivated. Activate the oven. The oven does not heat up. The clock is not set. Set the clock. The oven does not heat up.
This appliance is supplied without a main plug or a main cable. Covering terminal board B A • • A Minimum distances Dimension mm A 2 B 685 Levelling of the appliance • The recommended cross-section area is six square millimetres (6 mm²). When you refit the mains terminal cover, make sure that the lower tabs are located inside the bottom edge of the aperture, before you fix the two screws into the top edge of the mains terminal cover. Make sure that the cover is securely fastened.
Energy efficiency Product information for hob according to EU 66/2014 Model identification ZCI68330BA ZCI68330WA ZCI68330XA Type of hob Hob inside Freestanding Cooker Number of cooking zones 4 Heating technology Induction Diameter of circular cooking zones (Ø) Left front Left rear Right front Right rear 21.0 cm 14.0 cm 18.0 cm 18.0 cm Energy consumption per cooking zone (EC electric cooking) Left front Left rear Right front Right rear 171.4 Wh/kg 176.4 Wh/kg 171.2 Wh/kg 166.
Number of cavities 2 Heat source Electricity Volume Top oven: 37 l Main oven: 72 l Type of oven Oven inside Freestanding Cooker Mass EN 60350-1 - Household electric cooking appliances - Part 1: Ranges, ovens, steam ovens and grills - Methods for measuring performance. Oven - Energy saving The appliance contains features which help you save energy during everyday cooking.
867319088-C-152017 www.zanussi.