ELECTRIC DOUBLE OVEN AND GRILL WITH GAS HOB ZCM 7902 INSTRUCTION BOOKLET
IMPORTANT SAFETY INFORMATION These warnings are provided in the interests of your safety. Ensure that you understand them all before installing or using the appliance. Your safety is of paramount importance. If you are unsure about any of the information in this book contact the Customer Care Department. Telephone 0870 5 727727. · · INSTALLATION · · · · · · · · · The appliance must be installed according to the instructions supplied.
CONTENTS FOR THE USER Important Safety Information 2 Preface 4 Introduction Rating Plate General Notes On Using Your Appliance About Condensation and Steam The Cooling Fan for the Controls Control Panel Indicator Neons Cookware Grill and Oven Furniture 5 5 5 5 5 5 5 6 The Control Panel 7 The Timer To Set the Time of Day To Use the Timer Automatic Control Setting the Controls for Automatic Use 8 8 8 9 9 The Gas Hob Uses of the Hob To Light the Hob Burners To Turn Off Any Burner Things to Note Hints
PREFACE Dear Customer, Thank you for buying a Zanussi Electrolux appliance. With our experience in developing and manufacturing the very best in U.K. appliances, you can be assured that you have purchased a hard working, reliable, quality product. Zanussi Electrolux appliances comply with British Standard safety and performance requirements. They are covered by a 12 month parts and labour guarantee.
INTRODUCTION WARNING: THIS APPLIANCE MUST BE EARTHED THE COOLING FAN FOR THE CONTROLS The cooling fan operates immediately when the grill or top oven is switched on. It may run on after the controls are switched off until the appliance has cooled. If an automatic programme has been set the cooling fan does not switch on until the cooktime begins. RATING PLATE This is situated on the front frame of the appliance and can be seen upon opening the door.
GRILL AND OVEN FURNITURE The following items of grill and oven furniture have been supplied with the appliance. If you require replacements of any of the items listed below please contact your local Service Force Centre, quoting the relevant part number. 1 grill pan (311409401) 1 grill pan handle (311468100) Note: If you require an additional handle for your grill pan, this can be ordered from your local Service Force Centre by quoting part number 311479800\6.
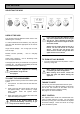
THE CONTROL PANEL THE CONTROL PANEL ZCM7702 A B H G FEATURES A B C D E F G H - D C Hotplate Controls Top Oven / Grill Temperature Control Automatic Timer Main Oven Temperature Control Hotplate Controls Ignition Button Top Oven Indicator Neon Main Oven Indicator 7 E F
THE TIMER Please note that this is a 24 hour clock, for example 2.00pm is shown as 1400. Cookpot symbol Bell symbol In the following pages we explain how to set the controls. Read through them a few times until you are familiar with the procedure. If the appliance is switched off on the wall, or there is a loss of power, the clock will stop and you will not be able to use the main oven. When you first switch the electricity supply on, the timer display will flash.
AUTOMATIC CONTROL You can only use the automatic control for the main oven. When you use the automatic controls for the first time it’s probably best to choose a time when you are at home. That way you can check to make sure you’ve set everything correctly and you’ll feel much more confident when you are away from home in the future. SETTING THE CONTROLS FOR AUTOMATIC USE This is very easy. All you have to do is work through the steps below. The clock will work out the rest for itself.
THE GAS HOB SELECTING THE HOB USES OF THE HOB If you close the lid of the appliance while any of the hotplate burners are lit the gas will go out. This is because it would be dangerous if the burners stayed on when the lid was closed. The gas hob has three different burner sizes to suit different types of cooking: To ensure maximum burner efficiency only use pots and pans with flat bases appropriate to the burner size used. Always use the control knob to turn off a burner.
HINTS AND TIPS · Keep flames under the base of pans. If the flames lick round the sides of the pan you are wasting gas. · · Do not overfill pans or they will boil over. · Use pans with flat bases. They are more stable than pans which are warped. · Do not use the lid as a wok surface or chopping board. This could damage the glass and reduce its strength. Do not use pans with very heavy handles which cause the pan to tip. Place pans on the centre of the burners.
THE DUAL GRILL USES OF THE DUAL GRILL CAUTION - ACCESSIBLE PARTS MAY BECOME HOT WHEN THE GRILL IS IN USE. CHILDREN SHOULD BE KEPT AWAY. The Dual Grill on this appliance has been designed to heat up more quickly than conventional grill elements. It provides quick, direct heat and no preheating is necessary. It has a dual circuit facility which means that the full area of the grill can be used, or for economy purposes the centre section only can be used when cooking smaller quantities of food.
GRILLING CHART HINTS AND TIPS · In order to become acquainted with the performance of the Dual Grill it is advisable to check food regularly when grilling. · Food should be thoroughly dried before grilling to minimise splashing. Brush lean meats and fish lightly with a little oil or melted butter to keep them moist during cooking.
THE TOP OVEN USES OF THE TOP OVEN The top oven is the smaller of the two ovens. It is heated by elements in the top and bottom of the oven. It is designed for cooking smaller quantities of food. It gives especially good results if used to cook fruit cakes, sweet or savoury flans or quiche. The top oven is also ideal for use as a warming compartment to warm dishes and keep food hot. Use the lowest setting on the top oven temperature control.
HINTS AND TIPS · Most cooking should be carried out using an oven shelf positioned in one of the shelf runners. · Larger roasts and casseroles should normally be cooked in the main fan oven. However, they may be cooked on a straight shelf placed on the base of the top oven provided there is sufficient room for air circulation around the food. · Stand dishes on a suitably sized baking tray on the shelf to prevent spillage onto the oven base and to help reduce cleaning.
THE MAIN OVEN USES OF THE FAN OVEN The oven is heated by an element around the fan situated behind the back panel. The fan draws air from the oven and the element heats the air which circulates in the oven via the vents in the back panel. The advantages of fan oven cooking are: PREHEATING The fan oven quickly reaches its temperature, so it is not usually necessary to preheat the oven. Without preheating however, you may find you need to add an extra 5 – 10 minutes on the recommended cooking times.
HINTS AND TIPS · Arrange the shelves in the required positions before switching the oven ON. Shelf positions are numbered from the bottom upwards. · When cooking more than one dish in the fan oven, place dishes centrally on different shelves rather than cluster several dishes on one shelf, this will allow the heat to circulate freely for the best cooking results. · When batch baking one type of food e.g. Victoria sandwich cakes, those of similar size will be cooked in the same time.
OVEN COOKING CHART The oven temperatures are intended as a guide only. It may be necessary to increase or decrease the temperatures by 10°C to suit individual preferences and requirements. FAN OVEN FOOD Biscuits Bread Bread rolls/buns Cakes: SHELF POSITION Shelf Small & Queen Sponges Victoria Sandwich Madeira Rich Fruit Christmas Gingerbread Meringues Flapjack Shortbread Casseroles: Beef/Lamb Chicken Convenience Foods Fish Fish Pie (Potato Topped) Fruit Pies, Crumbles Milk Puddings Pasta Lasagne etc.
ROASTING CHART ROASTING CHART INTERNAL TEMPERATURES – Rare : 50-60°C; Medium : 60-70°C; Well done : 70-80°C MEAT TOP/FAN OVEN COOKING TIME 20-35 minutes per ½kg (1lb) and 20-35 minutes over Beef 160-180°C Beef, boned 160-180°C 25-35 minutes per ½kg (1lb) and 25-35 minutes over Mutton and Lamb 160-180°C 25-35 minutes per ½kg (1lb) and 25-35 minutes over Pork and Veal 160-180°C 30-40 minutes per ½kg (1lb) and 30-40 minutes over Ham 160-180°C 30-40 minutes per ½kg (1lb) and 30-40 minutes over
DEFROST FEATURE Small or thin fish fillets, frozen peeled prawns, cubed or minced meat, liver, thin chops, steaks etc., can be thawed in 1 – 2 hours. USES OF DEFROST FEATURE This main oven function defrosts most foods faster than more conventional methods. It is particularly suitable for delicate frozen foods which are to be served cold e.g. cream filled gateaux, cakes covered with icings or frostings, cheesecakes, biscuits, scones, etc.
CARE AND CLEANING Aluminium based saucepans can leave shiny metal marks on the pan supports. Clean the pan supports regularly to remove the marks using a mild abrasive like 'Cif' with a soft scourer. For more stubborn marks you can use a soap-filled pad such as 'Brillo'. BEFORE CLEANING THE APPLIANCE, ALWAYS ALLOW THE COOLING FAN TO COOL THE APPLIANCE DOWN BEFORE SWITCHING OFF THE ELECTRICITY SUPPLY. After cleaning the appliance parts, dry them thoroughly before you put them back.
CLEANING THE APPLIANCE OUTSIDE OF THE CLEANING INSIDE THE GRILL/TOP OVEN AND MAIN OVEN COMPARTMENTS The top, sides and back of the grill/top oven and main oven compartments are coated with a special Stayclean coating. DO NOT use abrasive cleaning materials e.g. Hob Brite, Brillo pads or scourers on painted or printed finishes as damage may occur. Regularly wipe over the control panel, oven doors and appliance sides using a soft cloth and hot soapy water.
· · CLEANING BETWEEN THE OUTER AND INNER DOOR GLASS Cook at the recommended temperatures. Higher temperatures during roasting will increase soilage. Try cooking at lower temperatures for an increased length of time, you will save energy and often the joint is more tender. The outer door glass is removable for cleaning. TO REMOVE THE OUTER GLASS Use minimal, if any, extra oil or fat when roasting meat, potatoes only require brushing with fat before cooking.
Do not attempt to use the oven without the glass being in place. If If the door glass panel becomes chipped or has deep scratches the glass will be weakened and must be replaced to prevent the possibility of the panel shattering. Please contact your local Service Force Centre who will be pleased to advise further. TO CLEAN THE INNER GLASS DOOR PANELS Clean the inner glass door panels using a soft cloth and hot water to which a little washing up liquid has been added.
SOMETHING NOT WORKING? If the oven is not cooking evenly or the side opening door will not stay open: Before calling an Engineer please carry out the following checks, you may be able to solve the problem without the expense of an Engineer. * Check that the appliance is level. If our Service Engineer finds that the problem is listed below you will be charged for the call whether or not the appliance is under guarantee.
SERVICE AND SPARE PARTS In the event of your appliance requiring service, or if you wish to purchase spare parts, please contact your local Service Force Centre by telephoning:- 0870 5 929929 Your telephone call will be automatically routed to the Service Force Centre covering your post code area. For the address of your local Service Force Centre and further information about Service Force, please visit the website at www.serviceforce.co.
GUARANTEE CONDITIONS Standard guarantee conditions We, Zanussi Electrolux, undertake that if within 12 months of the date of the purchase this ZANUSSI ELECTROLUX appliance or any part thereof is proved to be defective by reason only of faulty workmanship or materials, we will, at our option repair or replace the same FREE OF CHARGE for labour, materials or carriage on condition that: · · The appliance has been correctly installed and used only on the electricity supply stated on the rating plate.
TECHNICAL DETAILS Loading info : Electric ovens Voltage: 230-240 Volts AC 50Hz Top Oven: 1.8 kW - 2.0 kW Grill: 2.5 kW - 2.7 kW Main Ovens Fan Element: 2.3 kW - 2.5 kW Fan Motor: 0.03 kW Oven Light: 0.025 kW Wattage: 4.8 - 5.2 kW Loading info : Gas hotplate Natural gas L.P. Gas L.H.F. – Rapid injector marking 2.9 kW ( 9895 Btu/h ) 130 2.9 kW ( 208.4 g/h ) 083 L.H.R. / R.H.R. – Normalinjector marking 1.9 kW ( 6483 Btu/h ) 104 1.9 kW ( 136.5 g/h ) 072 R.H.F. – Simmer injector marking 1.
INSTALLATION INSTRUCTIONS FOR YOUR SAFETY Where applicable Natural Gas and L.P Gas versions of this appliance are available. Check that this model is suitable for the type of supply available. In the interest of safety this appliance must be installed and/or serviced by a competent person, as stated in Gas Safety (Installation and Use) Regulations Current Editions. WARNINGS: · This appliance must be installed by a qualified electrician/competent person (CORGI Registered).
INSTALLATION INSTRUCTIONS IMPORTANT – SAFETY REQUIREMENTS This appliance must be installed in accordance with the Gas Safety (Installation and Use) Regulations Current Editions and the I.E.E. Wiring Regulations. Detailed recommendations are contained in the following British Standard Codes of Practice – BS.6172, BS.5440: Part 2 and B.S.6891. All British Standards must be ‘Current Editions’. PROVISION FOR VENTILATION This appliance is not connected to a combustion products evacuation device.
INSTALLATION INSTRUCTIONS LOCATION OF APPLIANCE 3 This appliance must not be installed in a bed-sitting room of volume less than 20m or in a bathroom, shower room or garage. This is a type ‘X’ appliance, it is essential that the appliance is positioned as stated below (See Fig 1a) i.e.
INSTALLATION INSTRUCTIONS CONNECTING TO THE ELECTRICITY SUPPLY Warning: This appliance must be earthed. Do not earth this appliance to the gas supply piping. · · · · · · We recommend you use a new length of 6mm twin core and earthed cable to ensure your safety. · · Clamp bare wires into the relevant terminal (Fig. 2) and check they are held by tugging each one in turn. · · Connect the remaining end of the mains cable to the appliance to the appliance point / junction box.
INSTALLATION INSTRUCTIONS CONNECTING TO GAS SUPPLY This appliance is designed to be installed with an appliance flexible connection only. Supply piping should not be 3 less than R /8. Connection is made to the Rc ½ (½” B.S.P.) female threaded entry pipe located just below the hotplate level on the rear left hand side of the appliance. NOTE: ONLY LIQUID SEALANTS TO BE USED WHEN INLET GAS PIPE IS FITTED I.E.: DO NOT USE P.T.F.E. SEALANT TAPE. Check for gas soundness after connecting to the gas supply.
INSTALLATION INSTRUCTIONS FITTING THE STABILITY BRACKET It is recommended that if the appliance is to be installed with a flexible supply pipe, a stability bracket (SK.4729.A) is fitted, and is available from your supplier (see Important Safety Requirements, page 30). These instructions should be read in conjunction with the leaflet packed with the stability bracket. 1. Place the appliance in its intended position and level appliance. 2.
INSTALLATION INSTRUCTIONS PRESSURE TESTING 1. The Rapid injector is used as a pressure test point. 2. Connect the pressure gauge to the Rapid injector. 3. Check the supply pressure by turning the Rapid burner on and one other hotplate burner full on and light the appropriate burner. The pressure should be either:(i) For Natural Gas 20mbar (ii) For LP. Gas. The pressure must be set to 28 mbar for use on butane or 37 mbar for use on propane. 4. Turn off the taps, disconnect the pressure gauge. 5.
INSTALLATION INSTRUCTIONS CHECKING THE MAIN OVEN 1. Ensure the timer is set to manual operation. 2. Turn on the main oven thermostat to the highest setting. 3. Ensure the oven is heating up by checking firstly that the oven neon illuminates. 4. After a short period the heat from the oven element may be felt with the oven door open. 5. Check that the oven light and oven fan are functioning. CHECKING THE SECOND OVEN 1. Ensure the timer is set for manual operation and the oven door is closed. 2.
NOTES 37
NOTES 38
NOTES 39
IMPORTANT NOTICE In line with our continuing policy of research and development, we reserve the right to alter models and specifications without prior notice. This instruction booklet is accurate at the date of printing, but will be superseded if specifications or appearance are changed. ZANUSSI ELECTROLUX 55 – 77 HIGH STREET, SLOUGH, BERKSHIRE, SL1 1DZ TELEPHONE 0870 5 727727 www.zanussi.co.