EN User Manual Cooker ZCV66030BA ZCV66030WA ZCV66030XA
Contents Safety information Safety instructions Product description Before first use Hob - Daily use Hob - Hints and tips 2 3 6 7 7 7 Hob - Care and cleaning Oven - Daily use Oven - Hints and tips Oven - Care and cleaning Troubleshooting Installation 8 8 10 15 17 17 Subject to change without notice. Safety information Before the installation and use of the appliance, carefully read the supplied instructions.
• • • • • • • • • • • • Unattended cooking on a hob with fat or oil can be dangerous and may result in fire. Never try to extinguish a fire with water, but switch off the appliance and then cover flame e.g. with a lid or a fire blanket. Do not store items on the cooking surfaces. Do not use a steam cleaner to clean the appliance. Metallic objects such as knives, forks, spoons and lids should not be placed on the hob surface since they can get hot.
• Make sure to install a stabilizing means in order to prevent tipping of the appliance. Refer to Installation chapter. Electrical Connection WARNING! Risk of fire and electrical shock. • • • • • • • • • • • • • All electrical connections should be made by a qualified electrician. The appliance must be earthed. Make sure that the electrical information on the rating plate agrees with the power supply. If not contact an electrician. Always use a correctly installed shockproof socket.
• • • • Do not activate the cooking zones with empty cookware or without cookware. Do not put aluminium foil on the appliance or directly on the bottom of the appliance. Cookware made of cast iron, aluminium or with a damaged bottom can cause scratches. Always lift these objects up when you have to move them on the cooking surface. This appliance is for cooking purposes only. It must not be used for other purposes, for example room heating.
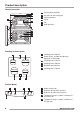
Product description General overview 1 2 3 6 3 2 1 4 1 2 3 4 5 6 Control panel and hob Air vents for the cooling fan Heating element Lamp Fan Shelf positions 3 4 5 4 3 2 1 5 Cooking surface layout 1 145 mm 180 mm 180 mm 6 1 Cooking zone 1200 W 2 Steam outlet - number and position depends on the model 3 Cooking zone 1700 W 4 Cooking zone 1200 W 5 Residual heat indicator 6 Cooking zone 1700 W 3 2 145 mm 5 4 Control panel 1 5 6 2 3 1 4 Knobs for the hob Knob for the top oven functions
Accessories • • • Wire shelf For cookware, cake tins, roasts. Grill- / Roasting pan To bake and roast or as pan to collect fat. Trivet For roasting and grilling. Use the trivet only with the Grill- / roasting pan. Before first use WARNING! Refer to Safety chapters. Initial Cleaning Remove all accessories from the appliance. Refer to "Care and cleaning" chapter. Preheat the two ovens. Heat up one oven at a time. 1. Set the maximum temperature. 2. Let the appliance operate for 1 hour.
Cookware made of enamelled steel and with aluminium or copper bottoms can cause the colour change on the glass-ceramic surface. Heat setting: Energy saving • If it is possible, always put the lids on the cookware. Put cookware on a cooking zone before you start it. Use the residual heat to keep the food warm or to melt it. The bottom of the pans and cooking zones must have the same dimension.
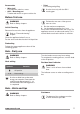
Activating and deactivating the top / main oven It depends on the model if your appliance has knob symbols, indicators or lamps: • The indicator comes on when the oven heats up. • The lamp comes on when the oven operates. • The symbol shows whether the knob controls one of the cooking zones, the oven functions or the temperature. 1. Turn the knob for the top / main oven functions to select an oven function. 2. To deactivate the oven turn the knob for the top / main oven functions to the off position.
Trivet and Grill- / Roasting pan WARNING! Be careful when you remove the accessories from a hot appliance. There is a risk of burns. You can use the trivet to roast larger pieces of meat or poultry on one shelf position. 2. Put the deep pan into the oven on the necessary shelf position. You can use the trivet to grill flat dishes in large quantities and to toast. 1. Put the trivet into the deep pan so that the supports of the wire shelf point down. 1.
Tips on baking Baking results Possible cause Remedy The bottom of the cake is not browned sufficiently. The shelf position is incorrect. Put the cake on a lower shelf. The cake sinks and becomes soggy, lumpy or streaky. The oven temperature is too high. The next time you bake, set a slightly lower oven temperature. The cake sinks and becomes soggy, lumpy or streaky. The baking time is too short. Set a longer baking time. You cannot decrease baking times by setting higher temperatures.
Food Temperature (°C) Time (min) Shelf position Cakes: Flapjack 160 - 170 25 -30 2 Cakes: Shortbread 130 - 150 45 - 60 2 Cakes: Apple Pie 170 - 180 50 - 60 2 Casseroles: Beef / Lamb 160 -170 150 - 180 2 Casseroles: Chicken 160 - 180 80 - 90 2 Convenience Foods Follow manufacturer`s instructions 2 Fish 170 - 190 20 - 30 2 Fish Pie (Potato Topped) 190 - 200 20 - 30 2 Fruit Pies, Crumbles 190 - 200 30 - 50 2 Milk Puddings 150 - 170 90 -120 2 Pasta Lasagne etc.
Food Temperature (°C) • • • • Shelf position Biscuits 180 - 190 10 - 20 1–3 Bread 190 - 210 30 - 35 2 Cakes: Small & Queen 150 - 170 18 - 25 1–3 Cakes: Sponges 160 - 170 20 - 25 3 Cakes: Madeira 140 - 160 60 - 80 3 Cakes: Rich Fruit 130 - 140 120 - 150 3 Cakes: Christmas 130 - 140 180 - 270 3 Cakes: Apple Pie 160 - 170 50 - 60 3 - Shortbread 130 - 150 45 - 60 1–3 Fish 160 - 180 30 - 40 3 Fruit Pies, Crumbles 170 - 180 30 - 50 3 Milk Puddings 140 - 160 60 - 9
Thermaflow® - Main Oven Roasting Food Temperature (°C) Time (min) Beef / Beef boned 170 - 190 20 - 35 minutes per 0.5 kb (1 lb) and 20-30 minutes over Mutton / Lamb 170 - 190 20 - 35 minutes per 0.5 kb (1 lb) and 25-35 minutes over Pork / Veal / Ham 170 - 190 30 - 40 minutes per 0.5 kb (1 lb) and 30-40 minutes over Chicken 180 - 200 20 - 25 minutes per 0.5 kb (1 lb) and 20 minutes over Turkey / Goose 170 - 190 15 - 20 minutes per 0.5 kg (1 lb) up to 3.5 kg (7 lb) then 10 minutes per 0.
Food Time (min) Fish - Whole / Trout / Makarel 10 - 12 2 Fillets - Plaice/Cod 4-6 2 Kebabs 12 - 18 2-3 Kidneys - Lamb / Pig 6 - 10 2-3 Sausages 20 - 30 3 Steaks: Rare 4-6 3 Steaks: Medium 6-8 3 Steaks: Well Done 12 - 15 3 Toasted Sandwiches 3- 4 3 Defrosting • • Shelf position Remove the food packaging. Put the food on a plate. Do not cover it with a bowl or a plate. This can extend the defrost time. • Use the first oven shelf level. The one on the bottom.
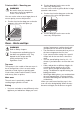
2. Pull up the trim. 3. Remove the glass panels. To replace the glass panels, do the same steps in reverse. Before you lower the trim, attach the A trim part to the door. Refer to the graphic. 1 Replacing the lamp Put a cloth on the bottom of the interior of the appliance. It prevents damage to the lamp glass cover and the cavity. 2 1 3. Pull the door trim to the front to remove it. 4. Remove the glass panels. To install the panels, do the same steps in reverse.
Troubleshooting WARNING! Refer to Safety chapters. What to do if... Problem Possible cause Remedy You cannot activate the appliance. The appliance is not connected to an electrical supply or it is connected incorrectly. Check if the appliance is correctly connected to the electrical supply. You cannot activate the appliance. The fuse is released. Make sure that the fuse is the cause of the malfunction. If the fuse releases again and again, contact a qualified electrician.
Technical data Use small feet on the bottom of appliance to set the appliance top surface level with other surfaces. Dimensions Height 894 - 912 mm Width 600 mm Depth 600 mm Top oven capacity 37 l Main oven capacity 74 l Anti-tilt protection Adjust the appliance to the correct height and put it in the correct area before you attach the anti-tilt protection. CAUTION! Location of the appliance You can install your freestanding appliance with cabinets on one or two sides and in the corner.
• 50 mm • 77 mm A • 4. Check that the anti-tilt protection (A) fits minimum 20 mm into the hole in the rear wall of the appliance (B) when you push the appliance. The recommended cross-section area is six square millimetres (6 mm²). When you refit the mains terminal cover, make sure that the lower tabs are located inside the bottom edge of the aperture, before you fix the two screws into the top edge of the mains terminal cover. Make sure that the cover is securely fastened.
867307275-B-372014 www.zanussi.