
User manual


After approximately five seconds, the flashing
stops and the display shows the time of day
you set.
To change the time, press
again and
again until the indicator for the Time of
Day function flashes. You must not set the Du-
ration
or End function at the same time.
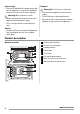
Pre-heating
1.
Set function
and maximum tempera-
ture.
2. Let the appliance operate without the food
for approximately 1 hour.
3.
Set function
and maximum tempera-
ture.
4. Let the appliance operate without the food
for approximately 10 minutes.
5.
Set function
and maximum tempera-
ture.
6. Let the appliance operate without the food
for approximately 10 minutes.
This is to burn off the residue in the appliance.
The accessories can become more hot than
usually. When you pre-heat the appliance for
the first time, the appliance can make an odour
and smoke. This is the usual effect. Make sure
the airflow is sufficient.
Preheat the two ovens. Heat up one oven at a
time.
Hob - Daily use
Warning! Refer to the Safety chapters.
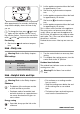
Heat settings
Control knob Function
0 Off position
1-6
Heat settings
(1 = lowest heat setting; 6=
highest heat setting)
1. Turn the control knob to a necessary heat
setting.
2. To complete the cooking process, turn the
control knob to the “0” position.
Residual heat indicator
The residual heat indicator comes on when a
cooking zone is hot.
Warning! Risk of burns from residual
heat!
Hob - Helpful hints and tips
Warning! Refer to the Safety chapters.
Cookware
• The bottom of the cookware must be
as thick and flat as possible.
• Cookware made of enamelled steel
and with aluminium or copper bottoms
can cause discoloration on glass ce-
ramic surface.
Energy saving
• If possible, always put the lids on the
cookware.
• Put cookware on a cooking zone be-
fore you start it.
• Stop the cooking zones before the end
of the cooking time to use residual
heat.
• The bottom of pans and cooking zones
must have the same dimension.
8
www.zanussi.com