EN User manual Dishwasher ZDM16301SA ZDM16301WA
Contents Safety instructions _ _ _ _ _ _ _ _ _ _ _ _ _ _ Control panel _ _ _ _ _ _ _ _ _ _ _ _ _ _ _ _ _ Programmes _ _ _ _ _ _ _ _ _ _ _ _ _ _ _ _ _ Before first use _ _ _ _ _ _ _ _ _ _ _ _ _ _ _ _ Daily use _ _ _ _ _ _ _ _ _ _ _ _ _ _ _ _ _ _ _ 2 3 4 5 6 Hints and tips _ _ _ _ _ _ _ _ _ _ _ _ _ _ _ _ 8 Care and cleaning _ _ _ _ _ _ _ _ _ _ _ _ _ _ 9 Troubleshooting _ _ _ _ _ _ _ _ _ _ _ _ _ _ 10 Technical information _ _ _ _ _ _ _ _ _ _ _ _ 11 Environment concerns _ _ _ _ _ _ _ _ _ _ _ 12 Subject to cha
to change the fuse in the mains plug, use a 13 amp ASTA (BS 1362) fuse. • This appliance complies with the E.E.C. Directives. Use • This appliance is intended to be used in household and similar applications such as: – Staff kitchen areas in shops, offices and other working environments – Farm houses – By clients in hotels, motels and other residential type environments – Bed and breakfast type environments. Warning! Risk of injury. • Do not change the specification of this appliance.
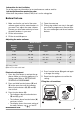
3 Display 4 Indicators 5 Delay button 6 Function buttons Indicators Description Washing phase indicator. Drying phase indicator. End indicator. Salt indicator. This indicator is off while the programme operates. Rinse aid indicator. This indicator is off while the programme operates. Programmes Programme1) 2) 3) 4) Degree of soil Type of load Programme phases Duration (min) Energy (kWh) Water (l) Normal soil Crockery and cutlery Prewash Wash 55 °C Rinses Dry 160 0.
Information for test institutes For all the necessary information for test performance. send an email to: info.test@dishwasher-production.com Write down the product number (PNC) that is on the rating plate. Before first use 1. Make sure that the set level of the water softener agrees with the water hardness in your area. If not, adjust the water softener. Contact your local water authority to know the water hardness in your area. 2. Fill the salt container. 3. Fill the rinse aid dispenser. 4.
Filing the rinse aid dispenser 3 Put 1 litre of water in the salt container (only for the first time). 4 1 2 max 3 5 6 Caution! Water and salt can come out from the salt container when you fill it. Risk of corrosion. To prevent it, after you fill the salt container, start a programme. 4 You can turn the selector of the released quantity between position 1 (lowest quantity) and position 6 (highest quantity). Daily use 1. Open the water tap. 2. Press the on/off button to activate the appliance.
A B 5. Adjust the water softener to the water hardness in your area. 6. Adjust the released quantity of rinse aid. Setting and starting a programme Setting mode 4 3 Fill the detergent dis- If you use a washing penser (A) with deprogramme with pretergent. wash phase, put more detergent in the prewash detergent compartment (B). The appliance must be in setting mode to accept some operations. The appliance is in setting mode when, after the activation: • All the programme indicators are on.
3. Close the appliance door. The countdown starts. • The display shows the countdown of the delay start that decreases with steps of 1 hour. • The wash indicator goes off. • When the countdown is completed, the programme starts. – The delay indicator goes off. – The wash indicator comes on. – The display shows the programme duration. You can set a programme, options and the delay start also with the appliance door closed.
• Do not put in the appliance items made of wood, horn, aluminium, pewter and copper. • Do not put in the appliance items that can absorb water (sponges, household cloths). • Remove remaining food from the items. • Make soft the remaining burned food on the items. • Put hollow items (cups, glasses and pans) with the opening down. • Make sure that cutlery and dishes do not bond together. Mix spoons with other cutlery. • Make sure that glasses do not touch other glasses.
Cleaning the filters Important! An incorrect position of the filters can cause bad washing results and damage to the appliance. Cleaning the spray arm Do these steps to remove and to put the spray arm back: A B 1 2 2 Remove the filters A and B from the bottom of the appliance. 1 2 1 3 4 Fully clean the filters below running water. 3 1 If the holes in the spray arms become clogged, remove remaining parts of soil with a thin pointed object.
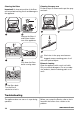
With some problems, the display shows an alarm code: • - The appliance does not fill with water. • • - The anti-flood device is on. Warning! Deactivate the appliance before you do the checks. - The appliance does not drain the water. Problem Possible solution You cannot activate the appliance. Make sure that the mains plug is connected to the mains socket. Make sure that there is not a damaged fuse in the fuse box. The programme does not start. Make sure that the appliance door is closed.
Voltage 220 - 240 V Frequency 50 Hz Water supply pressure Min. / max. (bar / MPa) (0.8 / 0.08 ) / (10 / 1.0 ) Water supply 1) Cold water or hot water2) Capacity Place settings 6 Power consumption Left-on mode 0.99 W Off-mode 0.10 W max. 60 °C 1) Connect the water inlet hose to a water tap with a 3/4'' thread. 2) If the hot water comes from alternative sources of energy, (e.g. solar panels, aeolian energy), use the hot water supply to decrease energy consumption.
www.zanussi.
www.zanussi.
www.zanussi.
156971560-A-272013 www.zanussi.