EN User manual Dishwasher ZDT13012FA
Contents Safety instructions _ _ _ _ _ _ _ _ _ _ _ _ _ _ Control panel _ _ _ _ _ _ _ _ _ _ _ _ _ _ _ _ Programmes _ _ _ _ _ _ _ _ _ _ _ _ _ _ _ _ _ Options _ _ _ _ _ _ _ _ _ _ _ _ _ _ _ _ _ _ _ Before first use _ _ _ _ _ _ _ _ _ _ _ _ _ _ _ Daily use _ _ _ _ _ _ _ _ _ _ _ _ _ _ _ _ _ _ _ 2 3 4 5 5 7 Hints and tips _ _ _ _ _ _ _ _ _ _ _ _ _ _ _ _ 9 Care and cleaning _ _ _ _ _ _ _ _ _ _ _ _ _ _ 9 Troubleshooting _ _ _ _ _ _ _ _ _ _ _ _ _ _ 10 Technical information _ _ _ _ _ _ _ _ _ _ _ 12 Environment concer
• The water inlet hose has a safety valve and a sheath with an inner mains cable. • Do not sit or stand on the open door. • Dishwasher detergents are dangerous. Obey the safety instructions on the detergent packaging. • Do not drink and play with the water in the appliance. • Do not remove the dishes from the appliance until the programme is completed. There can be detergent on the dishes. • The appliance can release hot steam if you open the door while a programme operates.
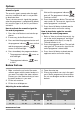
1 On/off button 2 Programme indicators 4 Programme button 5 Delay button 3 Indicators Indicators Description End indicator. Rinse aid indicator. This indicator is off while the programme operates. Salt indicator. This indicator is off while the programme operates. Programmes Programme 1) 2) 3) Degree of soil Type of load Programme phases Duration (min) Energy (kWh) Water (l) Heavy soil Crockery, cutlery, pots and pans Prewash Wash 70 °C Rinses Dry 130 - 150 1.3 - 1.
Options Acoustic signals The acoustic signals operate when the appliance has a malfunction and it is not possible to deactivate them. There is also an acoustic signal that operates when the programme is completed. By default, this acoustic signal is off, but it is possible to activate it. How to activate the acoustic signal for the end of programme 1. Press the on/off button to activate the appliance. 2. If necessary, do the Reset function. 3.
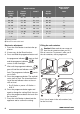
Water softener adjustment Water hardness German degrees (°dH) French degrees (°fH) mmol/l Clarke degrees Level 37 - 42 65 - 75 6.5 - 7.5 46 - 52 8 29 - 36 51 - 64 5.1 - 6.4 36 - 45 7 23 - 28 40 - 50 4.0 - 5.0 28 - 35 6 19 - 22 33 - 39 3.3 - 3.9 23 - 27 5 1) 15 - 18 26 - 32 2.6 - 3.2 18 - 22 4 11 - 14 19 - 25 1.9 - 2.5 13 - 17 3 4 - 10 7 - 18 0.7 - 1.8 5 - 12 2 <4 <7 < 0.7 <5 12) 1) Factory position. 2) Do not use salt at this level. Electronic adjustment 1.
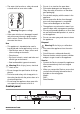
Filling the rinse aid dispenser 3 1 4 1 2 2 2 1 4 3 1 2 To adjust the released quantity of rinse aid, turn the selector between position 1 (lowest quantity) and position 4 (highest quantity). Daily use 1. Open the water tap. 2. Press the on/off button to activate the appliance. • If the salt indicator is on, fill the salt container. • If the rinse aid indicator is on, fill the rinse aid dispenser. 3. Load the baskets. 4. Add the detergent. 5.
2. Make sure that the salt container and the rinse aid dispenser are full. 3. Start the shortest programme with a rinsing phase, without detergent and without dishes. 4. Adjust the water softener to the water hardness in your area. 5. Adjust the released quantity of rinse aid. Cancelling the delay start while the countdown operates Setting and starting a programme Make sure that there is detergent in the detergent dispenser before you start a new programme.
Hints and tips The water softener Hard water contains a high quantity of minerals that can cause damage to the appliance and bad washing results. The water softener neutralises these minerals. The dishwasher salt keeps the water softener clean and in good conditions. It is important to set the right level of the water softener. This makes sure that the water softener uses the correct quantity of dishwasher salt and water.
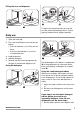
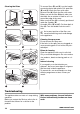
Cleaning the filters To remove filters (B) and (C), turn the handle counterclockwise and remove. Pull apart filter (B) and (C). Wash the filters with water. Remove filter (A). Wash the filter with water. Before you put the filter (A) back, make sure that there are no residues of food or soil in or around the edge of the sump. Make sure that filter (A) is correctly positioned under the 2 guides (D). Assemble filters (B) and (C). Put them back in filter (A). Turn the handle clockwise until it locks.
Alarm code Problem • The end indicator flashes 1 time intermittently. • Acoustic signal sounds 1 time intermittently. The appliance does not fill with water. • The end indicator flashes 2 times intermittently. • Acoustic signal sounds 2 times intermittently. The appliance does not drain the water. • The end indicator flashes 3 times intermittently. • Acoustic signal sounds 3 times intermittently. The anti-flood device is on. Warning! Deactivate the appliance before you do the checks.
Refer to ‘HINTS AND TIPS’ for other possible causes. Technical information Dimensions Width / Height / Depth (mm) Electrical connection Refer to the rating plate. Voltage 596 / 818 - 898 / 555 220-240 V Frequency 50 Hz Water supply pressure Min. / max. (bar / MPa) Water supply 1) Cold water or hot water2) (0.5 / 0.05 ) / (8 / 0.8 ) Capacity Place settings 12 Power consumption Left-on mode 0.50 W Off-mode 0.50 W max.
www.zanussi.
www.zanussi.
www.zanussi.
156970830-A-342013 www.zanussi.