User Manual GETTING STARTED? EASY.
SAFETY INFORMATION Before the installation and use of the appliance, carefully read the supplied instructions. The manufacturer is not responsible for any injuries or damages that are the result of incorrect installation or usage. Always keep the instructions in a safe and accessible location for future reference.
• • • • • • Put the cutlery in the cutlery basket with the sharp ends pointing down or put them in the cutlery drawer in a horizontal position with the sharp edges down. Do not leave the appliance with the open door unattended to avoid stepping accidentally onto it. Before any maintenance operation, deactivate the appliance and disconnect the mains plug from the socket. Do not use high pressure water sprays and/or steam to clean the appliance.
• Do not put flammable products or items that are wet with flammable products in, near or on the appliance. SERVICE • Contact the Authorised Service Centre to repair the appliance. We recommend only the use of original spare parts. • When you contact the Authorised Service Centre, ensure that you have the following information that is available on the rating plate. Model : PNC : Serial Number : DISPOSAL WARNING! Risk of injury or suffocation. • • • 4 Disconnect the appliance from the mains supply.
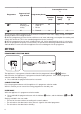
CONTROL PANEL 2 1 5 1 On/off button 2 Programme indicators 3 4 4 Programme button 5 Delay button 3 Indicators INDICATORS End indicator. Salt indicator. It is always off while the programme operates. Rinse aid indicator. It is always off while the programme operates. PROGRAMMES Consumption values 1) Programme Degree of soil Type of load Programme phases Duration (min) 2) Energy (kWh) Water (l) Normal soil Crockery and cutlery • • • • Prewash Wash 50 °C Rinses Dry 227 1.
Consumption values 1) Programme Degree of soil Type of load Programme phases Duration (min) 3) 4) Fresh soil Crockery and cutlery • All Energy (kWh) Water (l) 30 0.8 10 • Wash 60 °C or 65 °C Rinses • Prewash 14 0.1 5 1) The pressure and the temperature of the water, the variations of the mains supply, the options and the quantity of dishes can change the values.
As the appliance stores the saved settings, there is no need to configure it before every cycle. ADJUSTING THE WATER SOFTENER 1. While the appliance is in user mode, wait until the indicators • The indicator and are off. still flashes. • The current setting is indicated by the number of flashes of the indicator (e.g. 5 flashes + pause + 5 flashes... = level 5). 2. Press the programme button to change the setting. Each pressing of the programme button increases the level number.
By default, AirDry is activated with all programmes excluding deactivate it. (if applicable) but it is possible to While the drying phase operates, the device opens the appliance door. The door is then kept ajar. While the appliance is in user mode, within about 5 seconds: 1. Press the programme button twice. • The indicators and • The indicator flashes. 2. Wait until the indicators are on. and are off. • The indicator is on = AirDry is activated. 3.
Before the first use, put one litre of water in the salt container. CAUTION! Water and salt can come out of the salt container during filling. To prevent corrosion, start a programme immediately after filling the salt container. ADDING RINSE AID 1 43 21 2 The rinse aid helps to dry the dishes without streaks and stains. It is automatically released during the hot rinse phase. DAILY USE 1. Open the water tap. 2. Press the on/off button to activate the appliance.
ADDING MULTI-TABLETS 1 30 20 2 • • Do not fill the salt container and the rinse aid dispenser. Set the rinse aid dispenser to the lowest position. SETTING AND STARTING A PROGRAMME Starting a programme 1. Keep the appliance door ajar. 2. Press the on/off button to activate the appliance. Make sure that the appliance is in programme selection mode. 3. Press the programme button until the indicator of the chosen programme is flashing. 4. Close the appliance door to start the programme. Option delay 1.
HINTS AND TIPS GENERAL The following hints will ensure optimal cleaning and drying results in daily use and also help to protect the environment. • Remove larger residues of food from the dishes into the waste bin. • Do not pre-rinse dishes by hand. When needed, use the prewash programme (if available) or select a programme with a prewash phase. • Always use the whole space of the baskets.
UNLOADING THE BASKETS 1. Let the tableware cool down before you remove it from the appliance. Hot items can be easily damaged. 2. First remove items from the lower basket, then from the upper basket. At the end of the program water can still remain on the sides and on the door of the appliance. CARE AND CLEANING WARNING! Before maintenance, deactivate the appliance and disconnect the mains plug from the main socket. Dirty filters and clogged spray arms decrease the washing results.
Follow carefully the instructions on the packaging of the product. TROUBLESHOOTING If the appliance does not start or it stops during operation, before you contact an Authorised Service Centre, check if you can solve the problem by yourself with the help of the information in the table. With some problems the end indicator flashes intermittently indicating a malfunction. The majority of problems that can occur can be solved without the need to contact an Authorised Service Centre.
Problem and alarm code Possible cause and solution The program lasts too long. • If the delayed start option is set, cancel the delay setting or wait for the end of the countdown. Small leak from the appliance door. • The appliance is not levelled. Loosen or tighten the adjustable feet (if applicable). The appliance door is not centred on the tub. Adjust the rear foot (if applicable). • The appliance door is difficult to close. • • Rattling/knocking sounds from inside the appliance.
Problem Possible cause and solution There are whitish streaks or bluish layers on glasses and dishes. • There are stains and dry water drops on glasses and dishes. • The dishes are wet. • • • • • • • The release quantity of rinse aid is too much. Adjust the rinse aid level to a lower level. The quantity of detergent is too much. The released quantity of rinse aid is not sufficient. Adjust the rinse aid level to a higher level. The quality of the rinse aid can be the cause.
Refer to "Before first use", "Daily use" or "Hints and tips" for other possible causes. TECHNICAL INFORMATION Dimensions Width / height / depth (mm) 596 / 818-898 / 550 Electrical connection 1) Voltage (V) 220 - 240 Frequency (Hz) 50 Water supply pressure Min. / max. bar (MPa) 0.5 (0.05) / 8 (0.8) Water supply Cold water or hot water 2) max 60 °C Capacity Place settings 13 Power consumption Left-on mode (W) 5.0 Power consumption Off-mode (W) 0.
156914920-A-202017 WWW.ZANUSSI.