NL EN FR DE Gebruiksaanwijzing User manual Notice d'utilisation Benutzerinformation Grill Grill Gril Rost ZEG3915 2 11 19 29
Inhoud Veiligheidsinformatie _ _ _ _ _ _ _ _ _ _ _ _ _ _ _ _ Montage _ _ _ _ _ _ _ _ _ _ _ _ _ _ _ _ _ _ _ _ _ _ Beschrijving van het product _ _ _ _ _ _ _ _ _ _ _ _ _ Bediening _ _ _ _ _ _ _ _ _ _ _ _ _ _ _ _ _ _ _ _ _ _ Nuttige aanwijzingen en tips _ _ _ _ _ _ _ _ _ _ _ _ _ 2 3 5 6 6 Onderhoud en reiniging _ _ _ _ _ _ _ _ _ _ _ _ _ _ _ 7 Problemen oplossen _ _ _ _ _ _ _ _ _ _ _ _ _ _ _ _ 8 Technische gegevens _ _ _ _ _ _ _ _ _ _ _ _ _ _ _ _ 9 Milieubescherming _ _ _ _ _ _ _ _ _ _ _ _ _ _ _ _ 10 Wijzigin
bindingen en het apparaat of heet kookgerei. Voorkom dat elektrische verbindingen verstrikt raken. • Leg nooit aluminiumfolie over welk deel van het apparaat ook. Voorkomen van schade aan het apparaat Verwijdering van het apparaat. • Laat geen zure vloeistoffen, zoals azijn, citroensap of kalkverwijderingsmiddelen op de kookplaat komen. Deze veroorzaken matte plekken • Leg geen natte deksels op de kookzones en laat hete pannen niet afkoelen op de kookzones. Anders kan er condens en roest ontstaan.
• Gebruik de juiste voedingskabel en vervang de beschadigde voedingskabel door een speciale kabel. Neem contact op met onze serviceafdeling. Het apparaat moet met een poolschakelaar op een elektrisch circuit zijn aangesloten, met een contactopening van minstens 3 mm, zodat het apparaat te allen tijde uitgeschakeld kan worden. U dient gebruik te maken van de juiste isolatie-toestellen: stroomonderbrekers, zekeringen (schroefzekeringen moeten uit de houder worden verwijderd), aardlekstrips en contacten.
en het keukenmeubel moet voorzien zijn van ventilatiegaten om een continue luchttoevoer te kunnen garanderen. Om veiligheidsredenen en om een gemakkelijke verwijdering van de oven uit het meubel mogelijk te maken, moeten de elektrische aansluitingen van de kookplaat en de oven afzonderlijk geïnstalleerd worden.
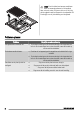
Bediening Voordat u het apparaat voor de eerste keer gebruikt Verwarm de grillplaat voor op de maximale warmte-instelling gedurende 15 minuten. Deze instelling kan een geur1 tje en rook veroorzaken. Dit is normaal. Zorg dat er voldoende luchtcirculatie is. 3 2 4 1. 2. Verwijder alle onderdelen onder de gietijzeren grillplaat 1 . De plastic zak met de gebruikershandleiding 2 en de afsluitstrip voor de installatieprocedure.
Voorbeelden van kooktoepassingen De gegevens in de volgende tabel dienen slechts als richtlijn.
Let op! U kunt de stalen beschermpan verwijderen onder het verwarmingselement om het apparaat beter schoon te maken. Zorg ervoor dat u ze op de juiste plek terugplaatst nadat het apparaat is schoongemaakt. Dit is belangrijk voor de juiste werking van het apparaat. Problemen oplossen Probleem Mogelijke oorzaak en oplossing Het apparaat werkt helemaal niet. • Controleer de zekering van de stroomvoorziening in de stoppenkast van het huis.
Als er een storing optreedt, probeer dan eerst zelf een oplossing voor het probleem te vinden. Als u niet zelf het probleem kunt verhelpen, neem dan contact op met uw verkoper of de serviceafdeling. Als u het apparaat verkeerd heeft gebruikt, of als de installatie niet is uitgevoerd door een erkende mon1 teur, dan is het bezoek van de klantenservicemonteur of van uw leverancier mogelijk niet gratis, zelfs niet in de garantieperiode.
Milieubescherming Het symbool op het product of op de verpakking wijst erop dat dit product niet als huishoudafval mag worden behandeld, maar moet worden afgegeven bij een verzamelpunt waar elektrische en elektronische apparatuur wordt gerecycled. Als u ervoor zorgt dat dit product op de juiste manier wordt verwijderd, voorkomt u mogelijke negatieve gevolgen voor mens en milieu die zich zouden kunnen voordoen in geval van verkeerde afvalverwerking.
Contents Safety information _ _ _ _ _ _ _ _ _ _ _ _ _ _ _ _ _ Installation _ _ _ _ _ _ _ _ _ _ _ _ _ _ _ _ _ _ _ _ Product description _ _ _ _ _ _ _ _ _ _ _ _ _ _ _ _ Operation _ _ _ _ _ _ _ _ _ _ _ _ _ _ _ _ _ _ _ _ _ Helpful hints and tips _ _ _ _ _ _ _ _ _ _ _ _ _ _ _ 11 12 14 15 15 Care and cleaning _ _ _ _ _ _ _ _ _ _ _ _ _ _ _ _ _ What to do if… _ _ _ _ _ _ _ _ _ _ _ _ _ _ _ _ _ _ Technical data _ _ _ _ _ _ _ _ _ _ _ _ _ _ _ _ _ _ _ Environment concerns _ _ _ _ _ _ _ _ _ _ _ _ _ _ _ 16 17 18 18 Su
How to prevent a damage to the appliance • Do not let acid liquids such as vinegar, lemon juice or limescale removing agents to touch the hob. This will cause matt patches • Do not place wet pan lids on the hotplates and do not let hot pans to cool on the hotplates. If not condensation and rust can form. • Do not let cookware boil dry to prevent the damage to cookware and hotplate. • Do not use the solid hotplate with empty cookware or without cookware.
Electrical connection • Ground the appliance according to safety precautions. • Make sure that the rated voltage and type of power on the rating plate agree with the voltage and the power of the local power supply. • This appliance is supplied with a mains cable. It has to be supplied with a correct plug, able to support the load marked on the rating plate. The plug has to be fitted in a correct socket.
Kitchen unit with oven The hob recess dimensions must obey the indication and the kitchen unit must be equipped with vents to let a continuous supply of air. The electrical connection of the hob and the oven must be installed separately for safety reasons and to let easy remove oven from the unit.
Operation Before first use Pre-heat the broiler on the maximum heat setting for 15 minutes. This operation can cause an odour and smoke to 1 occur. This is normal. Make sure that the airflow is sufficient. 3 2 4 1. 2. Remove all parts under the cast iron broiler 1 . The plastic bag with the user manual 2 and the seal stripe for the installation procedure.
Type of food Quantity (g) Steak 600 Pork chops Sauages Pieces of food Heat setting The minutes of pre-heat Cooking time (in minutes) Upper side Lower side 10-12 6-8 - 5-6 5 500 - max 5 5-6 5-6 450 3-4 5-6 5 10-12 6-8 Shish kebab 400 2 max 5 6-8 5-6 Hamburger 400 2 5 5 8-10 5-6 Toast - 3 6 5 1-2 1-2 Bread - 3 6 5 1-3 1-3 Eggplant - 3 slices max 5 4-5 4-5 Tomatoes - 4 max 5 8-10 5-6 Information on acrylamides Important! According to the newe
Caution! You can remove the steel protection pan under the heating element to clean the appliance more accurate. When you do that make sure that you put in its correct position after you clean the appliance. This is most important for correct operation of the appliance. What to do if… Problem Possible cause and remedy The appliance does not operate. • Examine the fuse in the electrical system of the house in the fuse box. If the fuses blow again and again, speak to a qualified electrician.
These data are necessary to help you quickly and correctly. These data are available on the supplied rating plate. • Model description ................. • Product number (PNC) ................. • Serial Number (S.N.) ................. Use the original spare parts only. They are available at Service Force Centre and approved spare parts shops.
Sommaire Consignes de sécurité _ _ _ _ _ _ _ _ _ _ _ _ _ _ _ Installation _ _ _ _ _ _ _ _ _ _ _ _ _ _ _ _ _ _ _ _ Description de l'appareil _ _ _ _ _ _ _ _ _ _ _ _ _ _ Fonctionnement _ _ _ _ _ _ _ _ _ _ _ _ _ _ _ _ _ _ Conseils utiles _ _ _ _ _ _ _ _ _ _ _ _ _ _ _ _ _ _ _ 19 20 23 23 24 Entretien et nettoyage _ _ _ _ _ _ _ _ _ _ _ _ _ _ _ En cas d'anomalie de fonctionnement _ _ _ _ _ _ _ _ Caractéristiques techniques _ _ _ _ _ _ _ _ _ _ _ _ En matière de protection de l'environnement _ _ _ _ _ 25 26 27 2
• Ne placez jamais de produits inflammables ou d'éléments imprégnés de produits inflammables et/ou d'objets susceptibles de fondre (en plastique ou en aluminium) sur ou à proximité de l'appareil. Risque d'explosion ou d'incendie. • N'utilisez que les accessoires fournis avec l'appareil. • Soyez prudent lorsque vous branchez l'appareil à des prises électriques situées à proximité. Veillez à ce que les câbles d'alimentation ne touchent pas l'appareil ou des récipients chauds.
• Mettez la borne d'alimentation hors tension. • Assurez une protection contre les contacts électriques pour une installation conforme. • Des connexions desserrées ou incorrectes peuvent être à l’origine d’une surchauffe des bornes. • L'installation et le raccordement électrique de votre appareil ne doivent être effectués que par un professionnel qualifié. • Utilisez une pince pour détendre le câble.
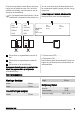
b) Espace pour les branchements A B A) joint fourni B) équerres fournies Possibilités d'insertion Élément de cuisine avec porte Le panneau installé sous la table de cuisson doit être facilement amovible et facile d'accès au cas où une intervention technique serait nécessaire. Au-dessus d'un four Les dimensions de la niche d'encastrement de la table de cuisson doivent être conformes aux indications et l'élément de cuisine doit être équipé d'aérations pour assurer un apport d'air continu.
Description de l'appareil Vue d'ensemble 1 5 3 2 4 1 Gril en fonte 2 Voyant de mise sous tension 3 Manette 4 Résistance 5 Protection en acier Manettes de commande des zones de cuisson électriques Symbole Fonction 0 position arrêt Symbole Fonction 1 température minimum max température maximum Fonctionnement Avant la première utilisation Préchauffez le gril sur le niveau de cuisson maximal pendant 15 minutes. Il peut se dégager une odeur et une fu- www.zanussi.com mée désagréables.
1 3 2 4 1. 2. Retirez toutes les pièces en dessous du gril en fonte 1 . Le sachet en plastique contenant la notice d'utilisation 2 et le joint d'étanchéité pour la procédure d'installation. La feuille de polyphane 3 et la couche protectrice de la protection en acier 4 . Remontez la protection en acier et le gril en fonte dans leur position d'origine. 3. Mettez le gril vide en fonctionnement environ 10 minutes sur la puissance maximale.
Type d'aliment Quantité (g) Portions d'aliment Niveau de cuisson Préchauffage (en minutes) Temps de cuisson (en minutes) Face supérieure Face inférieure Steak 600 - 5-6 5 10-12 6-8 Côtelettes de porc 500 - max 5 5-6 5-6 Saucisses 450 3-4 5-6 5 10-12 6-8 Chiche kébab 400 2 max 5 6-8 5-6 Steak haché 400 2 5 5 8-10 5-6 Toasts - 3 6 5 1-2 1-2 Pain - 3 6 5 1-3 1-3 Aubergine - 3 tranches max 5 4-5 4-5 Tomates - 4 max 5 8-10 5-6 Informations sur
Attention Vous pouvez retirer la protection en acier située sous la résistance afin de nettoyer l'appareil plus profondément. Assurez-vous de bien la remettre en place une fois le nettoyage terminé. Cela est essentiel au bon fonctionnement de l'appareil. En cas d'anomalie de fonctionnement Problème Cause et solution possibles L'appareil ne fonctionne pas du tout. • Vérifiez le fusible du système électrique de l'habitation dans la boîte à fusibles.
Certaines anomalies de fonctionnement peuvent dépendre d'opérations d'entretien non correctes ou d'oubli et peuvent être résolues à l'aide des indications fournies dans le tableau, sans faire appel à un service après-vente. Si l'anomalie persiste, contactez votre magasin vendeur ou votre service après-vente.
En matière de protection de l'environnement Le symbole sur le produit ou son emballage indique que ce produit ne peut être traité comme déchet ménager. Il doit être remis au point de collecte dédié à cet effet (collecte et recyclage du matériel électrique et électronique). En procédant à la mise au rebut de l'appareil dans les règles de l’art, nous préservons l'environnement et notre sécurité, s’assurant ainsi que les déchets seront traités dans des conditions optimum.
Inhalt Sicherheitshinweise _ _ _ _ _ _ _ _ _ _ _ _ _ _ _ _ Montage _ _ _ _ _ _ _ _ _ _ _ _ _ _ _ _ _ _ _ _ _ _ Gerätebeschreibung _ _ _ _ _ _ _ _ _ _ _ _ _ _ _ _ Betrieb _ _ _ _ _ _ _ _ _ _ _ _ _ _ _ _ _ _ _ _ _ _ Praktische Tipps und Hinweise _ _ _ _ _ _ _ _ _ _ _ 29 30 33 33 34 Reinigung und Pflege _ _ _ _ _ _ _ _ _ _ _ _ _ _ _ Was tun, wenn … _ _ _ _ _ _ _ _ _ _ _ _ _ _ _ _ _ Technische Daten _ _ _ _ _ _ _ _ _ _ _ _ _ _ _ _ _ Umwelttipps _ _ _ _ _ _ _ _ _ _ _ _ _ _ _ _ _ _ _ _ 35 36 37 38 Änderungen
oder Aluminium) auf das Gerät oder in der Nähe des Geräts. Es besteht Explosions- und Brandgefahr. • Verwenden Sie ausschließlich das mit dem Gerät gelieferte Zubehör. • Gehen Sie beim elektrischen Anschluss des Geräts sorgsam vor. Achten Sie darauf, dass elektrische Leitungen weder das Gerät noch heißes Kochgeschirr berühren können. Achten Sie darauf, dass sich keine elektrischen Kabel verheddern.
• Achten Sie darauf, dass an der Netzanschlussklemme keine Spannung anliegt. • Der Berührungsschutz muss durch fachgerechten Einbau gewährleistet sein. • Lockere und unsachgemäße Steckverbindungen können die Klemme überhitzen. • Klemmverbindungen müssen fachgerecht von einem Fachmann ausgeführt werden. • Am Kabel ist eine Zugentlastung erforderlich. • Verwenden Sie das richtige Netzanschlusskabel. Ersetzen Sie ein defektes Netzkabel nur durch ein geeignetes Kabel. Wenden Sie sich an Ihren Kundendienst.
b) Raum für Anschlüsse A B A) Mitgelieferte Dichtung B) Mitgelieferte Halterungen Einbaumöglichkeiten Unterbaumöbel mit Tür Die unter dem Kochfeld eingebaute Platte muss sich leicht entfernen lassen und einen einfachen Zugang im Fall einer notwendigen Reparatur ermöglichen. Unterbaumöbel mit Backofen Die Abmessungen der Kochfeldaussparung müssen den Angaben entsprechen, und die Unterbaumöbel müssen mit Lüftungsschlitzen versehen werden, um eine ständige Luftzufuhr zu gewährleisten.
Gerätebeschreibung Allgemeine Übersicht 1 5 3 2 4 1 Grillrost aus Gusseisen 2 Betriebskontrolllampe 3 Einstellknopf 4 Heizelement 5 Stahlschutzplatte Kochzonen-Schalter Symbol Funktion Symbol Funktion 1 Niedrigste Kochstufe 0 Position AUS max Höchste Kochstufe Betrieb Vor der ersten Inbetriebnahme Heizen Sie den Grillrost ca. 15 Minuten bei Maximaltemperatur auf. Dabei kann es möglicherweise zur Geruch- www.zanussi.com und Rauchentwicklung kommen. Das ist normal.
3 2 1 4 1. 2. 3. Lassen Sie den leeren Grill ca. 10 Minuten lang bei Maximaltemperatur laufen. Drehen Sie zum Einschalten und Erhöhen der Kochstufe den Bedienknopf im Uhrzeigersinn. Drehen Sie zum Verringern der Kochstufe den Bedienknopf gegen den Uhrzeigersinn. Drehen Sie zum Ausschalten den entsprechenden Einstellknopf auf 0. Entfernen Sie alle unter dem Grillrost 1 befindlichen Teile. Die Plastiktasche mit dem Benutzerhandbuch 2 und den Dichtungsstreifen für die Montage.
Lebensmittel Menge (g) Stückzahl Kochstufe Vorheizzeit (min) Garzeit (min) Oberseitig Unterseitig Schweinekotelett 500 - max. 5 5-6 5-6 Würstchen 450 3-4 5-6 5 10-12 6-8 Grillspieße 400 2 max. 5 6-8 5-6 Hamburger 400 2 5 5 8-10 5-6 Toast - 3 6 5 1-2 1-2 Brot - 3 6 5 1-3 1-3 Auberginen - 3 Scheiben max. 5 4-5 4-5 Tomaten - 4 max.
Vorsicht! Die Stahlschutzplatte unter dem Heizelement kann entfernt werden, um gründlichere Reinigungsergebnisse zu erzielen. Wenn Sie die Stahlschutzplatte für die Reinigung entfernen, stellen Sie sicher, dass Sie sie wieder ordnungsgemäß aufsetzen. Davon hängt der ordnungsgemäße Gerätebetrieb ab. Was tun, wenn … Problem Mögliche Ursache und Abhilfe Das Gerät funktioniert nicht. • Sehen Sie im Sicherungskasten nach, ob eine Sicherung ausgelöst hat.
Wenn ein Problem vorliegt, versuchen Sie zunächst, die Ursache des Problems herauszufinden und das Problem selbst zu beheben. Wenn Sie das Problem nicht selbst lösen können, wenden Sie sich an Ihren Händler oder an den Kundendienst. sen wurde, kann auch während der Garantiezeit für den Besuch eines Kundendiensttechnikers oder Händlers eine Gebühr anfallen.
Umwelttipps Das Symbol auf dem Produkt oder seiner Verpackung weist darauf hin, dass dieses Produkt nicht als normaler Haushaltsabfall zu behandeln ist, sondern an einem Sammelpunkt für das Recycling von elektrischen und elektronischen Geräten abgegeben werden muss. Durch Ihren Beitrag zum korrekten Entsorgen dieses Produkts schützen Sie die Umwelt und die Gesundheit Ihrer Mitmenschen. Umwelt und Gesundheit werden durch falsches Entsorgen gefährdet.
397233901-A-462011 www.zanussi.