FREEZER ZFA 96 W © Electrolux plc 2002 INSTRUCTION BOOKLET 2222 229-11
IMPORTANT SAFETY INFORMATION It is most important that this instruction book should be retained with the appliance for future reference. Should the appliance be sold or transferred to another owner, or should you move house and leave the appliance, always ensure that the book is left with the appliance in order that the new owner can get to know the functioning of the appliance and the relevant safety information. This information has been provided in the interest of safety.
CONTENTS Instructions for the User Important Safety Information 2 Instructions for the Installer Description of the Appliance 4 Technical Specification 13 Operation 5 Installation 14 Before use 5 Positioning 14 Control panel 5 Rear Spacers 14 Start your appliance 5 Electrical Connection 15 Temperature control 5 5 Door Reversal 16 Freezing fresh food Frozen food storage 6 Thawing 6 Making ice cubes 6 Normal operating sounds 7 Cold accumulators 7 Freezing calendar 7 Hint
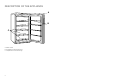
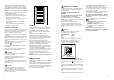
DESCRIPTION OF THE APPLIANCE A B C A - Freezer controls B - Compartments for freezing fresh foods C - Compartments for frozen food storage 4
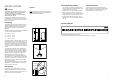
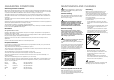
OPERATION Door reversal directions 1. Disconnect from the electricity supply. F F F 3. Remove the ventilation grill (D). 4. remove the bottom hinge (E) by unscrewing its three fixing screws; 5. Slide out the fridge door from pin (G), unscrew the latter and then refit it on the opposite side; Control Panel E E 2. Gently lay the fridge on its back with the top held away from the floor by 5-8 cm (2-3 inches) of packing; D A BC D F PR18 6.
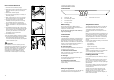
In order to freeze the quantity indicated on the rating plate, arrange the food directly in contact with the cooling surfaces. If the food is frozen in the baskets, the maximum quantity that can be frozen is slightly less. Once the food is completely frozen (which could take up to 24 hours) press again the fast freeze switch; the yellow light (B) goes off.
INSTALLATION Normal Operating Sounds Cold accumulators Important • It must be possible to disconnect the appliance from the mains power supply; the plug must therefore be easily accessible after installation. You may hear faint gurgling or bubbling sounds when the refrigerant is pumped through the coils or tubing at the rear, to the cooling plate/evaporator or to the fixed freezer shelves.
TECHNICAL SPECIFICATIONS HINTS AND TIPS Food Storage In the Event of a Power Failure To obtain the best performance from your freezer If there is a power failure during the storage of frozen foods, keep the door closed. If the temperature within your freezer should rise, do not refreeze the food without checking its condition. The following guidelines should assist you: Ice-cream: Once thawed should be discarded. Fruits & Vegetables: If soft should be cooked and used up.
GUARANTEE CONDITIONS Standard guarantee conditions We, Zanussi, undertake that if within 12 months of the date of the purchase this Zanussi appliance or any part thereof is proved to be defective by reason only of faulty workmanship or materials, we will, at our option repair or replace the same FREE OF CHARGE for labour, materials or carriage on condition that: The appliance has been correctly installed and used only on the electricity supply stated on the rating plate.
SOMETHING NOT WORKING If the appliance is not working correctly, please carry out the following checks before contacting your local Zanussi Service Force Centre Symptom Solution No power to the appliance Check there is power at the socket. Check there is not a power cut by checking the household lights. Check the fuse has not blown. The temperature in the freezer section is too high Check the thermostat control knob is turned to the correct setting relative to ambient conditions.
SOMETHING NOT WORKING If the appliance is not working correctly, please carry out the following checks before contacting your local Zanussi Service Force Centre Symptom Solution No power to the appliance Check there is power at the socket. Check there is not a power cut by checking the household lights. Check the fuse has not blown. The temperature in the freezer section is too high Check the thermostat control knob is turned to the correct setting relative to ambient conditions.
GUARANTEE CONDITIONS Standard guarantee conditions We, Zanussi, undertake that if within 12 months of the date of the purchase this Zanussi appliance or any part thereof is proved to be defective by reason only of faulty workmanship or materials, we will, at our option repair or replace the same FREE OF CHARGE for labour, materials or carriage on condition that: The appliance has been correctly installed and used only on the electricity supply stated on the rating plate.
TECHNICAL SPECIFICATIONS HINTS AND TIPS Food Storage In the Event of a Power Failure To obtain the best performance from your freezer If there is a power failure during the storage of frozen foods, keep the door closed. If the temperature within your freezer should rise, do not refreeze the food without checking its condition. The following guidelines should assist you: Ice-cream: Once thawed should be discarded. Fruits & Vegetables: If soft should be cooked and used up.
INSTALLATION Normal Operating Sounds Cold accumulators Important • It must be possible to disconnect the appliance from the mains power supply; the plug must therefore be easily accessible after installation. You may hear faint gurgling or bubbling sounds when the refrigerant is pumped through the coils or tubing at the rear, to the cooling plate/evaporator or to the fixed freezer shelves.
In order to freeze the quantity indicated on the rating plate, arrange the food directly in contact with the cooling surfaces. If the food is frozen in the baskets, the maximum quantity that can be frozen is slightly less. Once the food is completely frozen (which could take up to 24 hours) press again the fast freeze switch; the yellow light (B) goes off.
OPERATION Door reversal directions 1. Disconnect from the electricity supply. F F F 3. Remove the ventilation grill (D). 4. remove the bottom hinge (E) by unscrewing its three fixing screws; 5. Slide out the fridge door from pin (G), unscrew the latter and then refit it on the opposite side; Control Panel E E 2. Gently lay the fridge on its back with the top held away from the floor by 5-8 cm (2-3 inches) of packing; D A BC D F PR18 6.
CONTENTS Instructions for the User Important Safety Information 2 Instructions for the Installer Description of the Appliance 4 Technical Specification 13 Operation 5 Installation 14 Before use 5 Positioning 14 Control panel 5 Rear Spacers 14 Start your appliance 5 Electrical Connection 15 Temperature control 5 5 Door Reversal 16 Freezing fresh food Frozen food storage 6 Thawing 6 Making ice cubes 6 Normal operating sounds 7 Cold accumulators 7 Freezing calendar 7 Hint
IMPORTANT SAFETY INFORMATION It is most important that this instruction book should be retained with the appliance for future reference. Should the appliance be sold or transferred to another owner, or should you move house and leave the appliance, always ensure that the book is left with the appliance in order that the new owner can get to know the functioning of the appliance and the relevant safety information. This information has been provided in the interest of safety.
DESCRIPTION OF THE APPLIANCE A B C A - Freezer controls B - Compartments for freezing fresh foods C - Compartments for frozen food storage 4
FREEZER ZFA 96 W © Electrolux plc 2002 INSTRUCTION BOOKLET 2222 229-11