EN ES User manual Manual de instrucciones Freezer Congelador ZFU923FW 2 11
Contents Safety information _ _ _ _ _ _ _ _ _ _ _ _ _ _ _ _ _ _ Control panel _ _ _ _ _ _ _ _ _ _ _ _ _ _ _ _ _ _ _ _ First use _ _ _ _ _ _ _ _ _ _ _ _ _ _ _ _ _ _ _ _ _ _ Daily use _ _ _ _ _ _ _ _ _ _ _ _ _ _ _ _ _ _ _ _ _ _ Helpful Hints and Tips _ _ _ _ _ _ _ _ _ _ _ _ _ _ _ _ 2 4 4 4 5 Care and cleaning _ _ _ _ _ _ _ _ _ _ _ _ _ _ _ _ _ _ 6 What to do if… _ _ _ _ _ _ _ _ _ _ _ _ _ _ _ _ _ _ _ 6 Technical data _ _ _ _ _ _ _ _ _ _ _ _ _ _ _ _ _ _ _ 8 Installation _ _ _ _ _ _ _ _ _ _ _ _ _ _ _ _ _ _ _ _
2. Make sure that the power plug is not squashed or damaged by the back of the appliance. A squashed or damaged power plug may overheat and cause a fire. 3. Make sure that you can come to the mains plug of the appliance. 4. Do not pull the mains cable. 5. If the power plug socket is loose, do not insert the power plug. There is a risk of electric shock or fire. 6. You must not operate the appliance without the lamp cover1) of interior lighting. • This appliance is heavy.
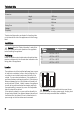
Control panel 1 2 3 1 Alarm Light 2 Fast Freeze Indicator Acoustic alarm reset switch 3 Fast Freeze Switch 4 Pilot Light 5 Temperature Regulator 4 5 Switching on However, the exact setting should be chosen keeping in mind that the temperature inside the appliance depends on: • room temperature • how often the door is opened • the quantity of food stored • the location of the appliance. Insert the plug into the wall socket. Turn the Temperature regulator clockwise to a medium setting.
Place the fresh food to be frozen in the two top compartments. The maximum amount of food that can be frozen in 24 hours is specified on the rating plate, a label located on the inside of the appliance. The freezing process lasts 24 hours: during this period do not add other food to be frozen. After 24 hours, when the freezing process is completed, return to the required temperature (see "Temperature regulation").
Care and cleaning Caution! Unplug the appliance before carrying out any maintenance operation. This appliance contains hydrocarbons in its cooling unit; maintenance and recharging must therefore only be carried out by authorized technicians. Periodic cleaning The equipment has to be cleaned regularly: • clean the inside and accessories with lukewarm water and some neutral soap. • regularly check the door seals and wipe clean to ensure they are clean and free from debris. • rinse and dry thoroughly.
Problem Possible cause Solution The Alarm light flashes. The temperature in the freezer is too high. Refer to "Excessive Temperature Alarm" The compressor operates continually. The temperature is not set correctly. Set a higher temperature. The door is not closed correctly. Refer to "Closing the door". The door has been opened too frequently. Do not keep the door open longer than necessary. The product temperature is too high.
Technical data Dimension Height 1600 mm Width 600 mm Depth 645 mm Rising Time 20 h Voltage 230 V Frequency 50 Hz The technical information are situated in the rating plate on the internal left side of the appliance and in the energy label. Installation Caution! Read the "Safety Information" carefully for your safety and correct operation of the appliance before installing the appliance.
Electrical connection Door reversibility Before plugging in, ensure that the voltage and frequency shown on the rating plate correspond to your domestic power supply. The appliance must be earthed. The power supply cable plug is provided with a contact for this purpose. If the domestic power supply socket is not earthed, connect the appliance to a separate earth in compliance with current regulations, consulting a qualified electrician.
A B 7. Unscrew the pin (A) and screw it on the opposite side. 8. Remove the cap (B) and position it on the opposite side. 9. Screw the lower hinges. 10. Refit the plinth. Do a final check to make sure that: • All screws are tightened. • The door opens and closes correctly. If the ambient temperature is cold (i.e. in Winter), the gasket may not fit perfectly to the cabinet. In that case, wait for the natural fitting of the gasket. 11. Stand the appliance upright. 12.
Índice de materias Información sobre seguridad _ _ _ _ _ _ _ _ _ _ _ _ Panel de mandos _ _ _ _ _ _ _ _ _ _ _ _ _ _ _ _ _ Primer uso _ _ _ _ _ _ _ _ _ _ _ _ _ _ _ _ _ _ _ _ Uso diario _ _ _ _ _ _ _ _ _ _ _ _ _ _ _ _ _ _ _ _ _ Consejos y sugerencias útiles _ _ _ _ _ _ _ _ _ _ _ 11 13 14 14 14 Mantenimiento y limpieza _ _ _ _ _ _ _ _ _ _ _ _ _ Qué hacer si… _ _ _ _ _ _ _ _ _ _ _ _ _ _ _ _ _ _ Datos técnicos _ _ _ _ _ _ _ _ _ _ _ _ _ _ _ _ _ _ _ Instalación _ _ _ _ _ _ _ _ _ _ _ _ _ _ _ _ _ _ _ _ _ Aspectos m
Advertencia Los componentes eléctricos (cable de alimentación, enchufe, compresor) debe sustituirlos un técnico autorizado o personal de reparaciones profesional a fin de evitar riesgos. 1. 2. El cable de alimentación no se debe prolongar. Compruebe que la parte posterior del aparato no aplaste ni dañe el enchufe. Un enchufe aplastado o dañado puede recalentarse y provocar un incendio. 3. Cerciórese de que tiene acceso al enchufe del aparato. 4. No tire del cable de alimentación. 5.
Protección del medio ambiente Este aparato no contiene gases perjudiciales para la capa de ozono, ni en el circuito de refrigerante ni en los materiales aislantes. El aparato no se debe desechar junto con los residuos urbanos. La espuma aislante con- tiene gases inflamables: el aparato se debe desechar de acuerdo con la normativa vigente, que puede solicitar a las autoridades locales. No dañe la unidad de refrigeración, en especial la parte trasera, cerca del intercambiador de calor.
Primer uso Limpieza de las partes internas Antes del empleo limpiar todas las partes internas con agua tibia y jabón neutro, a fin de eliminar el característico olor de nuevo y secarlas luego cuidadosamente. Importante No utilice detergentes ni polvos abrasivos, ya que podrían dañar el acabado Uso diario Congelación de alimentos frescos El compartimento del congelador es adecuado para congelar alimentos frescos y conservar a largo plazo los alimentos congelados y ultracongelados.
• no permita que alimentos frescos y sin congelar entren en contacto con alimentos ya congelados, para evitar el aumento de temperatura de los segundos; • los alimentos magros se congelan mejor que los grasos; la sal reduce el tiempo de almacenamiento de los alimentos; • el hielo, si se consume inmediatamente después de retirarlo del compartimento congelador, puede provocar quemaduras por congelación en la piel; • es recomendable etiquetar cada paquete con la fecha de congelación para controlar el tiempo qu
alimentos se echen a perder en caso de un corte de energía. Qué hacer si… Advertencia Antes de realizar cualquier reparación, desconecte el enchufe del aparato de la toma de red. Problema Sólo un electricista o un técnico profesional deben llevar a cabo cualquier reparación que no figure en este manual. Causa posible El aparato no funciona. La luz del El aparato está apagado. piloto no parpadea. El aparato no está correctamente enchufado a la toma de corriente. Solución Encienda el aparato.
Problema Hay demasiada escarcha. Causa posible Se han guardado muchos alimentos al mismo tiempo. Guarde menos alimentos al mismo tiempo. Los alimentos están demasiado juntos. Disponga los productos de modo que el aire frío pueda circular entre ellos. Los alimentos no están envueltos correctamente. Envuelva los alimentos correctamente. La puerta no está bien cerrada. Consulte la sección "Cierre de la puerta". El regulador de temperatura no se ha ajustado correctamente.
Ubicación 15 mm 15 mm 100 mm Instale el aparato alejado de fuentes de calor, como radiadores, calderas, luz solar directa, etc. Asegúrese también de que el aire pueda circular sin obstáculos por la parte trasera del aparato. Para garantizar el mejor rendimiento, si el aparato se coloca debajo de un mueble de cocina A B instalado en la pared, deje una distancia mínima de 100 mm entre la parte superior del aparato y el mueble de pared.
1. Quite el zócalo. 2. Desatornille y extraiga las bisagras inferiores. 3. Retire la puerta. 4. Afloje el pasador superior y enrósquelo en el lado opuesto. 5. Vuelva a montar la puerta. 6. Preste atención para que el borde de la puerta quede paralelo al borde superior. A B 7. Desenrosque el pasador (A) y enrósquelo en el lado opuesto. 8. Saque la tapa (B) y colóquela en el lado opuesto. 9. Atornille las bisagras inferiores. 10. Vuelva a montar el zócalo.
222343864-A-132011 www.zanussi.