INSTRUCTION BOOKLET COOKER HOOD ZHC 700
Thank you for buying a Zanussi product. To enable you to use your appliance effectively and safely, please read this instruction book carefully before using the appliance and retain for future reference. If you require guidance in the use of the appliance or require further information on Zanussi Products, please contact our Customer Care Department. For general enquiries concerning your Zanussi appliance or for further information, visit our website at http://www.zanussi.co.
IMPORTANT SAFETY INFORMATION These warnings are provided in the interests of your safety. Ensure that you understand them all before installing or using this appliance. Your safety is of paramount importance. If you are unsure about any of the meanings of these warnings contact the Customer Care Department. Installation • Do not install above a cooker with a high level grill. • Any installation work must be undertaken by a qualified electrician or a competent person.
360 YOUR APPLIANCE 698 OPERATING INSTRUCTIONS The cooker hood is designed to extract unpleasant odours from the kitchen, it will not extract steam. The appliance can be installed to recirculate or extract contaminated air. Cooker Hood Controls The cooker hood functions are controlled by three switches located to the right on the underside of the hood immediately in front of the metal grease filters. Worktop Lighting The switch (L) marked with the lamp symbol operates the worktop lighting.
To Operate Select the required fan speed and light if required. Recirculation In the recirculation mode the contaminated air enters the cooker hood through the grease filters. The air is cleaned by passing through the charcoal filters before being passed back into the kitchen through the grilles in either side of the chimney stack. Extraction In the extraction mode the contaminated air enters the cooker hood passing through the grease filters and is passed out through the ducting into the atmosphere.
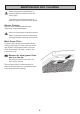
MAINTENANCE AND CLEANING Before carrying out any maintenance or cleaning isolate the cooker hood from the mains supply. The cooker hood must be kept clean, as a build up of grease or fat can be a fire hazard. External Cleaning Wipe the cooker hood frequently with warm soapy water using a mild detergent. Never use scouring pads or abrasive cleaners. Never use excessive amounts of water when cleaning particularly around the control panel.
Charcoal Filters In the recirculation mode the charcoal filters absorb smells and unwanted odours. The charcoal filters cannot be cleaned, we recommend they should be replaced approximately every three months or more often if the hood is used for more than three hours per day. To Remove/Replace the Charcoal Filters 1. First remove the metal grease filters. 2. Rotate the charcoal filter anti-clockwise (B) and remove. 3. To replace the charcoal filters, remove the metal grease filters. 4.
SOMETHING NOT WORKING If, having followed these instructions carefully, your cooker hood fails to work properly please carry out the following checks. Symptom Solution The cooker hood will not start • Check the hood is connected to the electricity supply. • Make sure the switch is in the ‘ON’ position. The cooker hood is not working effectively • The fan speed is set high enough for the task • The grease filter is clean. • The kitchen is adequately vented to allow the entry of fresh air.
GUARANTEE CONDITIONS We Zanussi, undertake that if within twenty four months of the date of the purchase this Zanussi built-in appliance or any part thereof is proved to be defective by reason only of faulty workmanship or materials, the company will, at our option repair or replace the same FREE OF ANY CHARGE for labour, materials or carriage on condition that: • • • • • The appliance has been correctly installed and used only on the electrical supply stated on the rating plate.
INSTALLATION INSTRUCTIONS It is dangerous to alter the specifications or attempt to modify this product in any way.
INSTALLING THE COOKER HOOD Please ensure that when the appliance is installed it is easily accessible to an engineer in the event of a breakdown. The manufacturer disclaims any responsibility for damage due to incorrect installation of the cooker hood or if the hood is not installed in compliance with relevant regulations controlling this type of installation. All installations must comply with the local authorities requirements for the discharge of exhaust air.
Clearance Height The cooker hood is designed to be fitted over a cooking appliance at the clearance heights stated, providing the maximum output of the appliance beneath does not exceed the maximums quoted in the Technical Specifications. If the output of the appliance below the cooker hood exceeds the maximum outputs quoted, please refer to the cooker manufacturer’s installation instructions.
4. Draw a horizontal line through the vertical line at X. X is a distance between the centre of the top and bottom fixing holes on the upper chimney stack. Mark the centre positions for the middle bracket fixing screws (3) at 95mm either of the vertical line (screws not supplied). 5. Drill the holes for the fixing screws using an 8mm masonary drill and fix the wall brackets using the plastic rawl plugs and 44mm screws (not supplied). Ensure the lower bracket (1) is fitted with the lugs at the bottom.
Venting The hood is more effective when used in the extraction mode (ducted to the outside). Venting kits may be purchased through your retailer or DIY store, and must be ducted to an outside vent of 125mm (5”). The 120-125mm collar should be fitted onto the ducting spigot to suit UK diameter ducting, and held in position by a jubilee clip (not supplied) used to secure the flexible hose.
Fitting the Chimney Stack The chimney stack consists of two sections. 1. Fit the upper section (S) first. Expand the chimney slightly to allow it to be fitted over the brackets (1) and (2), and then secure the chimney stack to bracket (2) using two self tapping screws provided in the fitting kit. 2. Fit the lower chimney section (I) by expanding the chimney slightly to allow it to be fitted over the brackets (1), and the upper chimney section and bracket (3). 3.
© Electrolux plc 2002 436002372_01 040705