
User manual


Fresh food refrigeration
To obtain the best performance:
¥ do not store warm food or evaporating liquids in
the refrigerator;
¥ do cover or wrap the food, particularly if it has a
strong flavour.
¥ Position food so that air can circulate freely round
it.
Important
Do not put carbonated liquids (fizzy drinks, etc.) in
the freezing compartment as they may burst.
Water ices, if consumed immediately after removal
from the freezing compartment, can possibly cause
the skin to be freeze burnt.
Remember that, once thawed, frozen food deterio-
rates rapidly.
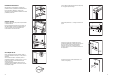
Storage of frozen food
When the freezer is being turned on for the first
time, or after a prolonged period of disuse, turn the
N/S knob to the Quick-freezing position and then
wait at least two hours before introducing the food to
be conserved. You may then return the knob to the
ÇNÈ position. This two-hour waiting period may be
avoided if the freezer has already been in operation.
To obtain the best performance from this appliance,
you should:
if large quantities of food are to be stored, remove
all drawers and baskets from appliance (except for
the last one at the bottom) and place food on cooling
shelves.
Pay careful attention not to exceed load limit stated
on the side of the upper section (where applicable).
Thawing
Deep-frozen or frozen food, prior to being used, can
be thawed in the refrigerator compartment or at
room temperature, depending on the time available
for this operation. Small pieces may even be cooked
still frozen, directly from the freezer: in this case,
cooking will take longer.
Ice-cube production
This appliance is equipped with one or more trays
for the production of ice-cubes. Fill these trays with
water, then put them in the freezer compartment. Do
not use metallic instruments to remove the trays
from the freezer.
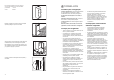
Temperature regulation
To start the appliance, turn the thermostat knob,
located inside the compartment, to the required
position. This thermostat has six operating positions
and an Ç0È (Stop) position. The higher the number
selected, the lower the temperature in the
refrigerator. When first starting up the appliance, an
initial setting of 3 or 4 is recommended. The
temperature inside the compartment depends on a
number of factors, such as the ambient temperature,
the amount of food stored in the appliance, the
frequency with which the door is opened, the
location of the appliance in the room, etc. These
factors must be taken into account when setting the
thermostat. To stop the appliance, turn the
thermostat knob to the ÇOÈ position. The freezer
compartment will continue to operate.
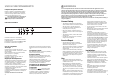
Important
If the ambient temperature is high, the thermostat
knob is on the coldest setting (higher numbers) and
the appliance is fully loaded, the compressor may
run continuously, causing frost or ice to form on the
evaporator. If this happens, turn the knob to a
warmer setting (lower numbers) to allow automatic
defrosting and so a saving in electricity
consumption.
18
27
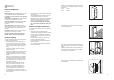
If the appliance is fixed to the side of the kitchen unit,
simply slacken the screws in the fixing brackets (E),
move the brackets as shown in the figure and re-
tighten the screws.
D735
E
E
8mm
PR167
A
B
PR168
PR167/1
D
B
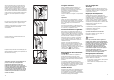
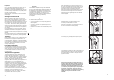
Open the appliance door and the furniture door at
90¡. Insert the small square (B) into guide (A). Put
together the appliance door and the furniture door
and mark the holes as indicated in the figure.
Remove the squares and drill holes with ¿ 2 mm at
8 mm from the outer edge of the door. Place the
small square on the guide again and fix it with the
screws supplied.
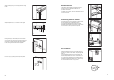
Should the lining up of the furniture door be
necessary, use the clearance of slots.
At the end of operations, it is necessary to check if
the door of the furniture closes properly.
Fix cover (D) on guide (B) until it clips into place.
After having reversed the opening direction of
the doors check that all the screws are properly
tightened and that the magnetic seal adheres to
the cabinet. If the ambient temperature is cold
(i.e. in Winter), the gasket may not fit perfectly to
the cabinet. In that case, wait for the natural
fitting of the gasket or accelerate this process by
heating up the part involved with a normal
hairdrier.