EN User Manual Microwave Oven ZKG38300 XK GB 1
Contents Microwave safety ...................................... 1 The advantages of microwaves ................... 3 Description of your oven ............................ 4 Accessories .............................................. 5 Basic settings ........................................... 6 Setting the clock ....................................... 6 Child lock ................................................. 6 Basic functions ......................................... 6 Microwaves ......................
The door window glass is damaged; There is frequent electrical arcing inside the oven even though there is no metal object inside. The oven can only be used again after it has been repaired by a Technical Assistance Service technician. Warning! Accessible parts may become hot during use. Young children should be kept away. Do not use harsh abrasive cleaners or sharp metal scrapers to clean the oven door glass since they can scratch the surface, which may result in shattering of the glass.
Eggs with their shells and whole boiled eggs must not be heated in microwave ovens because they may explode. Do not use the oven for frying as it is impossible to control the temperature of oil heated by microwaves. To avoid being burnt, always use oven gloves for handling dishes and containers and touching the oven. Do not lean or sit on the open oven door. This may damage the oven, especially in the hinge zone. The door can bear a maximum weight of 8 kg.
Inside the oven the microwaves propagate in all directions and are reflected by the metal walls, uniformly penetrating the food. Why food heats up Most foods contain water and water molecules vibrate when subjected to microwaves. The friction between molecules produces heat which raises the temperature of the food, defrosting it, cooking it or keeping it hot.
Microwave + Grill Function Power selector Display Child lock indicator light Safet Block Key Clock indicator Light Minus Key Minute Minder Plus Key Operating time indicator light Start/QuickStart/ Ok Key Stop Key Accessories Turntable plate Turntable installation Turntable support 5 1. Place the turntable support on the cavity Bottom. 2. Place the turntable on top of the turntable support.
turntable hub is securely locked in the turntable shaft. Never place the turntable upside down. Both turntable and turntable support must always be used during cooking. This turntable rotates clockwise and anticlockwise; this is normal. Low Grill High Grill Browning Plate Basic settings Setting the clock After your microwave oven is first pluggedin or after a power failure, the clock display will flash to indicate that the time shown is not correct.
3. Using the “-”“+” and “+”“-” keys set the desired operating time. 4. Press the Start/Quick Start/OK key to validate. 5. Using the Power selector set the required microwave power level. 6. Press the Start/Quick Start/OK key. The oven will start to operate. Grill Use this function to brown the top of food quickly. 1. Rotate the Function Selector to the position corresponding to the Grill Function. 2. The Operating Time Indicator Light and the Display start to flash. 3.
Cancelling a cooking cycle End of a cooking cycle If you wish to cancel the cooking process, rotate the Function Selector until zero or press the Stop key twice. When the set time has elapsed, the oven beeps and the Display shows END. If you have finished the cooking process, turn the function selector and the thermostat to zero. Cooking with a microwave oven Warning! Read the section “Microwave Safety” before cooking with your microwave.
Cooking with a microwave oven Cooling with microwaves... 1. The greater the amount of food, the longer the cooking time. Keep in mind that: Double the quantity » double the time Half the quantity » half the time 2. The lower the temperature, the longer the cooking time. 3. Foods containing a lot of liquid heat up more quickly. 4. Cooking will be more uniform if the food is evenly distributed on the turntable.
Cooking with the grill For good results with the grill, use the grid iron supplied with the oven. IMPORTANT POINTS: 1. When the microwave grill is used for the first time there will be some smoke and a smell coming from the oils used during oven manufacture. 2. The oven door window becomes very hot when the grill is working. Keep children away. 3. When the grill is operating, the cavity walls and the grid iron become very hot. You should use oven gloves. 4.
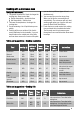
Tables and suggestions – Grill without microwave Fish Quantity (g) Time (min.) Instructions Fish Bass 800 18-24 6-8 fish. 15-20 Spread lightly with butter. After half of cooking time turn them around. 6-8 units 22-26 Prick after half cooking time and turn. 3 units 18-20 400 25-30 After half of cooking time, baste and turn. Toast 4 units 1½-3 Watch toasting. Toasted sandwiches 2 units 5-10 Watch toasting. Sardines/gurnard Meat Sausages Frozen hamburgers Spare rib (approx.
What kind of ovenware can be used? Microwave function For the microwave function, keep in mind that microwaves are reflected by metal surfaces. Glass, china, clay, plastic, and paper let microwaves pass. For this reason, metal pans and dishes or containers with metal parts or decorations cannot be used in the microwave. Glass ware and clay with metallic decoration or content (e.g. lead crystal) cannot be used in microwave ovens.
3. The food does not become dry; 4. The aroma is preserved. The lid should have holes or openings so that no pressure develops. Plastic bags must also be opened. Baby feeding bottles or jars with baby food and similar containers can only be heated without their tops / lids otherwise they can burst Operating mode Table of Ovenware The table below gives you a general idea of what type of ovenware is suitable for each situation. 1. Without any gold or silver leaf edging; no lead crystal. 2.
Oven Cleaning and Maintenance Cleaning is the only maintenance normally required. Warning! Your microwave oven should be cleaned regularly, with all food remains being removed. If the microwave is not kept clean its surfaces may deteriorate, reducing the oven’s working life and possibly resulting in a dangerous situation. Warning! Cleaning should be done with the oven power switched off. Take the plug out of the socket or switch off the oven’s power circuit.
To avoid any risk, do not remove the mica cover. The glass lamp cover (4) is located on the oven ceiling and can be removed easily for cleaning. For this you just need to unscrew it and clean it with water and dishwashing liquid. Accessories Clean the accessories after each use. If they are very dirty, soak them first of all and then use a brush and sponge. The accessories can be washed in a dish washing machine. Make sure that the turntable plate and the respective support are always clean.
Disconnect the oven from the power supply. Take the plug out of the socket or switch off the oven’s power circuit. Unscrew and remove the glass light cover (1). Remove the halogen light bulb (2). Warning! The bulb may be very hot. Fit a new G4 / 12V / 10 - 20W halogen bulb. Warning! Do not touch the light bulb surface directly with your fingers because you may damage the bulb. Follow the lamp manufacturer’s instructions. Screw the glass light cover into place (1).
Power required Grill power Hot-Air power Microwave output power Microwave frequency Exterior dimensions (W H D) Interior dimensions (W H D) Oven capacity Weight 3400 W 1500 W 1500 W 1000 W 2450 MHz 595 455 420 210 35 l 38 kg 542 mm 390 mm Installation instructions Warning: If microwave is used, please make sure there are no inappropriate objects inside of the oven, including wire racks or griddles that are the part of appliance and shall be used solely with grill or oven functions.
After installation The oven only functions when the door is closed correctly. After the first use, clean the inside of the oven and the accessories, following the cleaning instructions given in the section “Oven cleaning and maintenance”. Fit the Turntable support in the centre of the oven cavity and put the Turntable ring and the Turntable plate on top, making sure they slot in. Whenever you use the microwave, the turntable plate and the respective accessories must be inside and correctly fitted.
Exclusions Damage or calls resulting from transportation, improper use or neglect, the replacement of any light bulbs or removable parts of glass or plastic. Costs incurred for calls to put right an appliance which is improperly installed or calls to appliances outside the United Kingdom. Appliances found to be in use within a commercial environment, plus those which are subject to rental agreements. Products of Zanussi manufacturer that are not marketed by Zanussi.
residence for this particular model or range of appliances. The appliance guarantee is personal to the original purchaser of the appliance and cannot be transferred to another user. The appliance is installed and used in accordance with instructions issued by 20 Zanussi and is only used within the home, i.e. is not used for commercial purposes. The appliance is installed in accordance with all relevant regulations in force within your new country of residence.
Installation EN Push oven completely into the cabinet and centre it. Open microwave door and fasten the appliance to the cabinet using the four screws provided. Insert the screws through the front holes.
Cód:1630317 www.zanussi.