Cooker ZL55 INSTRUCTION BOOK
Contents Contents Safety ............................................................ 3 The Cooker ................................................ 4 Unpacking .......................................... 4 The accessories ................................. 4 The safety equipment ............................... 5 Non-tip device ................................... 5 The hob guard (optional accessory) ............................. 5 The door catch .................................. 6 Before the first use ......
Safety Safety Cooker technology is constantly improving. The way you use your new cooker may be different from the way you used your old one. Please read the whole instruction book before using your new cooker. This cooker is intended for normal domestic use. Take care of the instruction book which will be needed by the new owner if the cooker is sold or passed on to someone else. Do not hesitate to contact us with questions or viewpoints about the cooker and its use. warning triangle is to do with safety.
The Cooker The Cooker 1 1 Removable oven vent 2 Hob with HOTPLATES 2 3 Control panel with CONTROLS 4 Oven 5 Storage drawer 3 6 Plinth To make it easier to clean behind the cooker, it has wheels at the rear. To move the cooker forwards, open the oven door, lift carefully holding the upper edge and then pull the cooker out from the wall. 4 5 6 Unpacking Check that the cooker is undamaged and in perfect condition.
The safety equipment The safety equipment There should be at least 40 cm of worktops on both sides of the cooker (SEE PICTURE). Alternatively the cooker can be installed with a wall or a tall kitchen unit on one side and a worktop on the other. Child safety is further improved if the following equipment is fitted/in use: min. 40 cm min. 40 cm Non-tip device The non-tip device should be fitted, to prevent the cooker from tipping if subjected to an abnormal loading.
The safety equipment The door catch The door catch makes it harder for children to open the oven door/storage drawer. The catches are already activated when the cooker is supplied new, but can be deactivated if necessary. A Press the catch down when you want to open the door. B If you wish to deactivate the catch, check first that the oven is not hot. Press the catch on the top edge of the door downwards and then a few millimetres to the right.
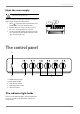
The control panel Heat the oven empty Children should be supervised! The cooker will get very hot. Before you use the oven for the first time, you need to heat it empty. Follow these instructions: 1 Select (top/bottom heat) and maximum temperature. The oven door should be shut. 2 Ventilate the room. Switch off the oven once the “new” smell and fumes have ceased. 3 Use hot water and washing-up liquid to wipe the oven, side racks and the inside of the door. Then wipe all of these parts dry. max.
The hob The hob The hob has four cast-iron hotplates. The two on the right, the rapid hotplates, are identified by red spots and have built-in protection against overheating. ø 145 mm ø 180 mm Using the hob Never leave the cooker unattended while deep frying, or when using it for melting fats, paraffin wax or other flammable substances. In the event of a fire, turn off all the controls and turn off the cooker hood fan. SMOTHER THE FIRE WITH A PAN LID, never use water.
The hob Frying It is best when frying not to use food that has come straight out of the refrigerator. Only about 2/3 of the bottom of the pan should be covered by food. Put the margarine or butter in the frying pan and turn on to the recommended heat. In order to get the best results, it is important that the fat is the right colour (temperature) when you start frying. Hold a light-coloured spatula to the bottom of the pan to see the colour of the fat.
The hob Save energy! • Putting a lid on pans cuts the amount of energy used by half (compared to cooking without lids). • Using pans with flat bases saves 25% energy (compared to uneven based pans). • Make sure the hob is clean and dry. Dirt and moisture reduce heat transfer between pans and hotplates. • Turn the hotplates off and finish cooking using the remaining heat. • Save energy by steaming and pressure-cooking.
The oven The oven The oven has removable side racks for the shelves with three rungs on each side. The functions of the oven For all oven functions, the indicator light comes on when the oven is heating and goes out when the set temperature is reached (goes on and off as the thermostat switches in and out). To choose an oven function, turn the function control clockwise to the symbol for the desired function (see below).
The oven its shape when cool. How does one know which oven functions to use in different situations? See below for practical advice on how to efficiently use the oven functions for various ways of cooking: Baking Use a skewer to check whether sponge cakes are ready when there are about 5 minutes left. You can then shorten or lengthen the baking time. The material, colour, shape and size of the baking tins as well as the recipe can affect results. TOP/BOTTOM HEAT gives an even colour.
The oven S Browning (swift start) Excellent for browning au gratin dishes, toasted sandwiches, etc. You can also use this function to heat the oven quickly to the set temperature. When the oven has reached that temperature, you can then select whichever function is required. It takes about 8 minutes to reach 200ºC. However, do not use this method of rapid heating when baking biscuits or meringues. Cleaning and maintenance The oven The oven surfaces are of vitreous enamel.
The oven 4 After cleaning (use a window-cleaning product), slot the the door front back into the bracket (SEE PICTURE). Make sure the door is properly secured on both sides. 5 Press the two springs on the top edge of the door and press the door front into place. 6 Remove the oven cloths. To change the oven light bulb 1 Turn all controls to off and check that the oven is not hot. 2 Unscrew the glass cover (see illustration). 3 Unscrew the old bulb.
Installation Installation Work on the cooker must be carried out by a qualified electrician. The cooker is heavy. Certain edges and corners which will not normally be exposed may be sharp. USE GLOVES when moving the cooker. Before installing the cooker, you should check that its dimensions correspond to the rest of your kitchen units. Measure the height of the worktop from floor to top surface of the worktop, and the plinth depth from the wall to the front edge of the plinth (SEE PICTURE).
Service Electrical connection Repairs and work on the cooker must be carried out by a QUALIFIED ELECTRICIAN. Work performed by unqualified persons can damage the cooker, and may also lead to personal injury and/or damage to property. The connection options for the cooker are shown on the plate on the rear of the cooker. Wattage and voltage is stated on the rating plate (see the right-hand side of the cooker). Service Repairs and work on the cooker must be carried out by a qualified electrician.
Technical data Technical data We reserve the right to alter these specifications. This appliance conforms with EC-directive 89/336/EEC and 73/23/EEC IEC class:Y.
Practical tips and advice Practical tips and advice Problem Cause Action needed Bread and cakes are not rising properly. Too low an oven temperature means that the baking is rising but then sinking flat again. Check the temperature used against that recommended in the recipe. Bread dough has not risen properly. Check the proving time recommended in Leaving the dough to prove too long can the recipe. cause the bread to turn out flat. Dough should prove in a warm, draught-free place.
Problems and actions needed Problems and actions needed Never attempt any repairs or work on the cooker which could cause injury or damage the product. If you cannot solve the problem after checking the list below, contact a service company approved by the supplier. Problem Action needed The cooker has no electrical supply Check that: • THE FUSE(S) has not gone • THE PLUG is pushed in correctly • THE RCD (if fitted) has not tripped Boiling/frying takes a long time.
821 04 12-00 2B tecknare ab Printed on environmentally sound paper © MO-STK 2000-10-18