
User manual


INSTALLATION
29
ENGLISH
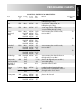
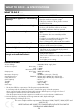
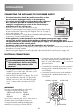
Measurements in (mm)
INSTALLING THE APPLIANCE
The microwave can be fitted in position A or B:
POSITION NICHE SIZE
WD H
A 560 x 550 x 450
B 560 x 500 x 450
CHIMNEY
(min)
50
40
Gap
Between
Cupboard
& Ceiling
50
50
Position A
Position B
Conventional
oven
C
himney
C
himney
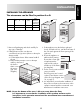
1. Remove all packaging and check carefully for
any signs of damage.
2. If fitting the microwave oven above a
conventional oven (position A) then use the mylar
sheet provided.
a. Cut the Mylar sheet to fit the internal width of
the unit.
b. Peel back the protective cover on the tape
and fix to the rear of
the shelf so
that it covers
the service
gap. (See
diagram.)
3. Fit the appliance into the kitchen cupboard
slowly, and without force, until the front frame of
the oven seals against the front opening of the
cupboard.
4. Ensure the appliance is
stable and not leaning.
Ensure that a 5 mm gap
is kept between the
cupboard door above
and the top of the frame
(see diagram).
5. Fix the oven in position with the
screws provided.
The fixing points are located
on the top and bottom corners
of the oven (see diagram, item
10, on page 7).
6. It is important to ensure that the installation of
this product conforms to the instructions in this
operation manual and the conventional oven
manufacturer’s installation instructions.
Mylar sheet
Conventional
oven
In
tern
al
wi
dth
Ser
vice
gap
5 mm
NOTE: Ensure the bottom of the oven is 85 cm or more above the floor.
It is important to ensure that the installation of this product conforms to the
instructions in this operation manual and the conventional oven manufacturer’s
installation instructions.