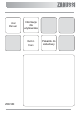
User Manual Informacje dla użytkownika Built-in Oven Piekarnik do zabudowy ZOB 580 1
Thank you for selecting our appliance We wish you lots of enjoyment with your new appliance and we hope that you will consider our brand again when purchasing household appliances. Please read this user manual carefully and keep it throughout the product life cycle as a reference document. The user manual should be passed on to any future owner of the appliance.
Contents Important safety information ........................................................................................................... 4 Description of the oven .................................................................................................................. 6 Controls ....................................................................................................................................... 7 Before the first use .......................................................
English Important Safety Information These warnings are provided for the safety of the users and those living with them. So read them carefully before installing and using the appliance. This will allow you to obtain best performance, avoid improper actions, use the appliance in complete safety and also respect the environment. If you need assistance, contact our Customer Care Department on 08705 727 727.
People Safety · · · This oven is designed to be operated by adults. Do not allow children to play near or with the oven. The oven gets hot when it is in use. Children should be kept away until it has cooled.
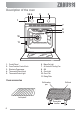
Description of the oven 56 4 3 2 1 7 8 9 10 11 1. 2. 3. 4. 5. Control Panel Oven Function Control Knob Electronic Programmer Thermostat Control Knob Thermostat Control Light Oven accessories 6. Mains On Light 7. Air Vents for Cooling Fan 8. Grill 9. Oven Light 10. Oven Fan 11.
Controls Push-Pull control knobs This model is provided with push-pull control knobs. These knobs can be completely sunken inside the control panel when the oven is not working. Oven Function Control Knob 0 The oven is off. Oven light - The oven light will be on without any cooking function. Conventional cooking - The heat comes from both the top and bottom element, ensuring even heating inside the oven. Top heating element - The heat comes from the top element only (outer section).
Fan cooking - This allows you to roast or roast and bake simoultaneously using any shelf, without flavour transference. Defrost Setting - This setting is intended to assist in thawing of frozen food. Mains on Light The mains on light will come on when the oven function control knob is set. Thermostat Control Knob Turn the thermostat control knob clockwise to select temperatures between 50°C and 250°C.
The cooling fan The cooling fan is designed to cool the oven and the control panel. The fan switches on automatically after a few minutes of cooking. Warm air is blown out through the aperture near the oven door handle. When the oven is switched off, the fan will remain on in order to cool the oven and kitchen cabinets properly, after which it switches off automatically. Before the first use Remove all packaging, both inside and outside the oven, before using the oven.
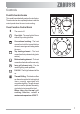
Electronic programmer 4 1. Push button for selecting a function 7 8 5 6 2. Decreasing control button “ ” 3. Increasing control button “ ” 4. Display 5. “Cooking Duration” pilot lamp 6. “End of cooking” pilot lamp 2 1 3 7. “Minute minder” pilot lamp 8. “Time of day” pilot lamp The oven will only work if the time of day has been set. However, the oven can also be operated without any programme.
“Cooking Duration” function This function allows the oven to automatically switch off at the end of a programmed cooking duration time. Place food in the oven, select a cooking function and adjust the cooking temperature. Press button repeatedly to select the “Cooking Duration” function. The relevant pilot lamp will start flashing. Then, proceed as follows: To set the duration time: 1. Press button “ ” or “ ”. 2.
“End of cooking” function With this function, you can set the oven to switch off automatically when a programmed end of cooking time is over. Place food in the oven, select a cooking function and adjust the cooking temperature. Press button repeatedly to select the “End of cooking” function. The relevant pilot lamp will start flashing. Then, proceed as follows: To set the End of cooking time: 1. Press button “ ” or “ ”. 2.
“Cooking duration” of cooking time” and “End combined The functions “Cooking duration” and “End of cooking time” can be used simultaneously to set the oven to switch on and off automatically at a later time. 1. With the “Cooking duration” function (carry out the cooking duration setting as described in the relevant chapter) set the duration time. Then, press button : the display will show the programmed setting. 2.
To cancel the minute minder: 1. Press button repeatedly to select the “Minute minder” function. The relevant pilot lamp will flash and the display will show the remaining time. 2. Press button “ ” until the display shows “0:00”. After 5 seconds the pilot lamp will go out and the display will revert to the time of day. How to switch off the display 1. Press two programmer push buttons simoultaneously and keep them pressed for about 5 seconds. The display will switch off. 2.
Using the oven The oven is supplied with an exclusive system which produces a natural circulation of air and the constant recycling of steam. This system makes it possible to cook in a steamy environment and keep the dishes soft inside and crusty outside. Moreover, the cooking time and energy consumption are reduced to a minimum. During cooking steam may be produced which can be released when opening the oven door. This is absolutely normal.
How to Use the Conventional Oven When using this setting, heat comes from both the top and bottom elements. This allows you to cook on a single level and is particularly suitable for dishes which require extra base browning such as pizzas, quiches and flans. Gratins, lasagnes and hotpots which require extra top browning also cook well in the conventional oven. This form of cooking gives you the opportunity to cook without the fan in operation. 1.
Fan Cooking The air inside the oven is heated by the element around the fan situated behind the back panel. The fan circulates hot air to maintain an even temperature inside the oven. The advantage of cooking with this function is energy saving through: z Faster Preheating As the fan oven quickly reaches temperature, it is not usually necessary to preheat the oven although you may find that you need to allow an extra 5-7 minutes on cooking times.
The cooling fan During cooking the cooling fan will operate continually. It may run on after the oven is switched off to keep the controls cool. This is quite normal. The action of the cooling fan will depend on how long the oven has been used and at what temperature. It may not switch in at all at lower temperature settings nor run on where the oven has only been used for a short time.
Hints and Tips Prepare foods in the same way as for conventional grilling. Brush lean meats and fish lightly with a little oil or butter to keep them moist during cooking. How to Use Defrosting The oven fan operates without heat and circulates the air, at room temperature, inside the oven. This increases the speed of defrosting. However, please note that the temperature of the kitchen will influence the speed of defrosting.
Hints and Tips On baking: Cakes and pastries usually require a medium temperature (150°C-200°C) and therefore it is necessary to preheat the oven for about 10 minutes. Do not open the oven door before 3/4 of the baking time has elapsed. Shortcrust pastry is baked in a springform tin or on a tray for up to 2/3 of the baking time and then garnished before being fully baked. This further baking time depends on the type and amount of topping or filling.
Cooking chart- Conventional and fan oven Cooking times in the table do not include pre-heating. We recommend to pre-heat the oven for about 10 minutes before cooking.
Cooking times in the tables do not include pre-heating. We recommend to pre-heat the oven for about 10 minutes before cooking. - Cooking chart- Grilling Quantity Cooking time in minutes 1st side 2nd side Grilling TYPE OF DISH Fillet steaks Beef-steaks Sausages Pork chops Chicken (cut in two) Kebabs Chicken (breast) Hamburger* *Preheat 5’00'’ Fish (fillets) Sandwiches Toast Pieces g.
Cleaning and Maintenance Before cleaning always allow the cooling fan to cool the oven down before switching off at the electricity supply. This appliance cannot be cleaned with steam or with a steam cleaning machine. The oven should be kept clean at all times. A build-up of fats or other foodstuffs could result in a fire, especially in the grill pan. Important: Before carrying out any cleaning operation, the appliance must be disconnected from the power supply.
Care of catalytic liners As cooking produces oil, fats, splashes of food, etc., catalytic enamel destroys them. To aid this process it is a good idea to run the oven for an hour or two per week, without food, to ensure continued good performance from the Catalytic liners. To clean the oven cavity, proceed as follows: 1. remove the oven accessories, if present (e.g. pans, grids, baking tray, dripping pan, etc.). Do not leave anything inside the oven. 2.
Shelf Supports and Catalytic Panels The shelf supports and the catalytic panels can be removed for easy cleaning. Make sure the appliance is completely cooled before carrying out this operation. Proceed as follows: 1. remove the front screw while keeping the shelf support and the catalytic panel in position with the other hand (see diagram 1); 2. keep the shelf support and the catalytic panel in position and lift them with a hand while disengaging the rear hook.
Cleaning the Oven Door Before cleaning the oven door, we recommend you to remove it from the oven. Proceed as follows: 1. open the oven door completely; 2. find the hinges linking the door to the oven (Fig. A); 3. unlock and turn the small levers located on the two hinges (Fig. B); 4. handle the door by its left- and right-hand sides, then slowly turn it towards the oven until it is half-closed (Fig. C); 5. gently pull the oven door off its site (Fig. C); 6. place it on a steady plan.
Replacing The Oven Light Disconnect the appliance If the oven bulb needs replacing, it must comply with the following specifications: - Electric power: 15 W/25 W, - Electric rate: 230 V (50 Hz), - Resistant to temperatures of 300°C, - Connection type: E14. These bulbs are available from your local Service Force Centre. To replace the faulty bulb: 1. Ensure the oven is isolated from the electrical supply. 2. Push in and turn the glass cover anticlockwise. 3.
Grill heating element This model has been fitted with a hinged grill element to make the roof of the oven especially easy to clean. Before proceeding ensure the oven is cool and disconnected from the electricity supply. Proceed as follows: ) 1. Undo the screw fastening the grill element. When carrying out this operation for the first time, we recommend using a screwdriver. 2. Then gently pull the grill downwards to allow access to the oven roof. 3.
Something not working If the oven is not working correctly, please carry out the following checks, before contacting your local Service Centre. IMPORTANT: If you call out an engineer to a fault listed below, or to repair a fault caused by incorrect use or installation, a charge will be made even if the appliance is under guarantee. PROBLEM SOLUTION The oven does not come on. Check that the current time of day has been set on the programmer (see chapter "Setting the time of day").
Technical Data The oven must be installed according to the instructions supplied. This oven must be installed by qualified personnel to the relevant British Standards.
Electrical Connection The oven is designed to be connected to 230 V (50 Hz) electricity supply. The oven has an easily accessible terminal block which is marked as follows: Letter L Live terminal Letter N Neutral terminal or E - Earth terminal THIS OVEN MUST BE EARTHED The cable used to connect the oven to the electrical supply must comply to the specifications given below.
Instructions for building in Please ensure that when the oven is installed it is easily accessible for the engineer in the event of a breakdown. Building In The surround or cabinet into which the oven will be built must comply with these specifications: z the dimensions must be as shown in the relevant diagrams; z the materials must withstand a temperature increase of at least 60°C above ambient; z proper arrangements must be made of a continuous supply of air to the oven to prevent the oven overheating.
Guarantee/Customer service (for the United Kingdom only) Standard guarantee conditions We, Zanussi-Electrolux, undertake that if within 12 months of the date of the purchase this ZanussiElectrolux appliance or any part thereof is proved to be defective by reason only of faulty workmanship or materials, we will, at our option repair or replace the same FREE OF CHARGE for labour, materials or carriage on condition that: · The appliance has been correctly installed and used only on the electricity supply state
When you contact the Service Force Centre you will need to give the following details: 1.Your name, address and postcode. 2.Your telephone number. 3. Clear concise details of the fault. 4. The model and Serial number of the appliance (found on the rating plate). 5.The purchase date. Please note a valid purchase receipt or guarantee documentation is required for in guarantee service calls.
European guarantee This appliance is guaranteed by Electrolux in each of the countries listed at the back of this user manual, for the period specified in the appliance guarantee or otherwise by law.
electrolux Dziękujemy za zakup produktu naszej firmy Życzymy Państwu wiele satysfakcji z dokonanego wyboru. Wierzymy, że dzięki korzyściom plynącym z użytkowania tego sprzętu dołączą Państwo do stale powiększającego się grona zadowolonych klientów, a podczas następnych zakupów wybiorą Państwo również produkty z naszej oferty. Prosimy o uważne zapoznanie się z instrukcją obsługi. Zalecamy przechowywanie jej przez cały okres eksploatacji urządzenia oraz przekazanie podczas ewentualnej zmiany właściciela.
electrolux Spis treści Ostrzeżenia i ważne informacje bezpieczeństwa ............................................. 39 Opis urządzenia ............................................................................................... 41 Pokrętła sterowania .......................................................................................... 42 Przed pierwszym użyciem piekarnika .............................................................. 44 Programator elektryczny .......................................
electrolux Polski Ostrzeżenia i ważne informacje bezpieczeństwa Zawsze przechowywać niniejsze instrukcje z urządzeniem. W razie sprzedaży lub przekazania urządzenia innemu użytkownikowi bądź w razie przeprowadzki i pozostawienia go na miejscu, należy pamiętać o przekazaniu nowemu użytkownikowi niniejszej instrukcji, aby umożliwić mu zapoznanie się z funkcjonowaniem urządzenia i ewentualnymi ostrzeżeniami. Niniejsze ostrzeżenia mają na celu zapewnienie bezpieczeństwa użytkownikowi i jego domownikom.
electrolux • Przed rozpoczęciem czyszczenia Serwis piekarnika, wyłączyć zasilanie lub wyjąć wtyczkę piekarnika z gniazdka. • Wszystkie przeglądy lub naprawy należy wykonywać w zakładach • Sprawdzić, czy piekarnik jest serwisowych producenta lub wyłączony “WYŁ”, jeśli już zakładach autoryzowanych przez zakończono pieczenie. producenta. Nalegać na stosowanie • Piekarnik może być używany jako wyłącznie oryginalnych części urządzenie niezależne lub w zamiennych.
electrolux Opis urządzenia 56 4 3 2 1 7 8 9 10 11 11 1. 2. 3. 4. 5. Panel sterowania Pokrętło wyboru funkcji piekarnika Programator elektroniczny Pokrętło termostatu Kontrolka zasilania WŁKontrolka termostatu 6. Kontrolka zasilania WŁ 7. Otwory wentylacyjne powietrza dla wentylatora chłodzenia 8. Ruszt do grilla 9. Oświetlenie piekarnika 10.Wentylator piekarnika 11.
electrolux Pokrętła sterowania Wysuwane pokrętła Niektóre modele są wyposażone w wysuwane pokrętła sterujące. Pokrętła znajdują się na panelu sterowania, całkowicie wsunięte, gdy piekarnik nie pracuje.
electrolux momentu osiągnięcia odpowiedniej temperatury. Następnie cyklicznie zapala się i gaśnie symbolizując utrzymywanie temperatury. Termostat bezpieczeństwa Dla zapobieżenia nadmiernemu przegrzaniu spowodowanemu nieprawidłowym użyciem urządzenia lub wadliwym komponentem, piekarnik został wyposażony w termostat bezpieczeństwa, który w razie potrzeby wyłącza zasilanie. Piekarnik włącza się ponownie automatycznie po obniżeniu temperatury.
electrolux Przed pierwszym użyciem piekarnika Przed przystąpieniem do eksploatacji piekarnika zdjąć całe opakowanie oraz wszystkie osłony, zarówno te znajdujące się wewnątrz, jak i na zewnątrz urządzenia. Przed pierwszym użyciem, piekarnik należy wygrzać bez wkładania do środka żadnych potraw. W tym czasie może być wyczuwalny nieprzyjemny zapach. Jest to zjawisko normalne. Zapach powodują resztki z procesu produkcyjnego. Sprawdzić, czy pomieszczenie posiada prawidłową wentylację.
electrolux Programator elektroniczny 4 7 8 5 6 2 1 3 Kuchenka jest gotowa do pracy tylko po ustawieniu godziny. Używanie piekarnika nie wymaga wybrania żadnego programu. Ustawianie godziny Po włączeniu zasilania lub po zaniku prądu w sieci, na wyświetlaczu pojawi się i będzie migać. Ustawianie godziny: 1. Naciskać przycisk “ ” lub “ ”. 2. Po ustawieniu godziny, należy poczekać 5 sekund: kontrolka “Godzina” zgaśnie, a na wyświetlaczu pojawi się aktualny czas. Urządzenie jest gotowe do pracy.
electrolux Funkcja “Czas pieczenia” Funkcja ta umożliwia automatyczne wyłącznie piekarnika po zakończeniu zaprogramowanego czasu pieczenia. Włożyć potrawę do piekarnika, wybrać funkcję pieczenia i ustawić temperaturę pieczenia. Naciskać przycisk aż pojawi się funkcja “Czas pieczenia” . Zacznie migać odpowiednia kontrolka. Następnie, wykonać następujące czynności: Ustawianie czasu pieczenia: 1. Naciskać przycisk “ “ lub “ “. 2.
electrolux Funkcja “Koniec pieczenia” Funkcja ta pozwala na ustawienie automatycznego wyłączenia piekarnika po upłynięciu zaprogramowanego czasu zakończenia pieczenia. Włożyć potrawę do piekarnika, wybrać funkcję pieczenia i ustawić temperaturę pieczenia. Naciskać przycisk aż pojawi się wybrana zostanie funkcja “Zakończenie pieczenia” . Zacznie migać odpowiednia kontrolka. Następnie, wykonać następujące czynności: Ustawianie czasu zakończenia pieczenia: 1. Naciskać przycisk “ ” lub “ ”. 2.
electrolux “Czas pieczenia” oraz “Zakończenie pieczenia” połączone Funkcje “Czas pieczenia” i “Zakończenia pieczenia” można stosować jednocześnie tak, aby ustawić piekarnik, aby automatycznie włączył i wyłączył się w późniejszym czasie. 1. W przypadku funkcji “Czas pieczenia” po wybraniu funkcji “Czas pieczenia” (czas pieczenia należy ustawić jak to opisano w odpowiednim rozdziale). Następnie nacisnąć przycisk : na wyświetlaczu pokazane zostaną zaprogramowane ustawienia. 2.
electrolux Wyłączanie wyświetlacza 1. Jednocześnie wcisnąć dwa przyciski programatora i przytrzymać je przez ok. 5 sekund. Wyświetlacz wyłączy się. 2. W celu ponownego włączenia wyświetlacza, wystarczy wcisnąć dowolny przycisk. Wyświetlacz można wyłączyć tylko pod warunkiem, że nie zostały ustawione żadne funkcje kuchenki.
electrolux Korzystanie z piekarnika Kuchenka posiada unikalny system, który powoduje naturalną cyrkulację powietrza oraz stały obieg pary. System ten umożliwia gotowanie na parze oraz zapewnia delikatność potraw w środku z jednoczesną ich chrupkością na zewnątrz. Dodatkowo, do minimum ograniczony zostaje czas pieczenia oraz zużycie energii. W czasie pieczenia może powstawać para, która może się wydostawać na zewnątrz po otwarciu drzwiczek piekarnika. Jest to zjawisko normalne.
electrolux Pieczenie konwekcyjne - - - - - Żywność pieczona jest przy użyciu podgrzanego powietrza rozprowadzanego równo wewnątrz piekarnika za pomocą wentylatora położonego na tylnej ścianie piekarnika. W ten sposób ciepło dociera szybko i równomiernie do wszystkich części piekarnika, co oznacza, że można jednocześnie piec różne rodzaje potraw na różnych poziomach.
electrolux 3. Wyregulować pozycję rusztu i patelni do grillowania odpowiednio do grubości potrawy oraz zgodnie z instrukcjami grillowania. Grzałka grilla jest sterowana przez termostat. Podczas pieczenia, grill włącza się i wyłącza cyklicznie, aby zapobiec przegrzaniu. Tylko górna grzałka Funkcja ta jest odpowiednia do kończenia pieczenia dań, np. lasagne, zapiekanka, zapiekanka serowokalafiorowa, itp. Tylko grzałka dolna Funkcja ta jest szczególnie przydatna do ciast do nadzień.
electrolux Rozmrażanie Wentylator piekarnika pracuje bez ciepła i powoduje cyrkulację powietrza w temperaturze pokojowej wewnątrz piekarnika. Sprawdzić, czy pokrętło termostatu jest wyłączone. Porady i wskazówki Pieczenie ciast: Ciasta zazwyczaj piecze się w średniej temperaturze (między 150 i 200°C) i dlatego konieczne jest rozgrzanie piekarnika przez ok. 10 min. Drzwiczek piekarnika nie należy otwierać przed upływem co najmniej 3/4 ustawionego czasu pieczenia.
electrolux Tabela pieczenia Pieczenie konwencjonalne - Podane czasy nie obejmują czasu wstępnego nagrzania piekarnika. Pusty piekarnik należy zawsze rozgrzewać przez 10 minut.
electrolux Grillowanie - Podane czasy nie obejmują czasu wstępnego nagrzania piekarnika Pusty piekarnik należy zawsze rozgrzewać przez 10 minut. Ilość Grillowanie TYP POTRAWY Steki (filety) Befsztyki Kiełbasy Kotlety wieprzowe Kurczak (połówki) Kebaby Kurczak (pierś) Hamburger* * Wstępne rozgrzanie 5’00'’ Ryby (filety) Kanapki Tosty Czas pieczenia w minutach 1-sza strona 2-ga strona Kawałki g.
electrolux Konserwacja i czyszczenie Przed rozpoczęciem czyszczenia, należy wyłączyć piekarnik i poczekać, aż ostygnie. Do czyszczenia urządzenia nie należy stosować pary ani parowych urządzeń czyszczących. WAŻNE: Przed rozpoczęciem prac konserwacyjnych lub czyszczenia, należy odłączyć piekarnik od zasilania elektrycznego. Aby zapewnić trwałość urządzenia konieczne jest regularne wykonywanie następujących czynności czyszczących: - Wykonywać dopiero po ostygnięciu piekarnika.
electrolux NIE należy stosować środków czyszczących zawierających wybielacz, ponieważ mogą one zmatowić powierzchnie. Nie należy również stosować ściernych środków czyszczących. Czyszczenie zewnętrznych powierzchni kuchenki Należy regularnie przecierać panel sterowania, drzwiczki piekarnika oraz uszczelkę drzwiową stosując do tego celu delikatną szmatkę zwilżoną ciepłą wodą z dodatkiem detergentu w płynie.
electrolux Pielęgnacja powłok katalitycznych Podczas przyrządzania potraw wytapia się z nich tłuszcz, wycieka olej i pryskają fragmenty potraw, ale emalia katalityczna usuwa te zabrudzenia. Aby wspomóc ten proces, zaleca się włączanie pustego piekarnika raz w tygodniu na jedną lub dwie godziny, aby zapewnić maksymalną wydajność powłoki katalitycznej. Aby wyczyścić piekarnik, proszę wykonać następujące czynności: 1.
electrolux • • W miarę upływu czasu może dojść do lekkiego odbarwienia i polerowania powłoki katalitycznej. Nie wpływa to w żaden sposób na jej właściwości. Przestrzegać zaleceń podanych w rozdziale "Jak przyrządzać p o t ra w y, a by zmniejszyć powstawanie zabrudzeń". Jak przyrządzać potrawy, aby zmniejszyć powstawanie zabrudzeń to szczególnie korzystne w przypadku przyrządzania dużych pieczeni czy indyków, gdyż umożliwia upieczenie mięsa w środku, zanim zewnętrzna część zbytnio się przyrumieni.
electrolux Wsporniki półek i panele katalityczne Wsporniki półek i panele katalityczne można zdemontować w celu oczyszczenia. Przed przystąpieniem do tej operacji proszę się upewnić, że piekarnik całkowicie ostygł. Należy postępować w następujący sposób: 1. odkręcić przednią śrubę jednocześnie przytrzymując wspornik półki i panel katalityczny drugą ręką (patrz diagram 1). 2. Przytrzymać wspornik półki i panel katalityczny i podnieść je, równocześnie odczepiając tylny hak.
electrolux 3. odkręcić i obrócić małe dźwignie znajdujące się na obu zawiasach (Rys. B); 4. drzwi należy trzymać po prawej lub lewej stronie, a następnie powoli obrócić w kierunku piekarnika do położenia w połowie zamkniętego (Rys. C); 5. delikatnie wyjąć drzwiczki (Rys. C); 6. położyć je na stabilnej podstawie. Drzwiczki należy wyczyścić przy pomocy delikatnej szmatki zwilżonej w ciepłej wodzie z mydłem. Nie należy korzystać ze ściemych środków czyszczących.
electrolux Wymiana oświetlenia piekarnika Odłączenie urządzenia Jeśli to konieczne, wymienić żarówkę. Żarówka musi mieć następujące parametry: - Moc: 15 W/25 W, - Napięcie: 230 V (50 Hz), - Żaroodporność do temperatury 300°C, - Typ gwintu: E14. Żarówki można nabyć w lokalnym punkcie serwisowym. Wymiana spalonej żarówki: 1. Sprawdzić, czy piekarnik jest odłączony od zasilania. 2. Wcisnąć szklaną oprawkę i obrócić w kierunku przeciwnym do ruchu wskazówek zegara. 3.
electrolux Co zrobić, jeśli urządzenie nie działa prawidłowo Jeśli urządzenie nie działa prawidłowo, przed skontaktowaniem się z lokalnym punktem serwisowym Electrolux, należy wykonać następujące kontrole. ROZWIĄZANIE PROBLEM Piekarnik się nie włącza. Nie działa kontrolka temperatury piekarnika. Nie działa piekarnika. oświetlenie Dania pieką się za długo lub za szybko. Sprawdzić, czy wybrana została funkcja pieczenia i temperatura.
electrolux Dane techniczne Wartości znamionowe grzałek Dolna grzałka 1000 W Górna grzałka 800 W Pełna moc (górna+dolna grzałka) 1800 W Pieczenie konwekcyjne 2000 W Grill 1650 W Pełny Grill 2450 W Grillowanie termiczne 2475 W Oświetlenie piekarnika 25 W Silnik wentylatora gorącego powietrza 25 W Silnik wentylatora chłodzenia 25 W Razem moc znamionowa Napięcie robocze (50 Hz) 2500 W 230 V Wymiary wnęki Wysokość pod blatem 593 mm w meblu 580 mm Szerokość 560 mm Głębokość 550 mm Pi
electrolux Instrukcje dla instalatora Podłączenie trzeba wykonać zgodnie z obowiązującymi przepisami prawa. Wszelkie prace wykonywać po wyłączeniu urządzenia. Prace przy urządzeniu wykonywać mogą jedynie upoważnieni serwisanci. Producent nie ponosi żadnej odpowiedzialności za niezastosowanie się do niniejszych wskazówek dotyczących bezpieczeństwa.
electrolux przepisami. Zielono-żółty przewód uziemienia nie może być przerwany przez przełącznik i powinien być o 2-3 cm dłuższy od przewodów fazy i zera. Dostarczony przewód zasilający oraz wtyczka muszą być podłączone do całkowicie izolowanego gniazdka (230 V~, 50 Hz). Całkowicie izolowane gniazdko powinno być prawidłowo zamontowane zgodnie z przepisami.
electrolux Instrukcje zabudowy Rys. A Rys. B Wymiary piekarnika (Rys. A) Instrukcje zabudowy Aby zapewnić prawidłowe działanie urządzenia do zabudowy, szafka kuchenna lub wnęka na urządzenie powinny mieć odpowiednie wymiary (Rys. B-C). 550 M 560 IN - 57 593 Aby zapewnić prawidłowe działanie urządzenia do zabudowy, szafka kuchenna lub wnęka na urządzenie powinny mieć odpowiednie wymiary.
electrolux Gwarancja/Serwis Warunki gwarancji 1. Electrolux Poland Sp. z o.o. gwarantuje, że zakupione urządzenie jest wolne od wad fizycznych zobowiązując się jednocześnie – w razie ujawnienia takich wad w okresie gwarancyjnym i w zakresie określonym niniejszym dokumentem – do ich usunięcia w sposób uzależniony od właściwości wady. 2. Ujawniona wada zostanie usunięta na koszt gwaranta w ciągu 14 dni od daty zgłoszenia uszkodzenia do autoryzowanego punktu serwisowego Electrolux Poland. 3.
electrolux Serwis i części zamienne Jeżeli kuchenka nie działa prawidłowo mimo wykonania wszystkich kontroli wymienionych w poprzednim rozdziale, należy skontaktować się z lokalnym punktem serwisowym i określić typ usterki, model urządzenia (Mod.), jego numer produktu (Nr prod.) i numer seryjny (nr na tabliczce identyfikacyjnej). Tabliczka ta umieszczona jest na przedniej zewnętrznej krawędzi komory piekarnika.
electrolux 70
electrolux ZOB 580 0.79 kWh 0.78 kWh 53 43 min. 41 min.
electrolux www.electrolux.co.uk www.electrolux.pl 72 35699-1601 01/08 R.