EN DE User Manual Benutzerinformation Oven Backofen ZOB21601 2 18
Contents Safety information Safety instructions Product description Before first use Daily use Clock functions 2 3 5 5 5 7 Additional functions Hints and tips Care and cleaning Troubleshooting Installation Energy efficiency 7 7 12 14 15 17 Subject to change without notice. Safety information Before the installation and use of the appliance, carefully read the supplied instructions. The manufacturer is not responsible if an incorrect installation and use causes injuries and damages.
• • • • • • • Internally the appliance becomes hot when in operation. Do not touch the heating elements that are in the appliance. Always use oven gloves to remove or put in accessories or ovenware. Before maintenance cut the power supply. Ensure that the appliance is switched off before replacing the lamp to avoid the possibility of electric shock. Do not use a steam cleaner to clean the appliance.
• • removed from the holder), earth leakage trips and contactors. The electrical installation must have an isolation device which lets you disconnect the appliance from the mains at all poles. The isolation device must have a contact opening width of minimum 3 mm. This appliance complies with the E.E.C. Directives. Use • • • • Care and cleaning WARNING! WARNING! Risk of injury, burns and electrical shock or explosion. • • • • • • • • • • • • Use this appliance in a household only.
• • Disconnect the appliance from the mains supply. Cut off the mains cable and discard it. • Remove the door catch to prevent children and pets to get closed in the appliance.
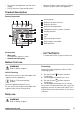
Activating and deactivating the appliance It depends on the model if your appliance has knob symbols, indicators or lamps: • The indicator comes on when the oven heats up. • The lamp comes on when the appliance operates. • The symbol shows whether the knob controls the oven functions or the temperature. 1. Turn the knob for the oven functions to select an oven function. 2. Turn the knob for the temperature to select a temperature. 3.
Clock functions Minute Minder Use it to set a countdown time for an oven function. After the time period is completed, an acoustic signal sounds. This function has no effect on the operation of the appliance. 1. Set an oven function and the temperature. 2. Turn the knob for the timer as far as it goes, then turn it to necessary time period. Additional functions Cooling fan Safety thermostat When the appliance operates, the cooling fan activates automatically to keep the surfaces of the appliance cool.
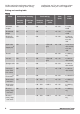
Initially, monitor the performance when you cook. Find the best settings (heat setting, cooking time, etc.) for your cookware, recipes and quantities when you use this appliance.
Food Conventional Cooking Temperature (°C) Shelf position Fan Cooking Temperature (°C) Time (min) Comments Shelf position Meringues 120 3 120 3 80 - 100 In a baking tray Buns1) 190 3 180 3 15 - 20 In a baking tray Eclairs 190 3 170 3 25 - 35 In a baking tray Plate tarts 180 2 170 2 45 - 70 In a 20 cm cake mould Rich fruit cake 160 1 150 2 110 - 120 In a 24 cm cake mould Victoria 170 1 160 1 50 - 60 In a 20 cm cake mould sandwich1) 1) Preheat the oven for 10 m
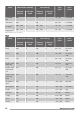
Food Conventional Cooking Temperature (°C) Shelf position Fan Cooking Temperature (°C) Time (min) Comments Shelf position Vegetable flan 200 2 175 2 45 - 60 In a mould Quiches1) 180 1 180 1 50 - 60 In a mould Lasagne1) 180 - 190 2 180 - 190 2 25 - 40 In a mould Cannelloni1) 180 - 190 2 180 - 190 2 25 - 40 In a mould 1) Preheat the oven for 10 minutes.
Food Conventional Cooking Temperature (°C) Shelf position Fan Cooking Temperature (°C) Time (min) Comments Shelf position Rabbit 190 2 175 2 60 - 80 Cut in pieces Hare 190 2 175 2 150 - 200 Cut in pieces Pheasant 190 2 175 2 90 - 120 Whole Fish Food Conventional Cooking Temperature (°C) Shelf position Fan Cooking Temperature (°C) Time (min) Comments Shelf position Trout / Sea bream 190 2 175 2 40 - 55 3 - 4 fish Tuna fish / Salmon 190 2 175 2 35 - 60 4 - 6 fil
Food Quantity Pieces Temperature (°C) (g) Time (min) 1st side Shelf position 2nd side Toasted sandwiches 4-6 - max. 5-7 - 4 Toast 4-6 - max. 2-4 2-3 4 Drying - Fan Cooking • let it cool down for one night to complete the drying. Cover trays with grease proof paper or baking parchment.
• • Clean all accessories after each use and let them dry. Use a soft cloth with warm water and a cleaning agent. If you have nonstick accessories, do not clean them using aggressive agents, sharpedged objects or a dishwasher. It can cause damage to the nonstick coating. Stainless steel or aluminium appliances Clean the oven door with a wet sponge only. Dry it with a soft cloth. Do not use steel wool, acids or abrasive materials as they can damage the oven surface.
3 The screen-printing zone must face the inner side of the door. Make sure that after the installation the surface of the glass panel frame on the screen-printing zones is not rough when you touch it. 4 Make sure that you install the internal glass panel in the seats correctly. 3 Close the oven door 4 Put the door on a soft halfway to the first cloth on a stable opening position. surface. Then pull forward and remove the door from its seat.
What to do if... Problem Possible cause Remedy The oven does not heat up. The oven is deactivated. Activate the oven. The oven does not heat up. The fuse is released. Make sure that the fuse is the cause of the malfunction. If the fuse releases again and again, contact a qualified electrician. The lamp does not operate. The lamp is defective. Replace the lamp. Steam and condensation settle on the food and in the cavity of the oven. You left the dish in the oven for too long.
Securing the appliance to the cabinet Building In 548 A 114 16 20 600 21 558 min. 550 min. 560 B 589 594 573 594 5 3 Electrical installation 548 min. 550 558 114 16 20 590 21 min. 560 589 594 573 The manufacturer is not responsible if you do not follow the safety precautions from the Safety chapters. This appliance is supplied only with a main cable.
Energy efficiency Product Fiche and information according to EU 65-66/2014 Supplier's name Zanussi Model identification ZOB21601XK Energy Efficiency Index 105,9 Energy efficiency class A Energy consumption with a standard load, conventional mode 0,93 kWh/cycle Energy consumption with a standard load, fan-forced mode 0,90 kWh/cycle Number of cavities 1 Heat source Electricity Volume 72 l Type of oven Built-In Oven Mass 30.
Inhaltsverzeichnis Sicherheitsinformationen Sicherheitsanweisungen Gerätebeschreibung Vor der ersten Inbetriebnahme Täglicher Gebrauch Uhrfunktionen 18 19 21 22 22 23 Zusatzfunktionen Tipps und Hinweise Reinigung und Pflege Fehlersuche Montage Energieeffizienz 23 24 29 32 33 34 Änderungen vorbehalten. Sicherheitsinformationen Lesen Sie vor der Montage und dem Gebrauch des Geräts zuerst die Gebrauchsanleitung.
Allgemeine Sicherheit • • • • • • • • Nur eine qualifizierte Fachkraft darf den Elektroanschluss des Geräts vornehmen und das Kabel austauschen. Der Geräteinnenraum wird während des Betriebs heiß. Berühren Sie nicht die Heizelemente im Geräteinnern. Verwenden Sie zum Anfassen des Zubehörs und der Töpfe wärmeisolierende Handschuhe. Trennen Sie das Gerät vor Wartungsarbeiten von der Stromversorgung.
• • • • • • • • • • • • Stellen Sie sicher, dass die elektrischen Daten auf dem Typenschild den Daten Ihrer Stromversorgung entsprechen. Wenden Sie sich andernfalls an eine Elektrofachkraft. Schließen Sie das Gerät nur an eine ordnungsgemäß installierte Schutzkontaktsteckdose an. Verwenden Sie keine Mehrfachsteckdosen oder Verlängerungskabel. Achten Sie darauf, Netzstecker und Netzkabel nicht zu beschädigen.
• bestimmungsfremd anzusehen, zum Beispiel das Beheizen eines Raums. Die Backofentür muss bei Betrieb stets geschlossen sein. • • Reinigung und Pflege WARNUNG! Backofenbeleuchtung Verletzungs-, Brandgefahr sowie Risiko von Schäden am Gerät. • • • • • • • Falls Sie ein Backofenspray verwenden, befolgen Sie bitte unbedingt die Anweisungen auf der Verpackung. Reinigen Sie die katalytische Emailbeschichtung (falls vorhanden) nicht mit Reinigungsmitteln.
Zubehör • • Kombirost Für Kochgeschirr, Kuchenformen, Braten. Aluminiumbackblech Für Kuchen und Plätzchen. • Brat- und Fettpfanne Zum Backen und Braten oder zum Auffangen von abtropfendem Fett. Vor der ersten Inbetriebnahme WARNUNG! Siehe Kapitel Sicherheitshinweise. Erste Reinigung Nehmen Sie die Zubehörteile und die herausnehmbaren Einhängegitter aus dem Gerät. Siehe Kapitel „Reinigung und Pflege“. Reinigen Sie das Gerät vor dem ersten Gebrauch.
Ofenfunktionen Backofenfunktion Anwendung Stellung Aus Das Gerät ist ausgeschaltet. Ober-/Unterhitze / Aqua-Reinigungsfunktion Zum Backen und Braten auf einer Einschubebene. Weitere Informationen zur Aqua-Reinigungsfunktion finden Sie im Kapitel „Reinigung und Pflege“. Heißluft Zum Braten oder zum Braten und Backen von Speisen mit derselben Gartemperatur auf mehreren Einschubebenen gleichzeitig, ohne dass es zu einer Aromaübertragung kommt.
Wiedereinschaltung des Backofens erfolgt automatisch bei Temperaturabfall. Tipps und Hinweise Backen von Kuchen WARNUNG! Siehe Kapitel Sicherheitshinweise. • Die Temperaturen und Backzeiten in den Tabellen sind nur Richtwerte. Sie sind abhängig von den Rezepten, der Qualität und der Menge der verwendeten Zutaten. • Garen von Fleisch und Fisch • Allgemeine Informationen • Das Gerät hat fünf Einschubebenen. Die Einschubebenen werden vom Boden des Backofens aus gezählt.
Speise Ober-/Unterhitze Temperatur (°C) Ebene Heissluft Temperatur (°C) Dauer (Min.
Speise Ober-/Unterhitze Temperatur (°C) Ebene Heissluft Temperatur (°C) Dauer (Min.
Ofengerichte Speise Ober-/Unterhitze Temperatur (°C) Ebene Heissluft Temperatur (°C) Dauer (Min.) Bemerkungen Ebene Nudelauflauf 200 2 180 2 40 - 50 In einer Auflaufform Gemüseauflauf 200 2 175 2 45 - 60 In einer Auflaufform Quiche1) 180 1 180 1 50 - 60 In einer Auflaufform Lasagne1) 180 - 190 2 180 - 190 2 25 - 40 In einer Auflaufform Cannelloni1) 180 - 190 2 180 - 190 2 25 - 40 In einer Auflaufform 1) Backofen 10 Min. vorheizen.
Speise Ober-/Unterhitze Temperatur (°C) Ebene Heissluft Temperatur (°C) Dauer (Min.) Bemerkungen Ebene Ente 175 2 220 2 120 - 150 ganz Gans 175 2 160 1 150 - 200 ganz Hasenbraten 190 2 175 2 60 - 80 zerlegt Hase 190 2 175 2 150 - 200 zerlegt Fasan 190 2 175 2 90 - 120 ganz Fisch Speise Ober-/Unterhitze Temperatur (°C) Ebene Heissluft Temperatur (°C) Dauer (Min.
Speise Menge Stück Temperatur (°C) (g) Erste Seite • Ebene Zweite Seite Hamburger 6 600 max. 20 - 30 - 4 Fischfilet 4 400 max. 12 - 14 10 - 12 4 Belegte Toastbrote 4-6 - max. 5-7 - 4 Toast 4-6 - max. 2-4 2-3 4 Dörren - Heißluft • Dauer (Min.) ausschalten, öffnen und am besten über Nacht auskühlen lassen. Verwenden Sie mit Butterbrot- oder Backpapier belegte Backbleche.
• • • • • reinigen Sie damit die Vorderseite des Geräts. Reinigen Sie die Metalloberflächen mit einem handelsüblichen Reinigungsmittel. Reinigen Sie den Geräteinnenraum nach jedem Gebrauch. Fettansammlungen und Speisereste könnten einen Brand verursachen. Bei der Brat- und Fettpfanne ist das Risiko besonders hoch. Entfernen Sie hartnäckige Verschmutzungen mit einem speziellen Backofenreiniger. Reinigen Sie alle Zubehörteile nach jedem Gebrauch und lassen Sie sie trocknen.
ACHTUNG! 7 Verwenden Sie das Gerät nicht ohne die innere Glasscheibe. 1 2 1 1 Klappen Sie die 2 Heben Sie die Hebel Backofentür ganz auf, der beiden und greifen Sie an Scharniere an, und die beiden klappen Sie sie nach Türscharniere. vorn. 3 4 2 7 Heben Sie die Glasscheibe vorsichtig an und entfernen Sie sie. Reinigen Sie die Glasscheibe mit Wasser und Spülmittel. Trocknen Sie die Glasscheibe sorgfältig ab. Nach der Reinigung müssen die Glasscheibe und die Backofentür wieder eingebaut werden.
ACHTUNG! Halogenlampen immer mit einem Tuch anfassen, um ein Einbrennen von Fett (Fingerabdrücke) zu vermeiden. 1. Schalten Sie das Gerät aus. 2. Entfernen Sie die Sicherungen aus dem Sicherungskasten, oder schalten Sie den Schutzschalter aus. Rückwandlampe 1. Drehen Sie die Glasabdeckung der Lampe gegen den Uhrzeigersinn, und nehmen Sie sie ab. 2. Reinigen Sie die Glasabdeckung. 3. Ersetzen Sie die Lampe durch eine geeignete, bis 300 °C hitzebeständige Lampe. 4. Bringen Sie die Glasabdeckung wieder an.
Montage Befestigung des Geräts im Möbel WARNUNG! Siehe Kapitel Sicherheitshinweise. Montage A 548 558 min. 550 114 16 20 600 B 21 min. 560 589 594 573 594 5 3 Elektrischer Anschluss Der Hersteller haftet nicht für Schäden, die aufgrund der Nichtbeachtung der in den Sicherheitshinweisen beschriebenen Sicherheitsvorkehrungen entstehen. 548 min. 550 114 16 20 590 21 558 min. 560 589 594 573 594 5 3 Das Gerät wird nur mit einem Netzkabel geliefert.
Energieeffizienz Produktdatenblatt und Backofeninformatationen gemäß EG 65-66/2014 Herstellername Zanussi Modellidentifikation ZOB21601XK Energieeffizienzindex 105,9 Energie-Effizienzklasse A Energieverbrauch bei Standardbeladung, Ober-/Unterhitze 0,93 kWh/Programm Energieverbrauch bei Standardbeladung, Heißluft 0,90 kWh/Programm Anzahl der Garräume 1 Hitzequelle Strom Volumen 72 l Backofentyp Einbau-Backofen Gewicht 30.
www.zanussi.
867304388-A-282014 www.zanussi.