EN DE User Manual Benutzerinformation Oven Backofen ZOB21601XK 2 19
Contents Safety information Safety instructions Product description Before first use Daily use Clock functions Using the accessories 2 3 5 5 6 7 7 Additional functions Hints and tips Care and cleaning Troubleshooting Installation Energy efficiency 8 8 13 15 16 17 Subject to change without notice. Safety information Before the installation and use of the appliance, carefully read the supplied instructions.
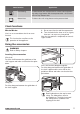
• • • • • • • • WARNING: The appliance and its accessible parts become hot during use. Care should be taken to avoid touching heating elements. Children less than 8 years of age shall be kept away unless continuously supervised. Always use oven gloves to remove or put in accessories or ovenware. Before maintenance cut the power supply. Ensure that the appliance is switched off before replacing the lamp to avoid the possibility of electric shock. Do not use a steam cleaner to clean the appliance.
• • • • • • • The shock protection of live and insulated parts must be fastened in such a way that it cannot be removed without tools. Connect the mains plug to the mains socket only at the end of the installation. Make sure that there is access to the mains plug after the installation. If the mains socket is loose, do not connect the mains plug. Do not pull the mains cable to disconnect the appliance. Always pull the mains plug.
• • If you use an oven spray, obey the safety instructions on the packaging. Do not clean the catalytic enamel (if applicable) with any kind of detergent. Internal light • The type of light bulb or halogen lamp used for this appliance is only for household appliances. Do not use it for house lighting. WARNING! Risk of electrical shock. • • Before replacing the lamp, disconnect the appliance from the power supply. Only use lamps with the same specifications.
Refer to "Care and cleaning" chapter. Clean the appliance and the accessories before first use. Put the accessories and the removable shelf supports back to their initial position. Preheating Preheat the empty appliance to burn off the remaining grease. 1. Set the function and the maximum temperature. 2. Let the appliance operate for 1 hour. 3. Set the function and set the maximum temperature. 4. Let the appliance operate for 15 minutes. Accessories can become hotter than usual.
Oven function Application Pizza Setting To bake food on one shelf position for a more intensive browning and a crispy bottom. Set the temperature 20 - 40 °C lower than for Top / Bottom Heat. Bottom Heat To bake cakes with crispy bottom and to preserve food. Clock functions Minute Minder Use it to set a countdown time for an oven function. This function has no effect on the operation of the appliance. 1. Set an oven function and the temperature. 2.
Additional functions Cooling fan Safety thermostat When the appliance operates, the cooling fan activates automatically to keep the surfaces of the appliance cool. If you deactivate the appliance, the cooling fan can continue to operate until the appliance cools down. Incorrect operation of the appliance or defective components can cause dangerous overheating. To prevent this, the oven has a safety thermostat which interrupts the power supply.
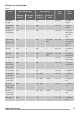
Baking and roasting table Cakes Food Top / Bottom Heat Temperature (°C) Shelf position Fan Cooking Temperature (°C) Time (min) Comments Shelf position Whisked recipes 170 2 160 3 45 - 60 In a cake mould Shortbread dough 170 2 160 3 20 - 30 In a cake mould Buttermilk cheesecake 170 1 160 1 70 - 80 In a 26 cm cake mould on a wire shelf Apple cake 170 2 160 2 (left and right) 80 - 100 In two 20 cm cake moulds on a wire shelf Strudel 175 3 150 2 60 - 80 In a baking tray
Food Top / Bottom Heat Temperature (°C) Shelf position Fan Cooking Temperature (°C) Time (min) Comments Shelf position Buns1) 190 3 180 3 15 - 20 In a baking tray Eclairs 190 3 170 3 25 - 35 In a baking tray Plate tarts 180 2 170 2 45 - 70 In a 20 cm cake mould Rich fruit cake 160 1 150 2 110 - 120 In a 24 cm cake mould Victoria 170 1 160 1 50 - 60 In a 20 cm cake mould sandwich1) 1) Preheat the oven for 10 minutes.
Food Top / Bottom Heat Temperature (°C) Shelf position Fan Cooking Temperature (°C) Time (min) Comments Shelf position Quiches1) 180 1 180 1 50 - 60 In a mould Lasagne1) 180 - 190 2 180 - 190 2 25 - 40 In a mould Cannelloni1) 180 - 190 2 180 - 190 2 25 - 40 In a mould 1) Preheat the oven for 10 minutes.
Food Top / Bottom Heat Temperature (°C) Shelf position Fan Cooking Temperature (°C) Time (min) Comments Shelf position Hare 190 2 175 2 150 - 200 Cut in pieces Pheasant 190 2 175 2 90 - 120 Whole Fish Food Top / Bottom Heat Temperature (°C) Shelf position Fan Cooking Temperature (°C) Time (min) Comments Shelf position Trout / Sea bream 190 2 175 2 40 - 55 3 - 4 fish Tuna fish / Salmon 190 2 175 2 35 - 60 4 - 6 fillets Grilling Preheat the empty oven for 3 minutes be
Food Quantity Pieces Toast 4-6 Temperature (°C) (g) - 1st side max. 2-4 Drying - Fan Cooking • • Time (min) Shelf position 2nd side 2-3 4 let it cool down for one night to complete the drying. Cover trays with grease proof paper or baking parchment.
Stainless steel or aluminium appliances Clean the oven door with a damp cloth or sponge only. Dry it with a soft cloth. Do not use steel wool, acids or abrasive materials as they can damage the oven surface. Clean the oven control panel with the same precautions. Cleaning the door gasket • • Regularly do a check of the door gasket. The door gasket is around the frame of the oven cavity. Do not use the appliance if the door gasket is damaged. Contact an Authorised Service Centre.
A 2 B 1 Hold the door trim (B) on the top edge of the door at the two sides and push inwards to release the clip seal. Pull the door trim to the front to remove it. Replacing the lamp Put a cloth on the bottom of the interior of the appliance. It prevents damage to the lamp glass cover and the cavity. WARNING! Danger of electrocution! Disconnect the fuse before you replace the lamp. The lamp and the lamp glass cover can be hot.
Problem Possible cause Remedy The oven does not heat up. The fuse is blown. Make sure that the fuse is the cause of the malfunction. If the fuse is blown again and again, contact a qualified electrician. The lamp does not operate. The lamp is defective. Replace the lamp. Steam and condensation settle on the food and in the cavity of the oven. You left the dish in the oven for too long. Do not leave the dishes in the oven for longer than 15 - 20 minutes after the cooking process ends.
Electrical installation 548 min. 550 21 558 114 16 20 590 The manufacturer is not responsible if you do not follow the safety precautions from the Safety chapters. This appliance is supplied only with a main cable. min. 560 589 594 573 Cable Cable types applicable for installation or replacement: 594 5 3 H07 RN-F, H05 RN-F, H05 RRF, H05 VV-F, H05 V2V2-F (T90), H05 BB-F For the section of the cable refer to the total power on the rating plate.
Energy consumption with a standard load, conventional mode 0.93 kWh/cycle Energy consumption with a standard load, fan-forced mode 0.90 kWh/cycle Number of cavities 1 Heat source Electricity Volume 72 l Type of oven Built-In Oven Mass 28.4 kg EN 60350-1 - Household electric cooking appliances - Part 1: Ranges, ovens, steam ovens and grills - Methods for measuring performance. Energy saving The appliance contains features which help you save energy during everyday cooking.
Inhaltsverzeichnis Sicherheitshinweise Sicherheitsanweisungen Gerätebeschreibung Vor der ersten Inbetriebnahme Täglicher Gebrauch Uhrfunktionen Verwendung des Zubehörs 19 20 23 23 24 25 25 Zusatzfunktionen Tipps und Hinweise Reinigung und Pflege Fehlersuche Montage Energieeffizienz 25 26 31 34 35 36 Änderungen vorbehalten. Sicherheitshinweise Lesen Sie vor der Montage und dem Gebrauch des Geräts zuerst die Gebrauchsanleitung.
• Kinder bis zu 3 Jahren sind während des Betriebs unbedingt von dem Gerät fernzuhalten. Allgemeine Sicherheit • • • • • • • • • Die Montage des Geräts und der Austausch des Kabels muss von einer Fachkraft vorgenommen werden. WARNUNG: Das Gerät und die zugänglichen Geräteteile werden während des Betriebs heiß. Seien Sie vorsichtig und berühren Sie niemals die Heizelemente. Halten Sie Kinder unter 8 Jahren vom Gerät fern, wenn sie nicht ständig beaufsichtigt werden.
• • • • • stets Sicherheitshandschuhe und festes Schuhwerk. Ziehen Sie das Gerät nicht am Griff. Die Mindestabstände zu anderen Geräten und Küchenmöbeln sind einzuhalten. Stellen Sie sicher, dass das Gerät unterhalb von bzw. zwischen sicheren Konstruktionen montiert wird. Die Seiten des Geräts dürfen nur an Geräte oder Einheiten in gleicher Höhe angrenzen. Das Gerät ist mit einem elektrischen Kühlsystem ausgestattet. Es muss an die Stromversorgung angeschlossen werden.
• • • • • – Stellen Sie feuerfestes Geschirr oder andere Gegenstände nicht direkt auf den Boden des Geräts. – Legen Sie keine Alufolie direkt auf den Boden des Geräts. – Stellen Sie kein Wasser in das heiße Gerät. – Lassen Sie nach dem Ausschalten des Geräts kein feuchtes Geschirr oder feuchte Speisen im Backofeninnenraum stehen. – Gehen Sie beim Herausnehmen oder Einsetzen der Innenausstattung sorgfältig vor. Verfärbungen der Emailbeschichtung haben keine Auswirkung auf die Leistung des Geräts.
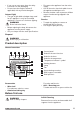
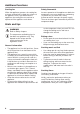
Gerätebeschreibung Gesamtansicht 1 2 3 4 5 6 11 5 4 3 2 1 7 8 9 1 2 3 4 5 6 7 8 9 10 11 Bedienfeld Backofen-Einstellknopf Timer-Einstellknopf Temperaturwahlknopf Temperaturanzeige/-symbol Heizelement Backofenbeleuchtung Ventilator Aqua-Reinigungsbehälter Einhängegitter, herausnehmbar Einschubebenen 10 Zubehör • • Kombirost Für Kochgeschirr, Kuchenformen, Braten. Aluminiumbackblech Für Kuchen und Plätzchen. • Brat- und Fettpfanne Zum Backen und Braten oder zum Auffangen von abtropfendem Fett.
Täglicher Gebrauch WARNUNG! Siehe Kapitel "Sicherheitshinweise". Ein- und Ausschalten des Geräts Je nach Modell besitzt Ihr Gerät Kontrolllampen, Knopfsymbole oder Anzeigen: • Die Lampe leuchtet, während das Gerät in Betrieb ist. • Das Symbol zeigt an, ob der Knopf eine Ofenfunktion oder die Temperatur regelt. • Die Anzeige leuchtet während der Aufheizphase des Backofens auf. 1. Drehen Sie den Backofen-Einstellknopf auf die gewünschte Ofenfunktion. 2.
Uhrfunktionen Kurzzeit-Wecker Einstellen der Countdown-Zeit einer Ofenfunktion. Diese Funktion hat keine Auswirkung auf den Gerätebetrieb. 1. Stellen Sie eine Backofenfunktion und die Temperatur ein. 2. Drehen Sie den Einstellknopf für den Timer bis zum Anschlag und drehen Sie ihn dann auf die erforderliche Zeit. Wenn die Zeit abgelaufen ist, ertönt ein Signal. Verwendung des Zubehörs WARNUNG! Siehe Kapitel "Sicherheitshinweise".
Wiedereinschaltung des Backofens erfolgt automatisch bei Temperaturabfall. Tipps und Hinweise Backen von Kuchen WARNUNG! Siehe Kapitel "Sicherheitshinweise". • Die Temperaturen und Backzeiten in den Tabellen sind nur Richtwerte. Sie sind abhängig von den Rezepten, der Qualität und der Menge der verwendeten Zutaten. • Garen von Fleisch und Fisch • Allgemeine Informationen • Das Gerät hat fünf Einschubebenen. Die Einschubebenen werden vom Boden des Backofens aus gezählt.
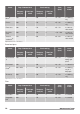
Gargut Ober-/Unterhitze Temperatur (°C) Ebene Heißluft Temperatur (°C) Dauer (Min.
Gargut Ober-/Unterhitze Temperatur (°C) Rosinenbröt- Ebene Heißluft Temperatur (°C) Dauer (Min.) Bemerkungen Ebene 190 3 180 3 15 - 20 Auf dem Backblech Blätterteig 190 3 170 3 25 - 35 Auf dem Backblech Törtchen 180 2 170 2 45 - 70 In einer Kuchenform (20 cm) Üppiger Früchtekuchen 160 1 150 2 110 - 120 In einer Kuchenform (24 cm) Englischer 170 Sandwichkuchen à la 1 160 1 50 - 60 In einer Kuchenform (20 cm) chen1) Victoria1) 1) Backofen 10 Min. vorheizen.
Pudding Gargut Ober-/Unterhitze Temperatur (°C) Ebene Heißluft Temperatur (°C) Dauer (Min.) Bemerkungen Ebene Nudelauflauf 200 2 180 2 40 - 50 In einer Auflaufform Gemüseauflauf 200 2 175 2 45 - 60 In einer Auflaufform Quiche1) 180 1 180 1 50 - 60 In einer Auflaufform Lasagne1) 180 - 190 2 180 - 190 2 25 - 40 In einer Auflaufform Cannelloni1) 180 - 190 2 180 - 190 2 25 - 40 In einer Auflaufform 1) Backofen 10 Min. vorheizen.
Gargut Ober-/Unterhitze Temperatur (°C) Ebene Heißluft Temperatur (°C) Dauer (Min.) Bemerkungen Ebene Ente 175 2 220 2 120 - 150 Ganz Gans 175 2 160 1 150 - 200 Ganz Hasenbraten 190 2 175 2 60 - 80 Zerlegt Hase 190 2 175 2 150 - 200 Zerlegt Fasan 190 2 175 2 90 - 120 Ganz Fisch Gargut Ober-/Unterhitze Temperatur (°C) Ebene Heißluft Temperatur (°C) Dauer (Min.
Gargut Menge Stück Temperatur (°C) (g) Erste Seite • Ebene Zweite Seite Hamburger 6 600 max. 20 - 30 - 4 Fischfilet 4 400 max. 12 - 14 10 - 12 4 Belegte Toastbrote 4-6 - max. 5-7 - 4 Toast 4-6 - max. 2-4 2-3 4 Dörren - Heißluft • Dauer (Min.) ausschalten, öffnen und am besten über Nacht auskühlen lassen. Verwenden Sie mit Butterbrot- oder Backpapier belegte Bleche.
• • • • • reinigen Sie damit die Vorderseite des Geräts. Reinigen Sie die Metalloberflächen mit einem geeigneten Reinigungsmittel. Reinigen Sie den Geräteinnenraum nach jedem Gebrauch. Fettansammlungen und Speisereste könnten einen Brand verursachen. Bei der Brat- und Fettpfanne ist das Risiko besonders hoch. Entfernen Sie hartnäckige Verschmutzungen mit speziellen Backofenreinigern. Reinigen Sie alle Zubehörteile nach jedem Gebrauch und lassen Sie sie trocknen.
Beachten Sie, dass die Backofentür zuklappen kann, wenn Sie versuchen, die innere Glasscheibe abzunehmen, solange die Tür noch am Gerät montiert ist. VORSICHT! Verwenden Sie das Gerät nicht ohne die innere Glasscheibe. Halten Sie die Oberkante der Türglasscheibe fest und ziehen Sie vorsichtig heraus. Achten Sie darauf, dass die Glasscheiben vollständig aus den Halterungen gezogen werden. Reinigen Sie die Glasscheibe mit Wasser und Spülmittel. Trocknen Sie die Glasscheibe sorgfältig ab.
VORSICHT! Halogenlampen immer mit einem Tuch anfassen, um ein Einbrennen von Fett (Fingerabdrücken) zu vermeiden. 1. Schalten Sie das Gerät aus. 2. Entfernen Sie die Sicherungen aus dem Sicherungskasten, oder schalten Sie den Schutzschalter aus. 1. Drehen Sie die Glasabdeckung der Lampe gegen den Uhrzeigersinn, und nehmen Sie sie ab. 2. Reinigen Sie die Glasabdeckung. 3. Ersetzen Sie die Lampe durch eine geeignete, bis 300 °C hitzebeständige Lampe. 4. Bringen Sie die Glasabdeckung wieder an.
Montage Befestigung des Geräts im Möbel WARNUNG! Siehe Kapitel "Sicherheitshinweise". Montage A 548 558 min. 550 114 16 20 600 B 21 min. 560 589 594 573 594 5 3 Elektrischer Anschluss 548 min. 550 21 558 114 16 20 590 Der Hersteller haftet nicht für Schäden, die aufgrund der Nichtbeachtung der in den Sicherheitshinweisen beschriebenen Sicherheitsvorkehrungen entstehen. min. 560 589 594 573 594 5 3 Das Gerät wird nur mit einem Netzkabel geliefert.
Die Erdleitung (gelb/grünes Kabel) muss 2 cm länger sein als die Phasenleitung und der Nullleiter (blaues und braunes Kabel). Energieeffizienz Produktdatenblatt und Informationen gemäß EU 65-66/2014 Herstellername Zanussi Modellidentifikation ZOB21601XK Energieeffizienzindex 105.9 Energieeffizienzklasse A Energieverbrauch bei Standardbeladung, Ober-/Unterhitze 0.93 kWh/Programm Energieverbrauch bei Standardbeladung, Heißluft 0.
Hausmüll. Bringen Sie das Gerät zu Ihrer örtlichen Sammelstelle oder wenden Sie sich an Ihr Gemeindeamt. www.zanussi.
www.zanussi.
www.zanussi.
867339578-A-382016 www.zanussi.