EN User Manual Oven ZOB35301
Contents Safety information Safety instructions Product description Before first use Daily use Clock functions Using the accessories 2 3 5 5 6 7 8 Additional functions Hints and tips Care and cleaning Troubleshooting Installation Energy efficiency 8 8 14 16 17 18 Subject to change without notice. Safety information Before the installation and use of the appliance, carefully read the supplied instructions.
• • • • • • • Internally the appliance becomes hot when in operation. Do not touch the heating elements that are in the appliance. Always use oven gloves to remove or put in accessories or ovenware. Before maintenance cut the power supply. Ensure that the appliance is switched off before replacing the lamp to avoid the possibility of electric shock. Do not use a steam cleaner to clean the appliance.
• • The electrical installation must have an isolation device which lets you disconnect the appliance from the mains at all poles. The isolation device must have a contact opening width of minimum 3 mm. This appliance complies with the E.E.C. Directives. Use WARNING! • • • • • Risk of injury, burns and electrical shock or explosion. • • • • • • • • • • • • Use this appliance in a household only. Do not change the specification of this appliance.
• • Before replacing the lamp, disconnect the appliance from the power supply. Only use lamps with the same specifications. Disposal Cut off the mains cable and discard it. Remove the door catch to prevent children and pets to get closed in the appliance. Service • WARNING! Risk of injury or suffocation. • • • Disconnect the appliance from the mains supply. • To repair the appliance contact an Authorised Service Centre. Use original spare parts only.
Changing the time You cannot change the time of day if the Duration operates. or End function again and again until the indicator for Press the Time of Day function flashes. To set a new time, refer to "Setting the time". Preheating 1. Set the function and the maximum temperature. 2. Let the appliance operate for 1 hour. 3. Set the function and set the maximum temperature. 4. Let the appliance operate for 15 minutes. Accessories can become hotter than usual. The appliance can emit an odour and smoke.
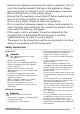
Display A B A) Function indicators B) Time display C) Function indicator C Buttons Button Function Description MINUS To set the time. CLOCK To set a clock function. PLUS To set the time. Clock functions Clock functions table Clock function Application Time of day To set, change or check the time of day. Minute Minder To set countdown time. This function has no effect on the operation of the appliance. Duration To set the cooking time of the oven.
signal sounds. Press a button to stop the signal. 4. Turn the knob for the oven functions and the knob for the temperature to the off position. With the Duration and End functions, the appliance deactivates automatically. Cancelling the clock functions 1. Press the again and again until the necessary function indicator flashes. 2. Press and hold . The clock function goes out after some seconds. Using the accessories WARNING! Refer to Safety chapters.
General information • • • • • • The appliance has five shelf positions. Count the shelf positions from the bottom of the appliance floor. The appliance has a special system which circulates the air and constantly recycles the steam. With this system you can cook in a steamy environment and keep the food soft inside and crusty outside. It decreases the cooking time and energy consumption to a minimum. Moisture can condense in the appliance or on the door glass panels. This is normal.
Food True Fan Cooking Temperature (°C) Time (min) Comments Shelf position Sponge cake 160 2 50 - 60 In a 26 cm cake mould Christmas cake / 150 2 90 - 120 In a 20 cm cake mould Plum cake1) 160 2 50 - 60 In a bread tin Small cakes - one level 140 - 150 3 20 - 30 In a baking tray Small cakes - two levels 140 - 150 2 and 4 25 - 35 In a baking tray Small cakes - three 140 - 150 levels 1, 3 and 5 30 - 45 In a baking tray Biscuits / pastry stripes - one level 140 - 150 3 30 - 3
Bread and pizza Food True Fan Cooking Temperature (°C) Time (min) Comments Shelf position White bread1) 190 1 60 - 70 1 - 2 pieces, 500 gr per piece Rye bread 180 1 30 - 45 In a bread tin Bread rolls1) 180 2 (2 and 4) 25 - 40 6 - 8 rolls in a baking tray Pizza1) 230 - 250 1 10 - 20 In a baking tray or a deep pan Scones1) 190 3 10 - 20 In a baking tray 1) Preheat the oven for 10 minutes.
Food True Fan Cooking Temperature (°C) Time (min) Comments Shelf position English roast beef, medium 200 2 60 - 70 On a wire shelf English roast beef, well done 200 2 70 - 75 On a wire shelf Shoulder of pork 170 2 120 - 150 With rind Shin of pork 160 2 100 - 120 2 pieces Lamb 175 2 110 - 130 Leg Chicken 200 2 70 - 85 Whole Turkey 160 2 210 - 240 Whole Duck 220 2 120 - 150 Whole Goose 160 1 150 - 200 Whole Rabbit 175 2 60 - 80 Cut in pieces Hare 175 2
Food Quantity Pieces Temperature (°C) Time (min) (g) 1st side Shelf position 2nd side Sausages 8 - max. 12 - 15 10 - 12 4 Pork chops 4 600 max. 12 - 16 12 - 14 4 Chicken (cut in 2) 2 1000 max. 30 - 35 25 - 30 4 Kebabs 4 - max. 10 - 15 10 - 12 4 Breast of chicken 4 400 max. 12 - 15 12 - 14 4 Hamburger 6 600 max. 20 - 30 - 4 Fish fillet 4 400 max. 12 - 14 10 - 12 4 Toasted sandwiches 4-6 - max. 5-7 - 4 Toast 4-6 - max.
Vegetables Food Temperature (°C) Time (h) Shelf position 1 position 2 positions Beans 60 - 70 6-8 3 1/4 Peppers 60 - 70 5-6 3 1/4 Vegetables for sour 60 - 70 5-6 3 1/4 Mushrooms 50 - 60 6-8 3 1/4 Herbs 40 - 50 2-3 3 1/4 Fruit Food Temperature (°C) Time (h) Shelf position 1 position 2 positions Plums 60 - 70 8 - 10 3 1/4 Apricots 60 - 70 8 - 10 3 1/4 Apple slices 60 - 70 6-8 3 1/4 Pears 60 - 70 6-9 3 1/4 Care and cleaning WARNING! Stainless steel or alum
The oven door can close if you try to remove the internal glass panel before you remove the oven door. CAUTION! Do not use the appliance without the internal glass panel. 1 2 7 First lift carefully and then remove the glass panel. Clean the glass panel with water and soap. Dry the glass panel carefully. 1 Open the door fully and hold the two door hinges. 2 Lift and turn the levers on the two hinges. When the cleaning is completed, install the glass panel and the oven door.
4. Install the glass cover. CAUTION! Always hold the halogen lamp with a cloth to prevent grease residue from burning on the lamp. 1. Deactivate the appliance. 2. Remove the fuses from the fuse box or deactivate the circuit breaker. The back lamp 1. Turn the lamp glass cover counterclockwise to remove it. 2. Clean the glass cover. 3. Replace the lamp with a suitable 300 °C heat-resistant lamp. The side lamp 1. Remove the left shelf support to get access to the lamp. 2. Use a narrow, blunt object (e.g.
We recommend that you write the data here: Model (MOD.) ......................................... Product number (PNC) ......................................... Serial number (S.N.) ......................................... Installation Securing the appliance to the cabinet WARNING! Refer to Safety chapters. Building In A min. 550 558 114 16 20 600 min.
Applicable types of cables for UK only Connection via Oven Control Circuit Min. size cable / flex 2,5 mm² Cable / flex type PVC / PVC twin and earth Fuse 15 A min. 20 A max. Energy efficiency Product Fiche and information according to EU 65-66/2014 Supplier's name Zanussi Model identification ZOB35301BK ZOB35301WK ZOB35301XA ZOB35301XK Energy Efficiency Index 101.2 Energy efficiency class A Energy consumption with a standard load, fan-forced mode 0.
• – Use the residual heat to warm up other foods. Cooking with fan - when possible, use the cooking functions with fan to save energy. • Keep food warm - if you want to use the residual heat to keep the meal warm, choose the lowest possible temperature setting. ENVIRONMENT CONCERNS appliances marked with the symbol with the household waste. Return the product to your local recycling facility or contact your municipal office. Recycle the materials with the symbol .
867304353-C-212015 www.zanussi.