EN FR User manual Notice d'utilisation Oven Four ZOB35301 2 18
Contents Safety information _ _ _ _ _ _ _ _ _ _ _ _ _ _ Safety instructions _ _ _ _ _ _ _ _ _ _ _ _ _ _ Product description _ _ _ _ _ _ _ _ _ _ _ _ _ Before first use _ _ _ _ _ _ _ _ _ _ _ _ _ _ _ _ Daily use _ _ _ _ _ _ _ _ _ _ _ _ _ _ _ _ _ _ _ Clock functions _ _ _ _ _ _ _ _ _ _ _ _ _ _ _ _ Using the accessories _ _ _ _ _ _ _ _ _ _ _ _ 2 3 5 5 6 7 8 Additional functions _ _ _ _ _ _ _ _ _ _ _ _ _ 8 Helpful hints and tips _ _ _ _ _ _ _ _ _ _ _ _ _ 9 Care and cleaning _ _ _ _ _ _ _ _ _ _ _ _ _ 13 What to
• Do not use a steam cleaner to clean the appliance. • Before maintenance cut the power supply. • Do not use harsh abrasive cleaners or sharp metal scrapers to clean the glass door since they can scratch the surface, which may result in shattering of the glass. Safety instructions Installation Warning! Only a qualified person must install this appliance. • Remove all the packaging. • Do not install or use a damaged appliance. • Obey the installation instruction supplied with the appliance.
• Do not let the appliance stay unattended during operation. • Deactivate the appliance after each use. • Be careful, when you open the appliance door while the appliance is in operation. Hot air can release. • Do not operate the appliance with wet hands or when it has contact with water. • Do not apply pressure on the open door. • Do not use the appliance as a work surface or as a storage surface. • Always keep the appliance door closed when the appliance is in operation.
Product description 1 2 3 4 6 Grill 7 Oven lamp 5 6 5 4 10 3 2 7 8 1 9 1 Knob for the oven functions 2 Power indicator 3 Electronic programmer 4 Knob for the temperature 8 Fan 9 Rating plate 10 Shelf positions Oven accessories • Wire shelf For cookware, cake tins, roasts. • Grill- / Roasting pan To bake and roast or as pan to collect fat. • Trivet For roasting and grilling. Use the trivet only with the Grill- / roasting pan.
2. 3. 4. Let the appliance operate for 45 minutes. and the maximum temSet the function perature. Let the appliance operate for 15 minutes. Accessories can become hotter than usually. The appliance can emit an odour and smoke. This is normal. Make sure that the airflow is sufficient. Daily use Warning! Refer to the Safety chapters. Activating and deactivating the appliance 1. Turn the knob for the oven functions to an oven function. The power indicator comes on while the appliance operates. 2. 3.
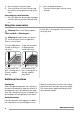
Clock functions Electronic programmer 1 2 1 1 Function indicators 2 Time display 3 Button + 4 Selection button 5 Button - 5 4 3 Clock function Time of day Minute Minder Duration End Application To set, change or check the time of day. To set a countdown time. This function has no effect on the operation of the oven. To set how long the appliance must operate. To set when the appliance must be deactivated.
4. 5. Press a button to stop the signal. Turn the knob for the oven functions and the knob for the temperature to the off position. 2. Press and hold the button -. The clock function goes out after some seconds. Cancelling the clock functions 1. Press the Selection button again and again until the necessary function indicator flashes. Using the accessories Warning! Refer to the Safety chapters. Put the grill- / roasting pan in the oven at the necessary level.
Helpful hints and tips • The appliance has five shelf levels. Count the shelf levels from the bottom of the appliance floor. • The appliance has a special system which circulates the air and constantly recycles the steam. With this system you can cook in a steamy environment and keep the food soft inside and crusty outside. It decreases the cooking time and energy consumption to a minimum. • Moisture can condense in the appliance or on the door glass panels. This is normal.
True Fan Cooking TYPE OF DISH Shelf position Temp [°C] Cooking time [min] Notes Christmas cake / Rich fruit cake 2 150 90 - 120 In a 20 cm cake mould1) Plum cake 2 160 50 - 60 In a bread tin1) Small cakes - one level 3 140 - 150 20 - 30 In a baking tray Small cakes - two levels 2 and 4 140 - 150 25 - 35 In a baking tray 1, 3 and 5 140 - 150 30 - 45 In a baking tray Biscuits / pastry stripes - one level 3 140 - 150 30 - 35 In a baking tray Biscuits / pastry stripes - two lev
True Fan Cooking Shelf position Temp [°C] Cooking time [min] Notes Pasta flan 2 180 40 - 50 In a mould Vegetable flan 2 175 45 - 60 In a mould Quiches 1 180 50 - 60 In a mould1) Lasagne 2 180 - 190 25 - 40 In a mould1) Cannelloni 2 180 - 190 25 - 40 In a mould1) TYPE OF DISH 1) Preheat for 10 minutes.
Grilling Preheat the empty oven for 10 minutes, before cooking. Quantity TYPE OF DISH Grilling Cooking time [min] Pieces [g] Shelf position Temp [°C] 1st side 2nd side Fillet steaks 4 800 4 max. 12 - 15 12 - 14 Beef steaks 4 600 4 max. 10 - 12 6-8 Sausages 8 - 4 max. 12 - 15 10 - 12 Pork chops 4 600 4 max. 12 - 16 12 - 14 Chicken (cut in 2) 2 1000 4 max. 30 - 35 25 - 30 Kebabs 4 - 4 max. 10 - 15 10 - 12 Breast of chicken 4 400 4 max.
TYPE OF DISH Shelf position Temperature [°C] Time [hr] 1/4 60 - 70 6-8 1/4 60 - 70 5-6 3 1/4 60 - 70 5-6 Mushrooms 3 1/4 50 - 60 6-8 Herbs 3 1/4 40 - 50 2-3 Temperature [°C] Time [hr] 1 level 2 levels Beans 3 Peppers 3 Vegetables for soup FRUIT TYPE OF DISH Shelf position 1 level 2 levels Plums 3 1/4 60 - 70 8 - 10 Apricots 3 1/4 60 - 70 8 - 10 Apple slices 3 1/4 60 - 70 6-8 Pears 3 1/4 60 - 70 6-9 Care and cleaning Warning! Refer to the Safety chapter
Put a cloth on the bottom of the oven to prevent damage to the oven light and glass cover. Always hold the halogen lamp with a cloth to prevent grease residue from burning on the lamp. 1. 2. 3. 4. Turn the glass cover counterclockwise to remove it. Clean the glass cover. Replace the oven light bulb with an applicable 300 °C heat-resistant oven light bulb. Use the same oven lamp type. Install the glass cover.
lation the surface of the glass panel frame on the screen-printing zones is not rough when you touch it. Make sure that you install the internal glass panel in the seats correctly. Refer to the illustration. What to do if… Warning! Refer to the Safety chapters. Problem Possible cause Remedy The oven does not heat up. The appliance is deactivated. Activate the appliance. The oven does not heat up. The clock is not set. Set the clock. The oven does not heat up. The necessary settings are not set.
Building In 548 558 20 600 min. 550 20 min. 560 573 589 6 594 A B min. 550 580 20 min. 560 Electrical installation Important! Only a qualified person must do the electrical installation. The manufacturer is not responsible if you do not follow the safety precautions from the chapter "Safety information". This appliance is supplied without a main plug and a main cable. Applicable types of cables for Europe: • Minimum size Cable / flex: 1,5 mm² 16 www.zanussi.
• Cable / flex type: H07 RN-F, H05 RN-F, H05 RRF, H05 VV-F, H05 V2V2-F (T90), H05 BB-F • Fuse 13 A Applicable types of cables for UK only Connection via Min. size Cable / flex Cable / flex type Fuse • 13 A socket outlet • 13 A spur box 2,5 mm² Three core butyl insulated 13 A min. Oven Control Circuit 2,5 mm² PVC / PVC twin and earth 15 A min. 20 A min. Environment concerns The symbol on the product or on its packaging indicates that this product may not be treated as household waste.
Sommaire Consignes de sécurité _ _ _ _ _ _ _ _ _ _ _ Instructions de sécurité _ _ _ _ _ _ _ _ _ _ _ Description de l'appareil _ _ _ _ _ _ _ _ _ _ Avant la première utilisation _ _ _ _ _ _ _ _ _ Utilisation quotidienne _ _ _ _ _ _ _ _ _ _ _ Fonctions de l'horloge _ _ _ _ _ _ _ _ _ _ _ Utilisation des accessoires _ _ _ _ _ _ _ _ _ 18 19 21 21 22 23 24 Fonctions supplémentaires _ _ _ _ _ _ _ _ _ Conseils utiles _ _ _ _ _ _ _ _ _ _ _ _ _ _ _ _ Entretien et nettoyage _ _ _ _ _ _ _ _ _ _ _ En cas d'anomalie de
Sécurité générale • L'intérieur de l'appareil devient chaud lorsqu'il est en fonctionnement. Ne touchez pas les éléments chauffants se trouvant dans l'appareil. Utilisez toujours des gants de cuisine pour retirer ou enfourner des accessoires ou des plats allant au four. • N’utilisez pas de nettoyeur vapeur pour nettoyer l'appareil. • Avant toute opération de maintenance, déconnectez l'alimentation électrique.
• Si la prise de courant est lâche, ne branchez pas la fiche d'alimentation secteur. • Ne tirez jamais sur le câble d'alimentation pour débrancher l'appareil. Tirez toujours sur la fiche. • N'utilisez que des systèmes d'isolation appropriés : des coupe-circuits, des fusibles (les fusibles à visser doivent être retirés du support), un disjoncteur différentiel et des contacteurs. • L'installation électrique doit être équipée d'un dispositif d'isolement à coupure omnipolaire.
• Nettoyez régulièrement l'appareil afin de maintenir le revêtement en bon état. • Des graisses ou de la nourriture restant dans l'appareil peuvent provoquer un incendie. • Nettoyez l'appareil avec un chiffon doux humide. Utilisez uniquement des produits de lavage neutres. N'utilisez pas de produits abrasifs, de tampons à récurer, de solvants ou d'objets métalliques. • Si vous utilisez un spray pour four, suivez les consignes de sécurité figurant sur l'emballage.
Premier nettoyage • Retirez tous les accessoires et les supports de grille amovibles (si présents). • Nettoyez l'appareil avant de l'utiliser pour la première fois. Important Reportez-vous au chapitre « Entretien et nettoyage ». Réglage de l'heure Vous devez régler l'heure avant de faire fonctionner le four. Lorsque vous branchez l'appareil à l'alimentation électrique ou après une coupure de courant, l'indicateur de la fonction Heure clignote. Appuyez sur la touche + ou - pour régler l'heure.
Fonction du four Utilisation Décongélation Pour décongeler des aliments surgelés. La manette du thermostat doit être sur la position « Arrêt ». Chaleur tournante Pour cuire ou rôtir simultanément sur plusieurs niveaux des aliments nécessitant une température de cuisson identique, sans que les saveurs ne se mélangent. Gril Pour faire griller des aliments peu épais en petites quantités au centre de la grille. Pour faire griller du pain.
4. 5. 3. Appuyez sur + ou - pour définir la durée de la fonction de l'horloge souhaitée. L'indicateur de la fonction de l'horloge que vous avez définie s'affiche. À la fin du temps réglé, l'indicateur clignote et un signal sonore retentit pendant deux minutes. Avec les fonctions Durée et Fin l'appareil s'éteint automatiquement. Appuyez sur une touche pour arrêter l'alarme. Tournez la manette de sélection des fonctions du four et celle du thermostat sur la position Arrêt.
Fonctions supplémentaires Ventilateur de refroidissement Lorsque le four fonctionne, le ventilateur de refroidissement se met automatiquement en marche pour refroidir les surfaces de l'appareil. Lorsque le four est mis à l'arrêt, le ventilateur de refroidissement continue à fonctionner jusqu'à ce que l'appareil refroidisse. surchauffe dangereuse. Pour éviter cela, le four dispose d'un thermostat de sécurité interrompant l'alimentation électrique.
Tableau de rôtissage et de cuisson des gâteaux GÂTEAUX Chaleur tournante TYPE DE PLAT Durée de cuisson [min] Remarques 160 45-60 Dans un moule à gâteau Positions des grilles Temp.
Chaleur tournante Durée de cuisson [min] Remarques 170 35-45 Sur un plateau de cuisson 2 170 45-70 Dans un moule à gâteau de 20 cm Cake aux fruits 2 150 110-120 Dans un moule à gâteau de 24 cm Gâteau à étages 2 160 50-60 Dans un moule à gâteau de 20 cm Durée de cuisson [min] Remarques 1 à 2 pièces, 500 g par pièce1) TYPE DE PLAT Positions des grilles Temp. [°C] 2 et 4 Tartelettes Éclairs - sur deux niveaux 1) Préchauffez pendant 10 minutes.
Chaleur tournante Durée de cuisson [min] Remarques 175 90-120 Sur une grille métallique 2 200 50-60 Sur une grille métallique Rôti de bœuf, cuit à point 2 200 60-70 Sur une grille métallique Rôti de bœuf, bien cuit 2 200 70-75 Sur une grille métallique Épaule de porc 2 170 120-150 Avec couenne Jarret de porc 2 160 100-120 2 morceaux Agneau 2 175 110-130 Gigot Poulet 2 200 70-85 Entier Dinde 2 160 210-240 Entière Canard 2 220 120-150 Entier Oie 1 160 150-2
Quantité TYPE DE PLAT Gril Durée de cuisson [min] Morceaux [g] Position de la grille Temp. [°C] 1re face 2e face Escalope de poulet 4 400 4 max. 12-15 12-14 Steak haché 6 600 4 max. 20-30 - Filets de poisson 4 400 4 max. 12-14 10-12 Sandwiches toastés 4-6 - 4 max. 5-7 - Toasts 4-6 - 4 max.
FRUITS TYPE DE PLAT Position de la grille Température [°C] Durée [heures] 1/4 60-70 8-10 3 1/4 60-70 8-10 3 1/4 60-70 6-8 3 1/4 60-70 6-9 1 niveau 2 niveaux Prunes 3 Abricots Pommes, lamelles Poires Entretien et nettoyage Avertissement Reportez-vous aux chapitres concernant la sécurité. • Nettoyez la façade du four à l'aide d'une éponge humide additionnée d'eau savonneuse. • Utilisez les produits spécifiques vendus dans le commerce pour l'entretien des surfaces en métal.
Nettoyage de la porte du four La porte du four est dotée de deux panneaux en verre. Vous pouvez retirer la porte du four ainsi que le panneau en verre intérieur afin de le nettoyer. Si vous tentez d'extraire le panneau en verre intérieur sans avoir au préalable retiré la porte du four, celle-ci peut se refermer brusquement. Attention N'utilisez pas l'appareil sans les panneaux de verre. 90° 5 Débloquez le système de verrouillage afin de retirer le panneau en verre intérieur.
En cas d'anomalie de fonctionnement Avertissement Reportez-vous aux chapitres concernant la sécurité. Problème Cause probable Solution Le four ne chauffe pas. L'appareil est éteint. Allumez l'appareil. Le four ne chauffe pas. L'horloge n'est pas réglée. Réglez l'horloge. Le four ne chauffe pas. Les réglages nécessaires n'ont pas été effectués. Vérifiez que les réglages sont corrects. Le four ne chauffe pas. Le fusible dans la boîte à fusibles a grillé. Vérifiez le fusible.
Encastrement 548 558 20 600 min. 550 20 min. 560 573 589 6 594 A B min. 550 580 20 min. 560 Installation électrique Important Le branchement électrique doit être confié à un électricien qualifié. Le fabricant ne pourra être tenu pour responsable si vous ne respectez pas les précautions de sécurité du chapitre « Consignes de sécurité ». Cet appareil est livré sans fiche ni câble d'alimentation. Types de câbles appropriés pour l'Europe : • Diamètre minimal du câble/flexible : 1,5 mm² www.zanussi.
• Type de câble/flexible : H07 RN-F, H05 RNF, H05 RRF, H05 VV-F, H05 V2V2-F (T90), H05 BB-F • Fusible 13 A Types de câbles appropriés pour le Royaume-Uni uniquement Connexion via Diamètre min. du câble/flexible Type de câble/flexible Fusible • Prise murale 13 A • Boîtier interrupteur 13 A 2,5 mm² Triple cœur, isolé au butyl 13 A min. Circuit de commande du four 2,5 mm² Jumelé PVC/PVC et masse 15 A min. 20 A min.
www.zanussi.
397216901-E-462012 www.zanussi.