EN User Manual Oven ZOD35712BK ZOD35712XK
Contents Safety information Safety instructions Product description Before first use Daily use Clock functions 2 3 5 5 6 8 Using the accessories Additional functions Hints and tips Care and cleaning Troubleshooting Energy efficiency 9 10 10 17 19 20 Subject to change without notice. Safety information Before the installation and use of the appliance, carefully read the supplied instructions.
• • • • • • • • • WARNING: The appliance and its accessible parts become hot during use. Care should be taken to avoid touching heating elements. Children less than 8 years of age shall be kept away unless continuously supervised. Always use oven gloves to remove or put in accessories or ovenware. Before maintenance cut the power supply. Ensure that the appliance is switched off before replacing the lamp to avoid the possibility of electric shock. Do not use a steam cleaner to clean the appliance.
• • • • • • • • Do not let mains cables touch or come near the appliance door, especially when the door is hot. The shock protection of live and insulated parts must be fastened in such a way that it cannot be removed without tools. Connect the mains plug to the mains socket only at the end of the installation. Make sure that there is access to the mains plug after the installation. If the mains socket is loose, do not connect the mains plug. Do not pull the mains cable to disconnect the appliance.
• • • Clean the appliance with a moist soft cloth. Only use neutral detergents. Do not use abrasive products, abrasive cleaning pads, solvents or metal objects. If you use an oven spray, obey the safety instructions on the packaging. Do not clean the catalytic enamel (if applicable) with any kind of detergent. Disposal • • • Service • WARNING! • Risk of injury or suffocation. Disconnect the appliance from the mains supply. Cut off the mains electrical cable close to the appliance and dispose of it.
Setting the time To set a new time, refer to "Setting the time". You must set the time before you operate the oven. Preheating Only the top oven works without the set time. The indicator for the Time of day function flashes when you connect the appliance to the electrical supply, when there was a power cut or when the timer is not set. Press the or button to set the correct time. After approximately five seconds, the flashing stops and the display shows the time of day you set.
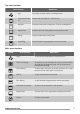
Top oven functions Oven function Application Light To activate the lamp without a cooking function. Conventional Cooking To bake and roast food on 1 shelf position. Top Heat To brown bread, cakes and pastries. To finish cooked dishes. Bottom Heat To bake cakes with crispy bottom and to preserve food. Grilling To grill flat food and to toast bread. Fast Grilling To grill flat food in large quantities and to toast bread.
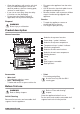
Display A. Function indicators B. Time display C. Function indicator The electronic programmer works only with the main oven. A B C Buttons Button Function Description MINUS To set the time. CLOCK To set a clock function. PLUS To set the time. Clock functions Clock functions table Clock function Application Time of day To set, change or check the time of day. Minute Minder To set countdown time. This function has no effect on the operation of the appliance.
The clock function operates. The display shows the indicator for the clock function you set. For the Minute Minder function the display shows the time left. 3. When the time ends the indicator of the clock function flashes and an acoustic signal sounds. Press a button to stop the signal. 4. Turn the knob for the oven functions and the knob for the temperature to the off position. Cancelling the clock functions 1. Press the again and again until the necessary function indicator flashes. 2. Press and hold .
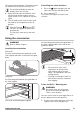
2. Put the deep pan into the oven on the necessary shelf position. You can use the trivet to grill flat dishes in large quantities and to toast. 2. Put the deep pan into the oven on the necessary shelf position. 1. Put the trivet into the deep pan so that the supports of the wire shelf point down. Additional functions Cooling fan When the appliance operates, the cooling fan activates automatically to keep the surfaces of the appliance cool.
Tips on baking Baking results Possible cause Remedy The bottom of the cake is not browned sufficiently. The shelf position is incorrect. Put the cake on a lower shelf. The cake sinks and becomes soggy, lumpy or streaky. The oven temperature is too high. The next time you bake, set a slightly lower oven temperature. The cake sinks and becomes soggy, lumpy or streaky. The baking time is too short. Set a longer baking time. You cannot decrease baking times by setting higher temperatures.
Food Temperature (°C) Time (min) Shelf position - Rich Fruit 140 - 150 120 - 150 2 - Gingerbread 140 - 150 75 - 90 2 - Meringues 90 - 100 150 - 180 2 - Flapjack 160 - 170 25 - 30 2 - Shortbread 130 - 150 45 - 65 2 - Beef / Lamb 160 - 170 150 - 180 1 - Chicken 160 - 180 75 - 90 1 Convenience Foods Follow manufacturer's instructions.
Main oven Food Temperature (°C) Conventional Cooking Time (min) Shelf position True Fan Cooking Biscuits 180 - 190 180 - 190 10 - 20 2 Bread 200 - 220 190 - 210 30 - 35 2 - Small & Queen 170 - 180 160 - 170 18 - 25 2 - Sponges 170 - 180 160 - 170 20 - 25 2 - Madeira 150 - 160 140 - 160 60 - 75 2 - Rich Fruit 140 - 150 130 - 140 120 - 150 2 - Christmas 140 - 150 130 - 140 180 - 270 2 Fish 170 - 180 160 - 180 20 - 30 3 Fruit Pies, Crumbles 180 - 200 170 - 180 30
Roasting tables - Main oven Beef Food Quantity Temperature (°C) Time (min) Shelf position Roast beef or fillet: rare per cm. of thickness 190 - 2001) 5-6 2 Roast beef or fillet: me- per cm. of thickdium ness 180 - 1901) 6-8 2 Roast beef or fillet: well done 170 - 1801) 8 - 10 2 per cm. of thickness 1) Preheat the oven. Pork Food Quantity Temperature (°C) Time (min) Shelf position Shoulder, neck, ham 1 - 1.5 kg 160 - 180 90 - 120 2 Pork chop 1 - 1.
Food Quantity (kg) Temperature (°C) Time (min) Shelf position Loin of Game 1.5-2 210-220 75 - 105 1 Leg of Game 1.5-2 200-210 90 - 135 1 Poultry Food Quantity Temperature (°C) Time (min) Shelf position Poultry pieces 200 - 250 g each 200 - 220 35 - 50 3 Half chicken 400 - 500 g each 190 - 210 35 - 50 3 Poultry 1 - 1.5 kg 190 - 210 45 - 75 1 Duck 1.5 - 2 kg 180 - 200 75 - 100 1 Goose 3.5 - 5 kg 160 - 180 150 - 210 1 Turkey 2.5 - 3.
Food Time (min) Pork Chops 20 - 25 Whole Fish, Trout / Makarel 10 - 12 Fillets, Plaice / Cod 4-6 Kebabs 12 - 18 Kidneys, Lamb / Pig 6 - 10 Sausages 20 - 30 Toasted Sandwiches 3-4 Steaks: - Rare 4-6 - Medium 6-8 - Well Done 12 - 15 Grilling - Main oven Food Temperature (°C) Time (min) 1st side Shelf position 2nd side Roast beef 210 - 230 30 - 40 30 - 40 2 Filet of beef 230 20 - 30 20 - 30 3 Back of pork 210 - 230 30 - 40 30 - 40 2 Back of veal 210 - 230 30 - 40 30
Food Time (min) 1st side Toast with topping Shelf position 2nd side 6-8 - 4 1) Preheat the oven. Defrost - Main oven Do not cover the food with a bowl or a plate, as this can extend the defrost time. Remove the food packaging and put the food on a plate. Use the first shelf position from the bottom. Food Quantity Defrosting time (min) Further defrosting time (min) Comments Chicken 1 kg 100 - 140 20 - 30 Put the chicken on an upturned saucer in a big plate. Turn halfway through.
Stainless steel or aluminium appliances Clean the oven door with a wet sponge only. Dry it with a soft cloth. Do not use steel wool, acids or abrasive materials as they can damage the oven surface. Clean the oven control panel with the same precautions. Removing the shelf supports To clean the oven, remove the shelf supports. 2 1 1 Pull the front of the shelf support away from the side wall. 2 Pull the rear end of the shelf support away from the side wall and remove it.
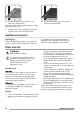
4. Hold the door with one hand on each side and pull it away from the appliance at an upwards angle. 5. Put the door with the outer side down on a soft cloth on a stable surface. This is to prevent scratches. 6. Hold the door trim (B) on the top edge of the door at the two sides and push inwards to release the clip seal. 9. Clean the glass panel with water and soap. Dry the glass panel carefully. When the cleaning is completed, install the glass panels and the door.
Problem Possible cause Remedy The oven does not heat up. The fuse is released. Make sure that the fuse is the cause of the malfunction. If the fuse releases again and again, contact a qualified electrician. The lamp does not operate. The lamp is defective. Replace the lamp. Steam and condensation settle on the food and in the cavity of the oven. You left the dish in the oven for too long. Do not leave the dishes in the oven for longer than 15 - 20 minutes after the cooking process ends.
Volume Top oven: 42 l Main oven: 62 l Type of oven Built-In Oven Mass EN 60350-1 - Household electric cooking appliances - Part 1: Ranges, ovens, steam ovens and grills - Methods for measuring performance. Energy saving The appliance contains features which help you save energy during everyday cooking. • General hints – Make sure that the oven door is closed properly when the appliance operates and keep it closed as much as possible during the cooking. – Use metal dishes to improve the energy saving.
www.zanussi.
www.zanussi.
867300155-B-142016 www.zanussi.