User Manual GETTING STARTED? EASY.
SAFETY INFORMATION Before the installation and use of the appliance, carefully read the supplied instructions. The manufacturer is not responsible for any injuries or damages that are the result of incorrect installation or usage. Always keep the instructions in a safe and accessible location for future reference.
• • • • • • • Before carrying out any maintenance, disconnect the appliance from the power supply. Ensure that the appliance is switched off before replacing the lamp to avoid the possibility of electric shock. Do not use a steam cleaner to clean the appliance. Do not use harsh abrasive cleaners or sharp metal scrapers to clean the glass door since they can scratch the surface, which may result in shattering of the glass.
• • • • • If the mains socket is loose, do not connect the mains plug. Do not pull the mains cable to disconnect the appliance. Always pull the mains plug. Use only correct isolation devices: line protecting cut-outs, fuses (screw type fuses removed from the holder), earth leakage trips and contactors. The electrical installation must have an isolation device which lets you disconnect the appliance from the mains at all poles. The isolation device must have a contact opening width of minimum 3 mm.
• • • Disconnect the appliance from the mains supply. Cut off the mains electrical cable close to the appliance and dispose of it. Remove the door catch to prevent children or pets from becoming trapped in the appliance. SERVICE • To repair the appliance contact an Authorised Service Centre. • Use original spare parts only.
1. Set the function and the temperature to 250ºC. Let the appliance operate for 1 hour. 2. Set the function and the temperature to 250ºC. Let the appliance operate for 15 minutes. 3. Set the function 250ºC. Let the appliance operate for 15 minutes. Accessories can become hotter than usual. The appliance can emit an odour and smoke. This is normal. Make sure that the airflow is sufficient. and the temperature to DAILY USE WARNING! Refer to Safety chapters.
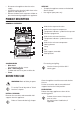
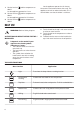
MAIN OVEN FUNCTIONS Symbol Oven function Application Light To activate the lamp without a cooking function. True Fan Cooking To bake on up to two shelf positions at the same time and to dry food. Set the temperature 20 - 40 °C lower than for Top / Bottom Heat. Defrost This function can be used for defrosting frozen foods, such as vegetables and fruits. The defrosting time depends on the amount and size of the frozen food. DISPLAY The electronic programmer works only with the main oven. A B A.
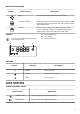
Clock function Application END To set when the appliance deactivates. TIME DELAY To combine DURATION and END function. MINUTE MINDER To set countdown time. This function has no effect on the operation of the appliance. You can set the MINUTE MINDER at any time, also when the appliance is off. SETTING THE TIME. CHANGING THE TIME You must set the time before you operate the oven. Only the top oven works without the set time.
3. When the set time ends, an acoustic signal sounds. Press any button to stop the acoustic signal. 4. Turn the knob for the oven functions and the knob for the temperature to the off position. CANCELLING THE CLOCK FUNCTIONS 1. Press the again and again until the necessary function indicator starts to flash. 2. Press and hold . The clock function goes out after some seconds. USING THE ACCESSORIES WARNING! Refer to Safety chapters.
2. Put the deep pan into the oven on the necessary shelf position. ADDITIONAL FUNCTIONS COOLING FAN When the appliance operates, the cooling fan activates automatically to keep the surfaces of the appliance cool. If you deactivate the appliance, the cooling fan can continue to operate until the appliance cools down. HINTS AND TIPS WARNING! Refer to Safety chapters. The temperature and baking times in the tables are guidelines only.
Baking results Possible cause Remedy The cake sinks and becomes soggy, lumpy or streaky. The oven temperature is too high. The next time you bake, set a slightly lower oven temperature. The cake sinks and becomes soggy, lumpy or streaky. The baking time is too short. Set a longer baking time. You cannot decrease baking times by setting higher temperatures. The cake sinks and becomes soggy, lumpy or streaky. There is too much liquid in the mixture. Use less liquid.
Food Temperature (°C) Time (min) Shelf position - Gingerbread 140 - 150 75 - 90 2 - Meringues 90 - 100 150 - 180 2 - Flapjack 160 - 170 25 - 30 2 - Shortbread 130 - 150 45 - 65 2 - Beef / Lamb 160 - 170 150 - 180 1 - Chicken 160 - 180 75 - 90 1 Convenience Foods Follow manufacturer's instructions. Fish 170 - 190 20 - 30 2 Fish Pie (Potato Topped) 190 - 200 20 - 30 2 Fruit Pies, Crumbles 190 - 200 30 - 50 2 Milk Puddings 150 - 170 90 - 120 2 Pasta, Lasagne etc.
Main oven Food Temperature (°C) Time (min) Shelf position Biscuits 180 - 190 10 - 20 3 Bread 190 - 210 30 - 35 3 - Small & Queen 160 - 170 18 - 25 3 - Sponges 160 - 170 20 - 25 3 - Madeira 140 - 160 60 - 75 3 - Rich Fruit 130 - 140 120 - 150 3 - Christmas 130 - 140 180 - 270 3 Fish 160 - 180 20 - 30 3 Fish Pies, Crumbles 170 - 180 30 - 50 3 Milk Puddings 140 - 160 60 - 90 3 - Choux 180 - 190 30 - 40 3 - Shortcrust 180 - 190 25 - 35 3 - Flaky 180 - 190 30
Grilling and Fast Grilling - Top oven Food Time (min) Bacon Rashers 5 -6 Beefburgers 10 - 20 Chicken Joints 20 - 40 Lamb Chops 15 - 25 Pork Chops 20 - 25 Whole Fish, Trout / Makarel 10 - 12 Fillets, Plaice / Cod 4-6 Kebabs 12 - 18 Kidneys, Lamb / Pig 6 - 10 Sausages 20 - 30 Toasted Sandwiches 3-4 Steaks: - Rare 4-6 - Medium 6-8 - Well Done 12 - 15 DEFROST - MAIN OVEN Remove the food packaging and put the food on a plate. Use the first shelf position from the bottom.
CARE AND CLEANING WARNING! Refer to Safety chapters. NOTES ON CLEANING • Clean the front of the appliance with a soft cloth with warm water and a cleaning agent. • To clean metal surfaces, use a dedicated cleaning agent. • Clean the appliance interior after each use. Fat accumulation or other food remains may result in a fire. The risk is higher for the grill pan. • Clean stubborn dirt with a special oven cleaner. • Clean all accessories after each use and let them dry.
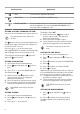
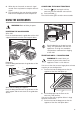
REMOVING AND INSTALLING THE DOOR You can remove the door and the internal glass panels to clean it. The number of glass panels is different for different models. WARNING! Be careful when you remove the door from the appliance. The door is heavy. CAUTION! Rough handling of the glass, especially around the edges of the front panel, can cause the glass to break. 7. Pull the door trim to the front to remove it. 8. Hold the door glass panels on their top edge one by one and pull them up out of the guide. 1.
TROUBLESHOOTING WARNING! Refer to Safety chapters. WHAT TO DO IF... Problem Possible cause Remedy The cooking zones do not operate. Refer to the operating instructions for the built-in cooking surface. You cannot activate or operate the oven. The display shows “400” and an acoustic signal sounds. The oven is incorrectly connected to an electrical supply. Check if the oven is correctly connected to the electrical supply (refer to the connection diagram if available). The oven does not heat up.
ENERGY EFFICIENCY PRODUCT FICHE AND INFORMATION ACCORDING TO EU 65-66/2014 Supplier's name Zanussi Model identification ZOF35611XE ZOF35621XK Energy Efficiency Index Top oven: 106.8 Main oven: 106.6 Energy efficiency class Top oven: A Main oven: A Energy consumption with a standard load, conventional mode Top oven: 0.78 kWh/cycle Main oven: not applicable Energy consumption with a standard load, fan-forced mode Top oven: not applicable Main oven: 0.
867336556-B-172017 WWW.ZANUSSI.