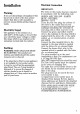
Installation Warning 1f you are discarding an old appliance that has a lock or cater on the door, please ensure that this is made unusable to prevent young children getting trapped fungicide. Electricity Supply The appliance is for operation on a 220/240 V. 50 Hz supply, so be sure that your electricity supply voltage is within this range which is also marked on the nameplate located inside the cabinet. Earthing WARNING: THIS APPLIANCE MUST BE EARTHED.
Some models have the main terminal board of the type shown in fig.1. To gain access to the terminals of the supply cable, unplug appliance from wall socket and remove the lid from the terminal board by releasing the two catches "A” and "B” Fig.1 with the aid of a small blade screwdriver. Positioning These models can be fitted into a kitchen column (see relevant instructions supplied with the appliance) being careful that the wall socket remains easily accessible). Before using Remove all securing tapes.
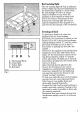
80019 we » 0 CDB A Thermostat Knob B Green light C Yellow light D -Red light A Fig 2 Red warning light The ted warning light (D Fig. 2) indicates (when it lights up} that the temperature in the freezer has climbed to a level where the safe storage of food is no longer ensured. Needless to say, when the appliance is first started or when fresh food to be frozen is first placed in the freezer, this warning light will stay on until the temperature has dropped to a safe level for the storage of the foodstuffs.
Also remember that lean foodstuffs store better and longer than fat foodstuffs and that salt reduces the storage periods; Wrap up the food in aluminum foil or polythene and make sure that the packages are airtight. This will preserve the color, taste, and nutritional values of the food; Do not freeze in more than 14 kg per 24 hours; During the freezing-in operation, do not add fresh food to be frozen and do not.
Thawing Deep-frozen or frozen food, prior to being used, can be thawed in the refrigerator compartment or at room temperature, depending on the time available for this operation. Small pieces may even be cooked still frozen, directly from the freezer: in this case, cooking will take longer.
Maintenance Prior to undertaking any maintenance operation, be sure to unplug the appliance from the wall socket as a safety precaution. Clean the interior periodically with lukewarm water and bicarbonate of soda, the cabinet exterior with a Silicone wax spray; the condenser and the motor compressor with a brush or a vacuum ¢leaner.
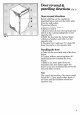
Door reversal & paneling directions ¢ 3 Door reversal directions Before carrying out the operations described below, pull out the mains plug from the wall socket, Proceed as follows: a) Remove bottom hinge 4; b} Remove door §; ¢} Remove pivot 3 from the top hinge and refit it in the corresponding hole on the opposite side; d) Refit the door and the bottom hinge; ¢} Remove handle 6 and refit it on the apposite side; 1) Unscrew foot 5 and base "b”, then refit these two parts on the opposite side.
Fast-freezing compartment door (Fig. 4) Whenever door reversal has been carried out, the fast-freezing compartment door should also be reversed to allow best access conditions. For this purpose proceed as follows: Using a cross head (Phillips) screwdriver remove door catch support "A”; Remove hinges "B” and the relevant door; Refit door catch support upside down on the opposite side; Fit the door and its hinges on the opposite side with respect to their original location {turn these parts upside-down).
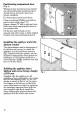
Building-in the appliance into a kitchen unit recess having a height of 820 mm Fit venting grille "C” into the rear part of the kitchen counter worktop (fig.5) and then Insert the appliance into the recess.
ZANINESS! APPLIANCE GUARANTEE GAUSSIAN STANDARD GUARANTEE CONDITIONS ‘This guarantee is in addition to your statutory and other legal rights which will not be excluded or in any way diminished by the return of the guarantee card.