DISHWASHER ZT 6905 COP04 152977 34/1 INSTRUCTION BOOK UK
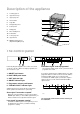
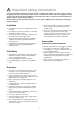
Description of the appliance 1. Levelling spacers 2. Upper basket stop 3. Upper spray arm 4. Salt container 5. Large filter 6. Detergent dispenser 7. Control panel 8. Rating plate 9. Rinse aid dispenser 1 13 2 12 3 11 4 10 5 10. Central filter 6 9 11. Lower spray arm 12. Upper basket 8 13. SID detergent dispenser (Super Intensity Dispenser) 7 IN72 The control panel In this fully integrated appliance the controls are located on the top of the door.
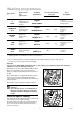
Washing programmes Type of load Degree of soil and type of load Required push buttons RINSE & HOLD Any. Partial load (to be completed later in the day) ON/OFF + RINSE & HOLD INTENSIVE 70°C Heavy soil. Crockery, cutlery, pots and pans ON/OFF + INTENSIVE 70°C Recommended quantity of detergent wash prewash / / 25 g 10 g 5g Warm prewash Main wash up to 65°C 1 cold rinse 1 hot rinse Drying Cold prewash Main wash up to 50°C 1 cold rinse 1 hot rinse Drying Normal soil.
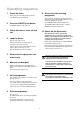
Operating sequence 1. Check the filters 9. At the end of the washing programme Ensure they are clean and properly positioned (see "Maintenance and cleaning"). At the end of the programme the dishwasher will automatically stop and an audible signal informs you that the programme has finished. 2. Press the ON/OFF push button The "END OF CYCLE" indicator lights flashes. The ON/OFF indicator light remains on until the ON/OFF push button is depressed. The ON/OFF indicator light comes on. 3.
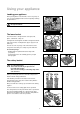
Using your appliance Loading your appliance Before placing dishes in the machine, remove any scraps of food, to avoid clogging the filters and consequently reducing the performance. Do not load very small items which can fall through the baskets. UI48 The lower basket The lower basket is designed to take saucepans, lids, plates, salad bowls, cutlery etc. Serving dishes and large lids should be arranged around the edge of the basket, ensuring that the upper spray arm can turn freely.
The upper basket The upper basket is designed for plates (dessert plates, saucers, dinner plates of up to 25 cm in diameter), salad bowls, cups and glasses. Arrange items on and underneath the fold-down cup racks so that water can reach all surfaces. For taller items, the cup racks can be folded upwards. Light items (plastic bowls etc.) should be loaded in the upper basket and arranged so they do not move.
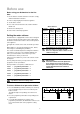
Hints for test centres Before starting any test it is necessary to fill completely with salt the salt container and with rinse aid the rinse aid dispenser Test standard: EN 50242 Reference programme: BIO 50°c Load: 12 standard place settings Rinse aid selector: position 5 Detergent dosage: 25 g in the dispenser 5 g on the dispenser lid Arrangement lower basket Arrangement upper basket Arrangement cutlery basket Technical specifications Dimensions Width Height Max depth Max depth with open door
Instruction Book - part 1 - Before use - Maintenance - Installation DISHWASHER Contents Important safety information 2 Before use Setting the water softener Filling with salt Filling with rinse aid and adjusting the dose Use of detergent 3 3 4 5 6 Hints and tips 7 Maintenance and cleaning Internal cleaning Cleaning the filters External cleaning Prolonged periods of non-operation Frost precautions Moving the machine 8 8 8 8 8 8 8 Something not working 10 Installation Water supply connections Wate
Important safety information It is most important that this instruction book should be retained with the appliance for future reference. Should the appliance be sold or transferred to another owner, or should you move house and leave the appliance, always ensure that the book is left with the appliance in order that the new owner can get to know the functioning of the appliance and the relevant safety information. This information has been provided in the interest of your safety.
Before use Before using your dishwasher for the first time: 1. Ensure that the electrical and water connections comply with the installation instructions 2. Remove all packaging from inside the appliance 3. Set the water softener 4. Pour 1 litre of water inside the salt container and then fill with salt Water hardness 5. Fill the rinse aid dispenser. 6. Run a "Rinse and Hold" programme.
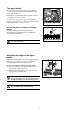
Filling with salt Attention! Only use salt specifically designed for use in dishwashers. All other types of salt not specifically designed for use in dishwasher, especially table salt, will damage the water softener. Only fill with salt just before starting a washing programme. This will prevent any grains of salt or salty water, which may have been spilled, remaining on the bottom of the machine, which may cause corrosion. SR15 1. Unscrew the cap of the salt container.
Rinse aid Rinse aid is automatically added during the last rinse, ensuring thorough rinsing, and spot and streak free drying. The dispenser, which is positioned inside the door, holds about 110 ml of rinse aid, which is sufficient for 16 - 40 dishwashing programmes, depending upon the dosage setting. Filling with rinse aid 1. Open the container by turning the lid (A) anticlockwise. 2. Add the rinse aid until the container is completely full. The indicator (B) will be completely dark. 3.
Use of detergent Only use detergents specifically designed for use in dishwashers. We recommend the use of Finish detergents which are available in the following options: Min = 15 g Max = 30 g D Finish Double Action Tablets. Each tablet has the exact amount of detergent required, simply place in the dispenser. Finish Powder recommended for every day use. Finish Liquid Gel ideal for every day use. As the gel is extra gentle is it recommended for fine bone china.
Hints and tips To save energy Items not suitable for dishwashers Place dishes in the machine immediately after every meal and wait until the dishwasher is full before washing. The following items should not be washed in the dishwasher (unless they are sold as dishwasher proof): If necessary run the Rinse and Hold programme (see "Washing Programmes" chart) so that any food scraps do not become caked on the dishes while you are waiting to run the complete wash programme.
Maintenance and cleaning Internal cleaning Ensure that the seals around the door, the detergent and rinse aid dispensers are cleaned regularly with a damp cloth. We recommend the use of Finish Dishwasher Cleaner every 3 months or run a 65°C wash without dishes using detergent. Regular use of Finish Dishwasher Cleaner cleans inaccessible parts, eliminates unpleasant food odours and helps prevent the build-up of limescale.
External cleaning Clean the external surfaces of the machine and control panel with a damp soft cloth. If necessary use only neutral detergents. Never use abrasive products, scouring pads or solvent (acetone, trichloroethylene etc....). Prolonged periods of non-operation If you are not using the machine for any period of time you are advised to: 1. Unplug the appliance and then turn off the water. 2. Fill the rinse aid dispenser. 3. Leave the door ajar to prevent the formation of any unpleasant smells. 4.
Something not working Certain problems are due to lack of simple maintenance or oversights, which can be solved easily without calling out an engineer. The dishwasher is fitted with a number of alarm systems which can help you to quickly determine the cause of any problems. In the case of alarm intervention the dishwasher will not start or stops during operation, all push buttons are inoperative except for the ON/OFF push button. All indicator lights are off except for the ON/OFF indicator light.
If after all these checks, the problem persists, contact your local Service Force Centre, quoting the model and serial number. This information can be found on the rating plate located on the right hand side of the dishwasher door. This product should be serviced by an authorised Service engineer, and only genuine spare parts should be used. Under no circumstances should you attempt to repair the machine yourself. Repairs carried out by inexperienced persons may cause injury or serious malfunctioning.
Installation Any electrical work required to install this appliance should be carried out by a qualified electrician or competent person. Any plumbing work required to install this appliance should be carried out by a qualified plumber or competent person. Remove all packaging before positioning the machine. If possible, position the machine next to a water tap and a drain. Levelling Good levelling is essential for correct closure and sealing of the door.
Water outlet hose connection 1 2 3 Ø 18 Ø 21 1. To the sink outlet spigot, securing it if necessary with a clip. min 4 cm The end of the drain hose can be connected in the following ways: 3. To a stand pipe provided with vent-hole, minimum internal diameter 4 cm. min 30 cm max 100 cm max 100 cm 2. Hooked over the edge of the sink using the special curved plastic guide (if provided).
Electrical connection This appliance must be earthed. The manufacturer declines any responsibility should this safety measure not be observed. If the plug that is fitted to your appliance is not suitable for the socket, it must be cut off and the appropriate plug fitted.
Guarantee conditions Service and spare parts Standard guarantee conditions In the event of your appliance requiring service, or if you wish to purchase spare parts please contact your local Zanussi Service Centre by telephoning: We, Zanussi, undertake that if within 24 months of the date of purchase this Zanussi appliance or any part thereof is proved to be defective by reason only of faulty workmanship or materials, we will, at our option repair or replace the same FREE OF CHARGE for labour, materials
To contact your local Service Force Centre telephone 08705 CHANNEL ISLANDS GUERNSEY Guernsey Electricity PO Box 4 Vale, Guernsey Channel Islands GY1 3AD JERSEY Jersey Electricity Company Haut De L’orme Rue De Haut De L’orme Trinity Jersey Channel Islands JE3 5FG ISLE OF LEWIS KELSO ND Macleod 16 James Street Stornoway Isle of Lewis PA87 2QW NORTH EAST GATESHEAD Unit 356a Dukesway Court Dukesway Gateshead NE11 0BH GRIMSBY 7 King Street Kirkwall Orkney KW15 1JF 15 Hainton Avenue Grimsby N. E.
To contact your local Service Force Centre telephone 08705 MIDLANDS 929 929 LONDON & EAST ANGLIA SOUTH EAST BIRMINGHAM 66 Birch Road East Wyrley Trading Estate Witton Birmingham B6 7DB BECKENHAM CHELMSFORD BOURNE BRIDGNORTH GLOUCESTER HEREFORD HIGHAM FERRERS Pinfold Road Bourne PE10 9HT 68 St.
Guarantee conditions Service and spare parts Standard guarantee conditions In the event of your appliance requiring service, or if you wish to purchase spare parts please contact your local Zanussi Service Centre by telephoning: We, Zanussi, undertake that if within 24 months of the date of purchase this Zanussi appliance or any part thereof is proved to be defective by reason only of faulty workmanship or materials, we will, at our option repair or replace the same FREE OF CHARGE for labour, materials
From the Electrolux Group. The world’s No.1 choice. The Electrolux Group is the world’s largest producer of powered appliances for kitchen, cleaning and outdoor use. More than 55 million Electrolux Group products (such as refrigerators, cookers, vacuum cleaners, chain saws and lawn mowers) are sold each year to a value of approx. 14 billion USD in more than 150 countries around the world.