EN User manual Washing Machine ZWH 8100 SE
Contents Safety instructions _ _ _ _ _ _ _ _ _ _ _ _ _ _ 2 Product description _ _ _ _ _ _ _ _ _ _ _ _ _ 4 Control panel _ _ _ _ _ _ _ _ _ _ _ _ _ _ _ _ _ 5 Washing programmes _ _ _ _ _ _ _ _ _ _ _ _ 8 Consumption values _ _ _ _ _ _ _ _ _ _ _ _ 12 Helpful hints and tips _ _ _ _ _ _ _ _ _ _ _ _ 13 First use _ _ _ _ _ _ _ _ _ _ _ _ _ _ _ _ _ _ _ 14 Daily use _ _ _ _ _ _ _ _ _ _ _ _ _ _ _ _ _ _ _ Care and cleaning _ _ _ _ _ _ _ _ _ _ _ _ _ What to do if… _ _ _ _ _ _ _ _ _ _ _ _ _ _ _ Technical data _ _ _ _ _
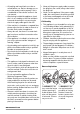
• All packing and transit bolts must be removed before use. Serious damage can occur to the product and to property if this is not adhered to. See relevant section in the user manual. • After having installed the appliance, check that it is not standing on the inlet and drain hose and the worktop is not pressing the electrical supply cable against the wall. • If the machine is situated on a carpeted floor, please adjust the feet in order to allow air to circulate freely under the appliance.
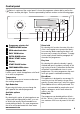
Product description 1 2 3 4 5 6 1 Detergent dispenser drawer 2 Control panel 4 Rating Plate 5 Drain pump 3 Door opening handle 6 Adjustable feet Detergent dispenser drawer Compartment for detergent used for prewash and soak phase or for stain remover used during the stain action phase (if available). The prewash and soak detergent is added at the beginning of the wash programme. The stain remover is added during the stain action phase. Compartment for powder or liquid detergent used for main wash.
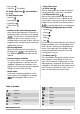
Control panel Below is a picture of the control panel. It shows the programme selector dial as well as the buttons and the pilot lights. These are presented by relevant numbers on the following pages. 1 2 1 Programme selector dial 2 TEMPERATURE button 3 SPIN reduction button 4 EASY IRON button 5 EXTRA RINSE button 6 DELAY START button 7 Display 8 START/PAUSE button 9 TIME MANAGER buttons Programme Selector Dial It allows you to switch the appliance on/off and/ or to select a programme.
Start Pause This button allows you to start or to interrupt the selected programme. Time Manager These buttons allows you to modify the programme duration automatically proposed by the appliance. • at the end of the cycle • if there is a fault. By pressing the 4 and 5 buttons simultaneously for about 6 seconds, the acoustic signal is deactivated (except if there is a fault). By pressing these 2 buttons again, the acoustic signal is reactivated.
• Easy Iron , • Sensitive (if available). - not available in 7.6: Child safety lock this model 7.7: Soil degree icons • Intensive • Normal/Daily • Light/Quick • Super Quick 7.8: • Duration of the selected programme After selecting a programme, the duration is displayed in hours and minutes (for example ). The duration is calculated automatically on the basis of the maximum recommended load for each type of fabric. After the programme has started, the time remaining is updated every minute.
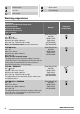
= Delicate spin = Door locked = No spin = Time Manager = Rinse hold Washing programmes Programme Maximum and Minimum Temperature Cycle Description Maximum Spin Speed Maximum Fabrics Load Type of Laundry Options COTTON 90° (cold) Main wash - Rinses Maximum spin speed 1000 rpm Max. load 7 kg - Reduced load 3.5 kg1) White and coloured cotton (normally soiled items).
Programme Maximum and Minimum Temperature Cycle Description Maximum Spin Speed Maximum Fabrics Load Type of Laundry Options Detergent Compartment SYNTHETICS 60° (cold) Main wash - Rinses Maximum spin speed 900 rpm Max. load 3.5 kg - Reduced load 2 kg1) Synthetic or mixed fabrics: underwear, coloured garments, non-shrink shirts, blouses. SPIN REDUCTION NO SPIN RINSE HOLD EASY IRON EXTRA RINSE TIME MANAGER SYNTHETICS + PREWASH 60° (cold) Prewash - Main wash - Rinses Maximum spin speed 900 rpm Max.
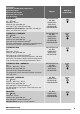
Programme Maximum and Minimum Temperature Cycle Description Maximum Spin Speed Maximum Fabrics Load Type of Laundry Options WOOL 40° (cold) Main wash - Rinses Maximum spin speed 1000 rpm Max. load 2 kg Washing programme for machine washable wool as well as for hand washable woollens and delicate fabrics. Note: A single or bulky item may cause imbalance. If the appliance doesn’t perform the final spin phase, add more items, redistribute the load manually and then select the spinning programme.
Programme Maximum and Minimum Temperature Cycle Description Maximum Spin Speed Maximum Fabrics Load Type of Laundry Options SOAK 30° Prewash - Soak for about 40 minutes - Stop with water in the tub Max. load 7 kg Special programme for heavily soiled laundry. The machine performs a soak at 30° C. At the end of this time the machine will stop automatically with water left in the tub.
Programme Maximum and Minimum Temperature Cycle Description Maximum Spin Speed Maximum Fabrics Load Type of Laundry Detergent Compartment Options DELICATE SPIN Drain and short spin Maximum spin speed 700 rpm Max. load 3.5 kg Separate short spin for delicate, synthetic, wool, silk and hand washed garments. = ON/OFF For cancelling the programme which is running or to switch the machine off .
Programmes1) Standard 40 °C cotton Load (kg) Energy consumption (kWh) Water consumption (litre) Approximate programme duration (minutes) Remaining moisture (%)2) 3.5 0.6 48 170 60 1) These values have been measured in the condition of CEI 60456. 2) At the end of spin phase. Helpful hints and tips Sorting out the laundry Follow the wash code symbols on each garment label and the manufacturer’s washing instructions. Sort the laundry as follows: whites, coloureds, synthetics, delicates, woollens.
Grass: soap lightly and treat with bleach (whites and fast coloureds only). Ball point pen and glue: moisten with acetone1), lay the garment on a soft cloth and dab the stain. Lipstick: moisten with acetone as above, then treat stains with methylated spirits. Treat any residual marks with bleach. Red wine: soak in water and detergent, rinse and treat with acetic or citric acid, then rinse. Treat any residual marks with bleach.
residue from the drum and tub. Pour 1/2 a measure of detergent into the main wash compartment and start the machine. Daily use Load the laundry Open the door by carefully pulling the door handle outwards. Place the laundry in the drum, one item at a time, shaking them out as much as possible. Close the door. Make sure that no laundry stays between the seal and the door. There is a risk of water leakage or damage to the laundry.
Select the available option by pressing buttons 3, 4 and 5 Depending on the selected programme, different functions can be combined before pressing the button 8. By selecting an option the relevant pilot light illuminates. If an incorrect option is selected, the integrated red pilot light of the button 8 flashes 3 times and the Err message appears on the display for few seconds. For compatibility among the washing programmes and the options see chapter «Washing Programmes».
Important! The Time Manager cannot be selected with the Economy (Eco) programmes. The availability of these soil level icons change according to the type of fabric as shown in the following chart.
gramme selector dial to to switch the machine off. Remove the laundry from the drum and carefully check that the drum is empty. If you do not in- tend to carry out another wash, close the water tap. Leave the door open to prevent the formation of mildew and unpleasant smells. Care and cleaning Warning! You must DISCONNECT the appliance from the electricity supply, before you can carry out any cleaning or maintenance work. Descaling The water we use normally contains lime.
Place a container close to the pump . Unscrew carefully the drain filter to drain out the water. Always wait until the appliance has finished the cycle, and is empty. When refitting the filter, ensure it is securely retightened so as to stop leaks and young children being able to remove it. Cleaning the water inlet filters When no more water comes out, remove the filter. If necessary, use pliers. Always keep a rag nearby to dry up any water spillage when removing the filter.
Frost precautions If the machine is installed in a place where the temperature could drop below 0°C, remove the remaining water from the inlet hose and the drain pump. 1. disconnect the mains plug from the mains socket. 2. close the water tap 3. unscrew the water inlet hose from the tap; 4. put the two ends of the inlet hose in a container and let the water flow out of the hose. 5. empty the drain pump as described in the ‘Emergency emptying out’ section. 6.
Problem Possible cause/Solution The machine does not start: The door has not been closed. • Close the door firmly. The plug is not properly inserted in the power socket. • Insert the plug into the power socket. There is no power at the socket. • Please check your domestic electrical installation. The main fuse has blown. • Replace the fuse. The selector dial is not correctly positioned and the button 8 has not been pressed. • Please turn the selector dial and press the button 8 again.
Problem Possible cause/Solution Unsatisfactory washing results: Too little detergent or unsuitable detergent has been used. • Increase the detergent quantity or use another one. Stubborn stains have not been treated prior to washing. • Use commercial products to treat the stubborn stains. The correct temperature was not selected. • Check if you have selected the correct temperature. Excessive laundry load. • Reduce the laundry load. The door will not open: The programme is still running.
Mod Prod . ... . No. ... ... ... ... .. Ser. No. ... ... ... If you are unable to identify or solve the problem, contact our service centre. Before telephoning, make a note of the model, serial number and purchase date of your machine: the Service Centre will require this information. Mod. ... ... ... Prod. No. ... ... ... Ser. No. ... ... ... Technical data Dimensions Width Height Depth Depth (Overall dimensions) 60 cm 85 cm 55.3 cm 64.
A Unscrew the three bolts A . Any necessary adjustment can be made with a spanner. B Slide out the relevant plastic spacers B . Accurate levelling prevents vibration, noise and displacement of the machine during operation. Caution! Never place cardboard, wood or similar materials under the machine to compensate for any unevenness in the floor. After having levelled the appliance, tighten the lock nuts. Open the porthole and remove the polystyrene block fitted on the door seal.
Connect the hose to a tap with a 3/4” thread. Always use the hose supplied with the appliance. Hooked over the edge of a sink using the plastic hose guide supplied with the machine. In this case, make sure the end cannot come unhooked when the machine is emptying. This could be done by tying it to the tap with a piece of string or attaching it to the wall. 35° 45° The other end of the inlet hose which connects to the appliance can be turned as showed in the picture.
Caution! Should the appliance power supply cable need to be replaced, this must be carried out by a Service Centre. Environment concerns The symbol on the product or on its packaging indicates that this product may not be treated as household waste. Instead it should be taken to the appropriate collection point for the recycling of electrical and electronic equipment.
www.zanussi.
148206050-A-242012 www.zanussi.