
User manual
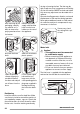
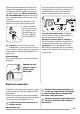


After removing all the
packaging, carefully
lay machine on it's
back to remove the
polystyrene base from
the bottom.
Remove the power
supply cable and the
hose from the hose
holders on the rear of
the appliance.
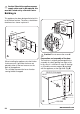
Unscrew the three
bolts.
Slide out the relevant
plastic spacers.
Open the porthole,
remove the polystyr-
ene block fitted on
the door seal and pull
out all items from the
drum.
Fill the smaller upper
hole and the two
large ones with the
corresponding plastic
plug caps supplied in
the bag containing
the instruction book-
let.
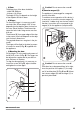
Positioning
Install the machine on a flat hard floor. Make
sure that air circulation around the machine is
not impeded by carpets, rugs etc. Check that
the machine does not touch the wall or other
kitchen units. Level the washing machine by
raising or lowering the feet. The feet may be
tight to adjust as they incorporate a self locking
nut, but the machine MUST be level and stable.
Any necessary adjustment can be made with a
spanner.
Accurate levelling prevents vibration, noise and
displacement of the machine during operation.
Never place cardboard, wood or similar materi-
als under the machine to compensate for any
unevenness in the floor.
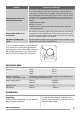
If necessary, check
the setting with a spi-
rit level.
Water inlet
Caution!
• This appliance must be connected
to a cold water supply.
• Before connecting up the appliance to
new pipework or to pipework that has
not been used for some time, run off a
reasonable amount of water to flush out
any debris that may have collected.
• Do not use the hose from your previous
appliance to connect to water supply.
The inlet hose is supplied with the appliance
and can be found inside the machine drum.
35°
45°
22
www.zanussi.com