EN User manual Washing Machine ZWI 71201 WA ZWI 71401 WA
Contents Safety information _ _ _ _ _ _ _ _ _ _ _ _ _ _ _ 2 Safety instructions _ _ _ _ _ _ _ _ _ _ _ _ _ _ 3 Product description _ _ _ _ _ _ _ _ _ _ _ _ _ _ 4 Control panel _ _ _ _ _ _ _ _ _ _ _ _ _ _ _ _ _ 5 Washing programmes _ _ _ _ _ _ _ _ _ _ _ _ 8 Consumption values _ _ _ _ _ _ _ _ _ _ _ _ _ 11 Helpful hints and tips _ _ _ _ _ _ _ _ _ _ _ _ 11 First use _ _ _ _ _ _ _ _ _ _ _ _ _ _ _ _ _ _ _ 13 Personalisation _ _ _ _ _ _ _ _ _ _ _ _ _ _ _ Daily use _ _ _ _ _ _ _ _ _ _ _ _ _ _ _ _ _ _ _ Care and clea
• Obey the maximum load volume of 7 kg (refer to the “Programme chart” chapter). • If the supply cord is damaged, it must be replaced by the manufacturer, its service agent or similarly qualified persons in order to avoid a hazard. • The operating water pressure (minimum and maximum) must be between 0,5 bar (0,05 MPa) and 8 bar (0,8 MPa) • The ventilation openings in the base (if applicable) must not be obstructed by a carpet.
• Before you connect the appliance to new pipes or pipes not used for a long time, let the water flow until it is clean. • The first time you use the appliance, make sure that there is no leakage. Use Warning! Risk of injury, electrical shock, fire, burns or damage to the appliance. • Use this appliance in a household environment. • Obey the safety instructions on the detergent packaging. • Do not put flammable products or items that are wet with flammable products in, near or on the appliance.
To activate this device, rotate the button (without pressing it) inside the door clockwise until the groove is horizontal. If necessary use a coin. To disable this device and restore the possibility of closing the door, rotate the button anti-clockwise until the groove is vertical. Detergent dispenser drawer Compartment for detergent used for prewash and soak phase or for stain remover used during the stain action phase (if available).
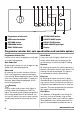
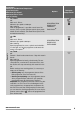
1 2 3 4 5 6 7 8 10 9 1 Programme selector dial 2 SPIN reduction button 6 EXTRA RINSE button 7 START/PAUSE button 3 OPTIONS button 4 PREWASH button 8 DELAY START button 9 DOOR LOCKED pilot light 5 EASY IRON button 10 Display Programme selector dial, spin speed button and available options Programme Selector Dial It allows you to switch the appliance on/off and/ or to select a programme. Spin Reduction By pressing this button you can change the spin speed of the selected programme.
lergic to detergents, and in areas where the water is very soft. Start Pause This button allows you to start or to interrupt the selected programme. Delay Start The programme can be delayed from 30 min 60 min - 90 min, 2 hours and then by 1 hour up to a maximum of 20 hours by means of this button. Door locked pilot light The pilot light 9 illuminates when the programme starts and indicates if the door can be opened: • light on: the door cannot be opened.
Washing programmes SPIN REDUCTION RINSE HOLD 2) ECO QUICK WASH3) PREWASH EASY IRON 4) EXTRA RINSE 5–6–7 60° - 30° Main wash - Rinses Maximum spin speed at 900 rpm Max. load 3 kg - Reduced load 1.5 kg Synthetic or mixed fabrics: underwear, coloured garments, non-shrink shirts, blouses. SPIN REDUCTION RINSE HOLD 2) ECO SUPER QUICK 3) PREWASH EASY IRON 4) EXTRA RINSE Delicates 8–9 40° - 30° Main wash - Rinses Maximum spin speed 700 rpm Max. load kg 3 - Reduced load kg 1.
Specials Programme Maximum and Minimum Temperature Cycle Description Maximum Spin Speed Maximum Fabrics Load Type of Laundry Options 14 – Jeans 40° Main wash - Rinses Maximum spin speed at 1200 rpm Max. load 3 kg With this programme it is possible to wash items like trousers, shirts or jackets in denim and also jersey realized with hi-tech materials. (The Extra Rinse option will be activated automatically).
Programme Maximum and Minimum Temperature Cycle Description Maximum Spin Speed Maximum Fabrics Load Type of Laundry Options Detergent Compartment 17 – Mini 30’ Main wash - Rinses Maximum spin speed at 700 rpm Max. load 3 kg Quick washing programme for cotton and synthetic items which are lightly soiled or only need freshening up. Extra 18 – Rinse Rinses Maximum spin speed at 1200 rpm for model ZWI71201WA (1400 rpm for model ZWI71401WA) Maximum spin speed at 1400 rpm for model ZWI71401WA Max.
4) Max. load with Easy iron option 1.5 kg 5) If using liquid detergents, a programme without PREWASH must be selected. 6) Make sure that the detergent is for low temperature in order to have good washing results. Consumption values The data of this table are approximate. Different causes can change the data: the quantity and type of laundry, the water and ambient temperature.
Treat curtains with special care. Remove hooks or tie them up in a bag or net. Removing stains Stubborn stains may not be removed by just water and detergent. It is therefore advisable to treat them prior to washing. Blood: treat fresh stains with cold water. For dried stains, soak overnight in water with a special detergent then rub in the soap and water. Oil based paint: moisten with benzine stain remover, lay the garment on a soft cloth and dab the stain; treat several times.
structions. When the degree of hardness is soft, readjust the quantity of the detergent. First use • Ensure that the electrical and water connections comply with the installation instructions. • Remove the polystyrene block and any material from the drum. • Pour 2 litres of water into the main wash of the detergent drawer compartment in order to activate the ECO valve.
Measure out the detergent and the fabric softener Pull out the dispenser drawer until it stops. Measure out the amount of detergent required, pour it into the main wash compartor in the appropriate compartment if ment the selected programme/option it requires (see more details in "Detergent dispenser drawer"). If required, pour fabric softener into the com(the amount used must partment marked not exceed the «MAX» mark in the drawer). Close the drawer gently.
1. Select the programme and the required options. 2. Select the delay start by pressing button 8. 3. Press button 7: - the machine starts its hourly countdown. - the programme will start after the selected delay has expired. Cancelling the Delay Start after having started the programme: 1. Set the washing machine to PAUSE by pressing button 7. 2. Press button 8 once. On the display will appear '. 3. Press button 7 again to start the programme.
tend to carry out another wash, close the water tap. Leave the door open to prevent the formation of mildew and unpleasant smells. Stand by : once the programme has finished after a few minutes the energy saving system will be enabled. The brightness of the display is reduced. By pressing any button the appliance will come out of the energy saving status. Care and cleaning Warning! You must DISCONNECT the appliance from the electricity supply, before you can carry out any cleaning or maintenance work.
Place a container close to the pump (A) to collect any spillage. Pull out the emergency emptying hose (B), place it in the container and remove its cap. Caution! When the appliance is in use and depending on the programme selected there can be hot water in the pump. Never remove the pump cover during a wash cycle, always wait until the appliance has finished the cycle, and is empty.
35° 45° • Screw the hose back to the machine and make sure the connection is tight. • Turn on the water tap. Frost precaution If the machine is exposed to temperatures below 0°C, certain precautions should be taken. • Turn off the water tap. • Unscrew the inlet hose. • Place the end of the emergency emptying hose and that of the inlet hose in a bowl placed on the floor and let water drain out.
Problem Possible cause/Solution The machine does not start: The door has not been closed. • Close the door firmly. The plug is not properly inserted in the power socket. • Insert the plug into the power socket. There is no power at the socket. • Please check your domestic electrical installation. The main fuse has blown. • Replace the fuse. The selector dial is not correctly positioned and the button 7 has not been pressed. • Please turn the selector dial and press the button 7 again.
Problem Possible cause/Solution There is water on the floor: Too much detergent or unsuitable detergent (creates too much foam) has been used. • Reduce the detergent quantity or use another one. Check whether there are any leaks from one of the inlet hose fittings. It is not always easy to see this as the water runs down the hose; check to see if it is damp. • Check the water inlet hose connection. The drain or inlet hose is damaged. • Replace it with a new one.
Problem Possible cause/Solution The machine makes an unusual noise: The machine is fitted with a type of motor which makes an unusual noise compared with other traditional motors. This new motor ensures a softer start and more even distribution of the laundry in the drum when spinning, as well as increased stability of the machine. No water is visible in the drum: Machines based on modern technology operate very economically using very little water without affecting performance. Mod Prod . ... . No.
After removing all the packaging, carefully lay machine on it's back to remove the polystyrene base from the bottom. Remove the power supply cable and the hose from the hose holders on the rear of the appliance. Level the washing machine by raising or lowering the feet. The feet may be tight to adjust as they incorporate a self locking nut, but the machine MUST be level and stable. If necessary, check the setting with a spirit level. Any necessary adjustment can be made with a spanner.
Water inlet Caution! • This appliance must be connected to a cold water supply. • Before connecting up the appliance to new pipework or to pipework that has not been used for some time, run off a reasonable amount of water to flush out any debris that may have collected. • Do not use the hose from your previous appliance to connect to water supply. The inlet hose is supplied with the appliance and can be found inside the machine drum.
38 mm (1.5”) standpipe diamater 30 cm (12”) The drain hose may be extended to a maximum of 4 metres. An additional drain hose and joining piece is available from your local Service Force Centre. The joining piece must have an internal diameter of 18 mm. Min. 60 cm (23.6”) Max. 90 cm (35.4”) If your drain hose looks like this (see beside) you do not require the “U” piece”. Just push the hose firmly in to the standpipe.
Building in This appliance has been designed to be built into the kitchen furniture. The recess should have the dimensions shown in picture A. Preparation and assembly of the door The machine is originally prearranged for the assembly of a door opening from right to left. In this case it is sufficient to screw in the hinges (1) and the counter-magnet (6) provided with the appliance, at the right level (Fig. B). 600 min. 560 596 35 Ø 12,5-14 depth 16-22 555 min.
• a) Door The dimensions of the door should be: - width 595-598 mm - thickness 16-22 mm The height (C-Fig. C) depends on the height of the adjacent furniture's base. • b) Hinges To mount the hinges it is necessary to drill two holes (dia. 35 mm, depth 12.5-14 mm depending on the depth of door furniture) on the inner side of the door. The distance between the holes hobs fixing centres must be 416 mm.
Where the appliance has been raised by mounting onto a wooden base provided by the installer. The material used to construct the base should have anon slip surface, be water repellent and if possible be one solid piece. If it is not possible to use one solid piece, due to the additional height required, ensure that any additional strips of timber are glued and screwed to the underside of the base (see Fig. F).
>PE<=polyethylene >PS<=polystyrene >PP<=polypropylene This means that they can be recycled by disposing of them properly in appropriate collection containers. Ecological hints To save water, energy and to help protect the environment, we recommend that you follow these tips: • Normally soiled laundry may be washed without prewashing in order to save detergent, 28 water and time (the environment is protected too!). • The machine works more economically if it is fully loaded.
www.zanussi.
www.zanussi.
www.zanussi.
132929833-A-202103 www.zanussi.