EN FR DE User manual Notice d'utilisation Benutzerinformation Oven Four Backofen ZYB 460 2 17 33
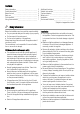
Contents Safety information _ _ _ _ _ _ _ _ _ _ _ _ _ _ _ _ _ _ Product description _ _ _ _ _ _ _ _ _ _ _ _ _ _ _ _ _ Before first use _ _ _ _ _ _ _ _ _ _ _ _ _ _ _ _ _ _ _ Daily use _ _ _ _ _ _ _ _ _ _ _ _ _ _ _ _ _ _ _ _ _ _ Clock functions _ _ _ _ _ _ _ _ _ _ _ _ _ _ _ _ _ _ _ Using the accessories _ _ _ _ _ _ _ _ _ _ _ _ _ _ _ _ 2 5 5 6 7 7 Additional functions _ _ _ _ _ _ _ _ _ _ _ _ _ _ _ _ _ 8 Helpful hints and tips _ _ _ _ _ _ _ _ _ _ _ _ _ _ _ _ 8 Care and cleaning _ _ _ _ _ _ _ _ _ _ _ _ _ _ _ _
• Keep the minimum distances to the other appliances and units. • Install the appliance with its back and one side close to the higher appliance. The other side must be close to appliance with the same height. • The appliance cannot be positioned on a base. • Built in ovens and built in cooking surfaces are attached with special connection system. To prevent damage to the appliance, only use an appliance with the appliances from the same manufacturer. Electrical connection • The appliance must be earthed.
• When the door glass panels are damaged they become weak and can break. You must replace them. Contact the service centre. • Be careful when you remove the door from the appliance. The door is heavy! • Do not clean catalytic enamel (if applicable). Pyrolytic cleaning • Do not leave the appliance unattended during Pyrolytic cleaning. • Do not try to open the door and do not cut the power supply during Pyrolytic cleaning. • Keep children away during pyrolytic cleaning. The appliance becomes very hot.
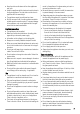
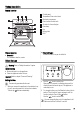
Product description General overview 2 3 4 1 5 9 8 6 7 Oven accessories • Oven shelf For cookware, cake tins, roasts. 1 2 3 4 5 6 7 8 9 Control panel Temperature/Time control knob Electronic programmer Oven function control knob Air vents for the cooling fan Oven lamp Fan Rating plate Grill • Deep roasting pan To bake and roast or as pan to collect fat. Before first use Warning! Refer to "Safety information" chapter. Initial Cleaning • Remove all parts from the appliance.
Pre-heating 1. Set function and maximum temperature. 2. Let the appliance operate without the food for approximately 1 hour. 3. Set function and maximum temperature. 4. Let the appliance operate without the food for approximately 10 minutes. 5. Set function and maximum temperature. 6. Let the appliance operate without the food for approximately 10 minutes. This is to burn off the residue in the appliance. The accessories can become more hot than usually.
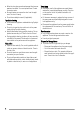
Clock functions Electronic programmer 6 Temperature check buton Setting the clock functions 1 2 3 6 1 2 3 4 5 5 4 Temperature / Time display Heat indicator Clock function indicators Selection button Pyrolyse function button 1. Push the Selection button again and again until the desired function indicator flashes. 2. To set the time for Minute Minder , Duration or End , use the + / - knob. The related function indicator comes on.
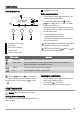
4 3 2 1 Additional functions Child lock Cooling fan When the child lock is on, you cannot operate the oven. It makes sure that children do not accidentally switch on the appliance. When the appliance operates, the cooling fan switches on automatically. If you switch off the appliance, the cooling fan continues to operate until the appliance cools down. Important! Do not set an oven function. Safety thermostat Switching on the child lock: 1. Turn + / - control knob to the left and hold it. 2.
when you cook. This can change the baking results and damage the enamel coating. Baking cakes • The best temperature for baking cakes is between 150°C and 200°C. • Preheat the oven for approximately 10 minutes before baking. • Do not open the oven door before 3/4 of the set cooking time is up. • If you use two baking trays at the same time, keep one level empty between them. Cooking meat and fish • Do not cook meat with weight below 1 kg. Cooking too small quantities makes the meat too dry.
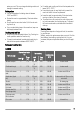
Conventional cooking Fan cooking Cooking time [min] Notes 160 20-30 On flat baking tray 3 150 20-30 On flat baking tray1) 100 3 100 90-120 On flat baking tray 3 190 3 180 15-20 On flat baking tray1) Choux 3 190 3 180 25-35 On flat baking tray1) Plate tarts 3 180 2 170 45-70 In cake mould 20 cm 1 or 2 180 2 170 40-55 Left + right in cake mould 20 cm TYPE OF DISH Level Temp [°C] Level Temp [°C] Small cakes 3 170 3 (1 and 3) Biscuits 3 150 Meringues 3 Bun
Conventional cooking TYPE OF DISH Fan cooking Cooking time [min] Notes 190 25-40 In mould 210 20-30 6 pudding mould 1) Cooking time [min] Notes Level Temp [°C] Level Temp [°C] Cannelloni 2 200 2 Yorkshire pudding 2 220 2 1) Preheat for 10 minutes.
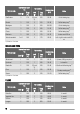
FISH TYPE OF DISH Conventional cooking Fan cooking Cooking time [min] Notes 175 40-55 3-4 fishes 175 35-60 4-6 fillets Level Temp [°C] Level Temp [°C] Trout/Sea bream 2 190 2 (1 and 3) Tuna fish/Salmon 2 190 2 (1 and 3) Grilling Preheat the empty oven for 10 minutes, before cooking. Quantity TYPE OF DISH Grilling Pieces g Fillet steaks 4 800 Beef steaks 4 600 Sausages 8 Pork chops Chicken (cut in 2) Cooking time in minutes Temp.
Quantity TYPE OF DISH Grilling Pieces g Quail 4 500 Vegetable gratin - pieces. Scallops Cooking time in minutes Temp. (°C) 1st side 2nd side 3 200 25-30 20-25 - 3 200 20-25 - level - - 3 200 15-20 - Mackerel 2-4 - 3 200 15-20 10-15 Fish slices 4-6 800 3 200 12-15 8-10 Information on acrylamides Important! According to the newest scientific knowledge, if you brown food (specially the one which contains starch), acrylamides can pose a health risk.
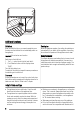
The display shows the reminder message when the appliance is off until you clean the appliance with the Pyrolytic cleaning. Cleaning the oven door 90° The oven door has three panels of glass. You can remove the oven door and the internal panels of glass to clean them. The oven door can close if you try to remove the panels of glass before you remove the oven door. Removing the oven door and the glass panel 5 Release the locking system to remove the panels of glass.
Oven lamp Warning! Be careful! There is the risk of electrical shock! Before you change the oven lamp: • Switch off the oven. • Remove the fuses in the fuse box or switch off the circuit breaker. 1. Turn the glass cover anti-clockwise to remove it. 2. Clean the glass cover. 3. Replace the oven light bulb with applicable 300°C heat-resistant oven light bulb. Use the same oven lamp type. 4. Install the glass cover. Put a cloth on the bottom of the oven for protection of the oven light and glass cover.
Serial number (S.N.) ......................................... Installation Electrical installation Warning! Refer to "Safety information" chapter. 540 Warning! Only a qualified and competent person must do the electrical installation. 50 560 The manufacturer is not responsible if you do not follow safety precautions from chapter "Safety Information". 570 590 20 in 594 587 550m 560-5 7 70 The cable 560 -570 600 in 550 m 00 ÷1 80 This appliance is only supplied with a main cable.
Sommaire Consignes de sécurité _ _ _ _ _ _ _ _ _ _ _ _ _ _ _ Description de l'appareil _ _ _ _ _ _ _ _ _ _ _ _ _ _ Avant la première utilisation _ _ _ _ _ _ _ _ _ _ _ _ Utilisation quotidienne _ _ _ _ _ _ _ _ _ _ _ _ _ _ _ Fonctions de l'horloge _ _ _ _ _ _ _ _ _ _ _ _ _ _ _ Utilisation des accessoires _ _ _ _ _ _ _ _ _ _ _ _ _ 17 20 20 21 22 23 Fonctions supplémentaires _ _ _ _ _ _ _ _ _ _ _ _ _ Conseils utiles _ _ _ _ _ _ _ _ _ _ _ _ _ _ _ _ _ _ _ Entretien et nettoyage _ _ _ _ _ _ _ _ _ _ _ _ _ _ _ En
• Vous devez disposer de dispositifs d'isolement appropriés : des coupe-circuits, des fusibles (les fusibles à visser doivent être retirés du support), des disjoncteurs différentiels et des contacteurs. • Les dispositifs de protection doivent être fixés de telle sorte qu'ils ne puissent pas être retirés sans outils. • Avant l'installation, vérifiez que les dimensions de votre cuisine sont appropriées (écartement). • Vérifiez que l'appareil est installé sous et à proximité de structures sûres.
• Toutes les cuissons, même au gril, doivent être effectuées porte fermée. Entretien et nettoyage • Avant toute opération de nettoyage ou intervention technique, assurez-vous que l'appareil soit débranché électriquement et complètement refroidi. • Avant toute opération d'entretien, assurez-vous que l'appareil est froid. Risque de brûlure. Les vitres risquent de se briser. • L'appareil doit rester propre en permanence.
Description de l'appareil Vue d'ensemble 2 3 4 1 5 9 8 6 7 Accessoires du four • Grille du four Elle permet de poser les plats (rôtis, gratins), les moules à pâtisserie et de faire des grillades.
Vous ne pouvez modifier l'heure que si le four est à l'arrêt. Assurez-vous que la Sécurité enfants n'est pas activée. Préchauffage 1. Fonction de réglage et température maximale. 2. Laissez l'appareil fonctionner sans aliments pendant environ 1 heure. 3. Fonction de réglage et température maximale. 5. Fonction de réglage et température maximale. 6. Laissez l'appareil fonctionner sans aliments pendant environ 10 minutes. Cela a pour but de brûler les résidus dans l'appareil.
Fonction du four Utilisation Chaleur tournante Cette fonction permet de cuire ou de rôtir simultanément sur plusieurs gradins des aliments nécessitant une température de cuisson identique, sans que les odeurs ne se mélangent. Décongélation Décongèle les aliments surgelés. La manette du thermostat doit être placée sur Arrêt. Nettoyage par pyrolyse Pour le nettoyage par pyrolyse automatique du four. Elle brûle les salissures résiduelles dans le four.
Annulation des fonctions de l'horloge 1. Appuyez plusieurs fois sur le bouton Sélection jusqu'à ce que le voyant de fonctions clignote. 2. Tournez en appuyant sur la manette de commande "+/- ". Au bout de quelques secondes, la fonction horloge disparaît. Utilisation des accessoires Avertissement Reportez-vous au chapitre « Consignes de sécurité ». Installation des accessoires du four 4 Glissez les accessoires entre les barres de guidage de l'un des niveaux du four.
Conseils utiles • Le four dispose de quatre niveaux de gradins. Comptez les niveaux de gradins à partir du bas de l'appareil. • L'appareil est doté d'un système spécial qui permet à l'air de circuler et qui recycle perpétuellement la vapeur. Dans cet environnement, ce système permet de cuisiner des plats tout en maintenant ceux-ci tendres à l'intérieur et croquants à l'extérieur. Le temps de cuisson et la consommation énergétique sont donc réduits au minimum.
Cuisson traditionnelle Chaleur tournante Gradin Temp [°C] Gradin Temp [°C] Gâteau au fromage blanc avec babeurre 1 170 2 160 60-80 Dans un moule à gâteaux de 26 cm Tarte aux pommes 1 170 2 (1 et 3) 160 100-120 2 moules à gâteaux de 20 cm sur la grille Strudel 2 175 2 150 60-80 Sur plaque à pâtisserie Tarte à la confiture 2 170 2 160 30-40 Dans un moule à gâteaux de 26 cm Cake aux fruits secs 2 170 2 155 60-70 Dans un moule à gâteaux de 26 cm Gâteau de Savoie (gâteau
Cuisson traditionnelle Chaleur tournante Gradin Temp [°C] Gradin Temp [°C] Petits pains 2 190 2 (1 et 3) 180 25-40 6-8 petits pains sur plaque de cuisson 1) Pizzas 1 190 1 190 20-30 Sur la lèchefrite 1) Petits pains au lait 3 200 2 190 10~20 Sur la plaque à gâteaux 1) Temps de cuisson [min] Notes TYPE DE PLAT Temps de cuisson [min] Notes 1) Pré-chauffez pendant 10 minutes.
TYPE DE PLAT Cuisson traditionnelle Chaleur tournante Temps de cuisson [min] Notes Gradin Temp [°C] Gradin Temp [°C] Rôti de bœuf à l’anglaise bien cuit 2 210 2 200 55-60 Sur la grille de four et au-dessus de la lèchefrite Épaule de porc 2 180 2 170 120-150 Sur la lèchefrite Jarret de porc 2 180 2 160 100-120 2 morceaux sur la lèchefrite Agneau 2 190 2 190 110-130 Gigot Poulet 2 200 2 200 70-85 Le tout sur la lèchefrite Dinde 1 180 1 160 210-240 Le tout sur
Quantité TYPE DE PLAT Cuisson au gril Pièces Temps de cuisson en minutes g Niveau de gradin Temp. (°C) 1er côté 2ème côté Brochettes 4 / 3 250 10-15 10-12 Blanc de poulet 4 400 3 250 12-15 12-14 Hamburgers 6 600 3 250 20-30 Filets de poisson 4 400 3 250 12-14 Sandwichs toastés 4-6 / 3 250 5-7 / Toasts 4-6 / 3 250 2-4 2-3 10-12 Gril à chaleur tournante Avertissement Utilisez cette fonction avec une température maximum de 200°C.
Nettoyez le joint d'étanchéité de la porte • Vérifiez régulièrement le joint d'étanchéité de la porte. Le joint d'étanchéité de la porte est posé sur l'encadrement de la cavité du four. N'utilisez pas l'appareil si le joint d'étanchéité de la porte est endommagé. Prenez contact avec le service après-vente. • Pour le nettoyage du joint d'étanchéité de la porte, consultez les informations générales concernant le nettoyage. Nettoyage par pyrolyse 1. Retirez tous les accessoires du four.
Le panneau vitré du milieu est décoré d'un motif ornemental. Après avoir installé ce panneau, vérifiez que la zone décorée est tournée vers la paroi interne de la porte. Après l'installation, vérifiez que la surface de la zone décorée est lisse au toucher (le côté rugueux doit être de l'autre côté). Veillez à poser correctement le panneau vitré supérieur dans son logement. Reportez-vous à l'illustration.
Problème Cause possible Solution Le four ne chauffe pas. Les réglages souhaités n'ont pas été effectués. Vérifiez les réglages. Le four ne chauffe pas. Le fusible dans la boîte à fusibles a disjoncté. Vérifiez le fusible. Si les fusibles disjonctent à plusieurs reprises, faites appel à un électricien agréé. L'éclairage du four ne fonctionne pas. L'éclairage du four est défectueux. Remplacez l'ampoule du four.
560 -570 600 in 550 m 00 ÷1 80 Le fabricant ne peut pas être tenu responsable si vous ne respectez pas les consignes de sécurité énoncées dans la présente notice. L'appareil est fourni avec un câble seulement. Câble d'alimentation Types de câbles applicables pour l'installation ou le remplacement: H07 RN-F, H05 RN-F, H05 RRF, H05 VV-F, H05 V2V2-F (T90), H05 BB-F.
Inhalt Sicherheitshinweise _ _ _ _ _ _ _ _ _ _ _ _ _ _ _ _ Gerätebeschreibung _ _ _ _ _ _ _ _ _ _ _ _ _ _ _ _ Vor der ersten Inbetriebnahme _ _ _ _ _ _ _ _ _ _ _ Täglicher Gebrauch _ _ _ _ _ _ _ _ _ _ _ _ _ _ _ _ Uhrfunktionen _ _ _ _ _ _ _ _ _ _ _ _ _ _ _ _ _ _ _ Verwendung des Zubehörs _ _ _ _ _ _ _ _ _ _ _ _ _ 33 36 36 37 38 39 Zusatzfunktionen _ _ _ _ _ _ _ _ _ _ _ _ _ _ _ _ _ _ Praktische Tipps und Hinweise _ _ _ _ _ _ _ _ _ _ _ Reinigung und Pflege _ _ _ _ _ _ _ _ _ _ _ _ _ _ _ Was tun, wenn … _ _ _
• • • • • • • sen aus dem Halter entfernt werden können), Fehlerstromschutzschalter und Schütze. Gemäß den bestehenden Vorschriften müssen alle Teile, die den Berührungsschutz gewährleisten, so befestigt sein, dass sie nicht ohne Werkzeug abgenommen werden können. Die Einbaumöbel bzw. die Einbaunische, in die das Gerät eingebaut werden soll, müssen geeignete Abmessungen aufweisen. Stellen Sie sicher, dass das Gerät unter und an angrenzenden sicheren Konstruktionen montiert ist.
Reinigung und Pflege • Schalten Sie vor Wartungsarbeiten immer das Gerät aus und trennen Sie es von der Stromversorgung. • Vergewissern Sie sich vor Wartungsarbeiten, dass das Gerät abgekühlt ist. Es besteht Verbrennungsgefahr. Zusätzlich besteht die Gefahr, dass die Glasscheiben brechen. • Halten Sie das Gerät jederzeit sauber. Ablagerungen von Fett oder Lebensmittelresten können einen Brand auslösen. • Eine regelmäßige Reinigung verhindert den vorzeitigen Verschleiß des Oberflächenmaterials.
– Entsorgen Sie die Türverriegelung. Damit wird verhindert, dass Kinder oder kleine Tiere im Gerät ein- geschlossen werden können. Es besteht Erstickungsgefahr.
Sie können die Uhrzeit nur ändern, wenn das Gerät ausgeschaltet ist. Vergewissern Sie sich, dass die Kindersicherung nicht aktiviert ist. Vorheizen 1. Stellen Sie die Funktion und die Höchsttemperatur ein. 2. Lassen Sie den leeren Backofen ca. 1 Stunde eingeschaltet. 3. Stellen Sie die Funktion und die Höchsttemperatur ein. 4. Lassen Sie den leeren Backofen ca. 10 Minuten eingeschaltet. 5. Stellen Sie die Funktion und die Höchsttemperatur ein. 6. Lassen Sie den leeren Backofen ca.
Backofenfunktion Anwendung Um-/Heißluft Zum Braten oder zum Braten und Backen von Speisen mit derselben Gartemperatur auf mehreren Ebenen gleichzeitig, ohne dass es zu einer Aromaübertragung kommt. Auftauen Zum Auftauen von Gefriergut. Der Temperaturwahlknopf muss ausgeschaltet sein. Pyrolytische Reinigung Zur automatischen, pyrolytischen Reinigung des Backofens. Verschmutzungen im Backofen werden verbrannt.
Ausschalten der Uhrfunktionen 1. Drücken Sie die Auswahltaste so oft, bis die gewünschte Funktionsleuchte blinkt. 2. Drehen Sie den Schalter „+/-“ und halten Sie ihn gedrückt. Nach einigen Sekunden wird die Uhrfunktion ausgeschaltet. Verwendung des Zubehörs Warnung! Siehe Kapitel „Sicherheitshinweise“. Einsetzen des Backofenzubehörs 4 Setzen Sie die Einschubteile zwischen den Führungsstäben einer der Einschubebenen ein.
Praktische Tipps und Hinweise • Der Backofen hat vier Einsatzebenen. Sie werden von unten nach oben gezählt. • Das Gerät ist mit einem speziellen System ausgestattet, das die Luft umwälzt und den Dampf kontinuierlich rückführt. Das Garen mit Dampf macht Ihre Speisen innen weich und außen knusprig. Die Garzeit und der Energieverbrauch verringern sich auf ein Minimum. • Es kann sich Feuchtigkeit im Gerät oder an den Glastüren niederschlagen. Das ist normal.
Ober-/Unterhitze GERICHT Ebene Temperatur [°C] Heißluft Ebene Temperatur [°C] Garzeit [Min.
Ober-/Unterhitze GERICHT Ebene Temperatur [°C] Heißluft Ebene Temperatur [°C] Garzeit [Min.] Anmerkungen Roggenbrot 1 190 1 180 30-45 Brotform Brötchen 2 190 2 (1 und 3) 180 25-40 6-8 Brötchen auf flachem Backblech 1) Pizza 1 190 1 190 20-30 Fettpfanne1) Mürbeteigplätzchen 3 200 2 190 10~20 Backblech1) Temperatur [°C] Garzeit [Min.] Anmerkungen 1) 10 Minuten vorheizen.
Ober-/Unterhitze Heißluft Temperatur [°C] Garzeit [Min.
Menge GERICHT Grillen Garzeit in Minuten Stück g Einsatzebene Temp. (°C) 1. Seite 2. Seite Schweinskotelett 4 600 3 250 12-16 12-14 Hähnchen (in zwei Hälften) 2 1000 3 250 30-35 25-30 Spieße 4 / 3 250 10-15 10-12 Hähnchenbrustfilet 4 400 3 250 12-15 12-14 Hamburger 6 600 3 250 20-30 Fischfilets 4 400 3 250 12-14 10-12 Belegte Toastbrote 4-6 / 3 250 5-7 / Toast 4-6 / 3 250 2-4 2-3 Temp. (°C) 1. Seite 2.
schmutzungen leicht entfernen und es brennt nichts ein. • Entfernen Sie hartnäckige Verschmutzungen mit speziellen Backofenreinigern. • Reinigen Sie nach jedem Gebrauch alle Zubehörteile mit einem weichen Tuch, das mit warmem Wasser und Reinigungsmittel angefeuchtet wurde, und lassen Sie sie trocknen. • Reinigen Sie Zubehörteile mit Antihaftbeschichtung nicht mit aggressiven Reinigungsmitteln, scharfkantigen Gegenständen oder im Geschirrspüler.
Reinigen Sie die Glasscheiben mit Wasser und Spülmittel. Trocknen Sie die Glasscheiben sorgfältig ab. Einbau der Backofentür und der Glasscheiben 4 Legen Sie die Back3 Schließen Sie die Backofentür bis zur ersten ofentür auf einer ebenen Raststellung (halb). An- Fläche auf ein weiches schließend ziehen Sie sie Tuch. nach vorn aus der Halterung heraus. Nach der Reinigung müssen Backofentür und Glasscheiben wieder eingebaut werden. Führen Sie die obigen Schritte in umgekehrter Reihenfolge durch.
Problem Mögliche Ursache Abhilfe Der Backofen heizt nicht auf. Der Ofen ist nicht eingeschaltet. Schalten Sie den Backofen ein. Der Backofen heizt nicht auf. Die Uhrzeit ist nicht eingestellt. Stellen Sie die Uhrzeit ein. Der Backofen heizt nicht auf. Die erforderlichen Einstellungen wur- Kontrollieren Sie die Einstellungen. den nicht vorgenommen. Der Backofen heizt nicht auf. Die Sicherung im Sicherungskasten hat ausgelöst. Überprüfen Sie die Sicherung.
540 Elektrischer Anschluss 50 560 Warnung! Der elektrische Anschluss darf nur von einer qualifizierten Fachkraft vorgenommen werden. 570 590 20 in 594 587 550m 560-5 7 70 Der Hersteller haftet nicht für Schäden aufgrund der Nichtbeachtung der Sicherheitsvorkehrungen des Kapitels „Sicherheitshinweise“. Dieses Gerät wird lediglich mit einem Netzkabel geliefert.
397206301-A-052011 www.zanussi.