EN DE User Manual Benutzerinformation Oven Backofen ZZB25601XX 2 20
Contents Safety information Safety instructions Product description Before first use Daily use Clock functions Using the accessories 2 3 5 5 6 8 8 Additional functions Hints and tips Care and cleaning Troubleshooting Installation Energy efficiency 9 9 14 16 17 18 Subject to change without notice. Safety information Before the installation and use of the appliance, carefully read the supplied instructions.
• • • • • • • • WARNING: The appliance and its accessible parts become hot during use. Care should be taken to avoid touching heating elements. Children less than 8 years of age shall be kept away unless continuously supervised. Always use oven gloves to remove or put in accessories or ovenware. Before maintenance cut the power supply. Ensure that the appliance is switched off before replacing the lamp to avoid the possibility of electric shock. Do not use a steam cleaner to clean the appliance.
• • • • • • • The shock protection of live and insulated parts must be fastened in such a way that it cannot be removed without tools. Connect the mains plug to the mains socket only at the end of the installation. Make sure that there is access to the mains plug after the installation. If the mains socket is loose, do not connect the mains plug. Do not pull the mains cable to disconnect the appliance. Always pull the mains plug.
• • If you use an oven spray, obey the safety instructions on the packaging. Do not clean the catalytic enamel (if applicable) with any kind of detergent. Internal light • The type of light bulb or halogen lamp used for this appliance is only for household appliances. Do not use it for house lighting. WARNING! Risk of electrical shock. • • Before replacing the lamp, disconnect the appliance from the power supply. Only use lamps with the same specifications.
Refer to "Care and cleaning" chapter. Clean the appliance and the accessories before first use. Put the accessories and the removable shelf supports back to their initial position. Setting the time You must set the time before you operate the oven. The indicator for the Time of day function flashes when you connect the appliance to the electrical supply, when there was a power cut or when the timer is not set. or button to set the correct Press the time.
Oven Functions Oven function Application Off position The appliance is off. Top / Bottom Heat To bake and roast food on one shelf position. Fan Cooking To roast or roast and bake food with the same cooking temperature on more than one shelf position, without flavour transference. Grilling To grill flat food and to toast bread. Fast Grilling To grill flat food in large quantities and to toast bread. Turbo Grilling To roast larger meat joints or poultry with bones on one shelf position.
Clock functions Clock functions table Clock function Application Time of day To set, change or check the time of day. Minute Minder To set countdown time. This function has no effect on the operation of the appliance. Duration To set the cooking time of the oven. End To set the time of day when the oven should deactivate. You can use the functions Duration and End at the same time to set the time for how long the appliance should operate and when the appliance should deactivate.
Push the baking tray between the guide bars of the shelf support. Small indentation at the top increase safety. The indentations are also anti-tip devices. The high rim around the shelf prevents cookware from slipping. Wire shelf and baking tray together: Push the baking tray between the guide bars of the shelf support and the wire shelf on the guide bars above.
deep pan. To prevent the smoke condensation, add water each time after it dries up. Initially, monitor the performance when you cook. Find the best settings (heat setting, cooking time, etc.) for your cookware, recipes and quantities when you use this appliance. Cooking times Cooking times depend on the type of food, its consistency, and volume.
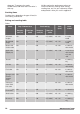
Food Top / Bottom Heat Temperature (°C) Shelf position Fan Cooking Temperature (°C) Time (min) Comments Shelf position Meringues 100 3 115 3 35 - 40 In a baking tray Buns1) 190 3 180 3 80 - 100 In a baking tray Choux1) 190 3 180 3 (1 and 3) 15 - 20 In a baking tray Plate tarts 180 3 170 2 25 - 35 In a 20 cm cake mould Victoria sandwich 180 1 or 2 170 2 45 - 70 Left + right in a 20 cm cake mould Rich fruit cake 160 1 150 2 110 - 120 In a 24 cm cake mould Victo
Flans Food Top / Bottom Heat Temperature (°C) Shelf position Fan Cooking Temperature (°C) Time (min) Comments Shelf position Pasta flan 180 2 180 2 40 - 50 In a mould Vegetable flan 200 2 200 2 45 - 60 In a mould Quiches 190 1 190 1 40 - 50 In a mould Lasagne 200 2 200 2 25 - 40 In a mould Cannelloni 200 2 200 2 25 - 40 In a mould Yorkshire 220 2 210 2 20 - 30 6 pudding mould pudding1) 1) Preheat the oven for 10 minutes.
Food Top / Bottom Heat Temperature (°C) Shelf position Fan Cooking Temperature (°C) Time (min) Comments Shelf position Shin of pork 180 2 160 2 100 - 120 2 pieces on a deep pan Lamb 190 2 190 2 110 - 130 Leg Chicken 200 2 200 2 70 - 85 Whole Turkey 180 1 160 1 210 - 240 Whole Duck 175 2 160 2 120 - 150 Whole Goose 175 1 160 1 150 - 200 Whole Rabbit 190 2 175 2 60 - 80 Cut in pieces Hare 190 2 175 2 150 - 200 Cut in pieces Pheasant 190 2 175
Food Quantity Pieces Temperature (°C) (g) Time (min) 1st side Shelf position 2nd side Pork chops 4 600 250 12 - 16 12 - 14 3 Chicken (cut in 2) 2 1000 250 30 - 35 25 - 30 3 Kebabs 4 - 250 10 - 15 10 - 12 3 Breast of chicken 4 400 250 12 - 15 12 - 14 3 Hamburger 6 600 250 20 - 30 - 3 Fish fillet 4 400 250 12 - 14 10 - 12 3 Toasted sandwiches 4-6 - 250 5-7 - 3 Toast 4-6 - 250 2-4 2-3 3 Care and cleaning WARNING! Stainless steel or aluminium applia
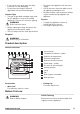
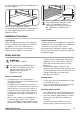
1 1 Pull the front of the shelf support away from the side wall. 2 2 Pull the rear end of the shelf support away from the side wall and remove it. Install the shelf supports in the opposite sequence. 3 Close the oven door 4 Put the door on a soft halfway to the first cloth on a stable opening position. surface. Then pull forward and remove the door from its seat. Cleaning the oven door The oven door has two glass panels. You can remove the oven door and the internal glass panel to clean it.
1. Deactivate the appliance. 2. Remove the fuses from the fuse box or deactivate the circuit breaker. The back lamp 1. Turn the lamp glass cover counterclockwise to remove it. 2. Clean the glass cover. 3. Replace the lamp with a suitable 300 °C heat-resistant lamp. 4. Install the glass cover. Replacing the lamp Put a cloth on the bottom of the interior of the appliance. It prevents damage to the lamp glass cover and the cavity.
Service data If you cannot find a solution to the problem yourself, contact your dealer or an Authorised Service Centre. The necessary data for the service centre is on the rating plate. The rating plate is on the front frame of the appliance cavity. Do not remove the rating plate from the appliance cavity. We recommend that you write the data here: Model (MOD.) ......................................... Product number (PNC) ......................................... Serial number (S.N.) ..............
Electrical installation The manufacturer is not responsible if you do not follow the safety precautions from the Safety chapters. This appliance is supplied only with a main cable. Cable Cable types applicable for installation or replacement: Total power (W) Section of the cable (mm²) maximum 1380 3 x 0.75 maximum 2300 3x1 maximum 3680 3 x 1.5 The earth cord (green / yellow cable) must be 2 cm longer than phase and neutral cables (blue and brown cables).
cooking time, depending on the duration of the cooking. The residual heat inside the oven will continue to cook. Keep food warm Choose the lowest possible temperature setting to use residual heat and keep a meal warm. Use the residual heat to warm up other dishes. Cooking with fan When possible, use the cooking functions with fan to save energy. ENVIRONMENTAL CONCERNS Recycle the materials with the symbol . Put the packaging in applicable containers to recycle it.
Inhaltsverzeichnis Sicherheitshinweise Sicherheitsanweisungen Gerätebeschreibung Vor der ersten Inbetriebnahme Täglicher Gebrauch Uhrfunktionen Verwendung des Zubehörs 20 21 24 24 25 26 27 Zusatzfunktionen Tipps und Hinweise Reinigung und Pflege Fehlersuche Montage Energieeffizienz 28 28 33 35 36 37 Änderungen vorbehalten. Sicherheitshinweise Lesen Sie vor der Montage und dem Gebrauch des Geräts zuerst die Gebrauchsanleitung.
• Kinder bis zu 3 Jahren sind während des Betriebs unbedingt von dem Gerät fernzuhalten. Allgemeine Sicherheit • • • • • • • • • Die Montage des Geräts und der Austausch des Kabels muss von einer Fachkraft vorgenommen werden. WARNUNG: Das Gerät und die zugänglichen Geräteteile werden während des Betriebs heiß. Seien Sie vorsichtig und berühren Sie niemals die Heizelemente. Halten Sie Kinder unter 8 Jahren vom Gerät fern, wenn sie nicht ständig beaufsichtigt werden.
• • • • • stets Sicherheitshandschuhe und festes Schuhwerk. Ziehen Sie das Gerät nicht am Griff. Die Mindestabstände zu anderen Geräten und Küchenmöbeln sind einzuhalten. Stellen Sie sicher, dass das Gerät unterhalb von bzw. zwischen sicheren Konstruktionen montiert wird. Die Seiten des Geräts dürfen nur an Geräte oder Einheiten in gleicher Höhe angrenzen. Das Gerät ist mit einem elektrischen Kühlsystem ausgestattet. Es muss an die Stromversorgung angeschlossen werden.
• • • • • – Stellen Sie feuerfestes Geschirr oder andere Gegenstände nicht direkt auf den Boden des Geräts. – Legen Sie keine Alufolie direkt auf den Boden des Geräts. – Stellen Sie kein Wasser in das heiße Gerät. – Lassen Sie nach dem Ausschalten des Geräts kein feuchtes Geschirr oder feuchte Speisen im Backofeninnenraum stehen. – Gehen Sie beim Herausnehmen oder Einsetzen der Innenausstattung sorgfältig vor. Verfärbungen der Emailbeschichtung haben keine Auswirkung auf die Leistung des Geräts.
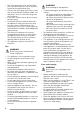
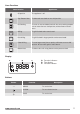
Gerätebeschreibung Gesamtansicht 1 2 3 4 5 6 7 12 4 8 9 3 10 2 1 11 Zubehör • Kombirost Für Kochgeschirr, Kuchenformen, Braten. 1 2 3 4 5 6 7 8 9 10 11 12 • Bedienfeld Temperaturanzeige/-symbol Temperaturwahlknopf Elektronischer Programmspeicher Backofen-Einstellknopf Betriebskontrolllampe/-symbol Lüftungsöffnungen für das Kühlgebläse Heizelement Backofenbeleuchtung Ventilator Einhängegitter, herausnehmbar Einschubebenen Backblech Für Kuchen und Plätzchen.
3. Stellen Sie die Funktion und stellen Sie die Höchsttemperatur ein. 4. Lassen Sie das Gerät 15 Minuten lang eingeschaltet. Das Zubehör kann heißer werden als bei normalem Gebrauch. Das Gerät kann Geruch und Rauch verströmen. Das ist normal. Sorgen Sie für eine ausreichende Raumbelüftung. Täglicher Gebrauch WARNUNG! Siehe Kapitel "Sicherheitshinweise".
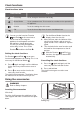
Display A B C A. Funktionsanzeigen B. Zeitanzeige C. Funktionsanzeige Tasten Taste Funktion Beschreibung MINUS Einstellen der Zeit. UHR Einstellen einer Uhrfunktion. PLUS Einstellen der Zeit. Uhrfunktionen Tabelle der Uhrfunktionen Uhrfunktion Tageszeit Zum Einstellen, Ändern oder Abfragen der Uhrzeit. Kurzzeit-Wecker Zum Einstellen einer Countdown-Zeit. Diese Funktion hat keine Auswirkung auf den Gerätebetrieb. Dauer Zum Einstellen der Garzeit für den Backofen.
Im Fall des Kurzzeit-Weckers zeigt das Display die verbleibende Zeit an. 3. Nach Ablauf der eingestellten Zeit blinkt die Anzeige der Uhrfunktion und es ertönt ein akustisches Signal. Drücken Sie eine beliebige Taste, um den Signalton abzustellen. 4. Drehen Sie den Backofen-Einstellknopf und den Temperaturwahlknopf auf die AusPosition. Bei den Funktionen Dauer Ausschalten der Uhrfunktionen 1. Drücken Sie so oft , bis die Anzeige für die gewünschte Funktion blinkt. 2. Halten Sie gedrückt.
Zusatzfunktionen Kühlgebläse Wenn das Gerät in Betrieb ist, wird automatisch das Kühlgebläse eingeschaltet, um die Geräteflächen zu kühlen. Nach dem Abschalten des Geräts kann das Kühlgebläse weiterlaufen, bis das Gerät abgekühlt ist. gefährlichen Überhitzung führen. Um dies zu verhindern, ist der Backofen mit einem Sicherheitsthermostat ausgestattet, der die Stromzufuhr unterbrechen kann. Die Wiedereinschaltung des Backofens erfolgt automatisch bei Temperaturabfall.
Back- und Brattabelle Kuchen Gargut Ober-/Unterhitze Temperatur (°C) Ebene Heißluft Temperatur (°C) Dauer (Min.
Gargut Ober-/Unterhitze Temperatur (°C) Ebene Heißluft Temperatur (°C) Dauer (Min.
Pudding Gargut Ober-/Unterhitze Temperatur (°C) Ebene Heißluft Temperatur (°C) Dauer (Min.) Bemerkungen Ebene Nudelauflauf 180 2 180 2 40 - 50 In einer Auflaufform Gemüseauflauf 200 2 200 2 45 - 60 In einer Auflaufform Quiche 190 1 190 1 40 - 50 In einer Auflaufform Lasagne 200 2 200 2 25 - 40 In einer Auflaufform Cannelloni 200 2 200 2 25 - 40 In einer Auflaufform Yorkshire 220 2 210 2 20 - 30 6 Puddingformen Pudding1) 1) Backofen 10 Min. vorheizen.
Gargut Ober-/Unterhitze Temperatur (°C) Schweineschulter Ebene Heißluft Temperatur (°C) Dauer (Min.
Gargut Menge Stück Temperatur (°C) (g) Dauer (Min.
Entfernen der Einhängegitter Entfernen Sie zur Reinigung des Backofens die Einhängegitter . 1 2 1 Ziehen Sie das 2 Ziehen Sie das Einhängegitter vorne Einhängegitter hinten von der Seitenwand von der Seitenwand weg. weg und nehmen Sie es heraus. 3 Schließen Sie die 4 Legen Sie die Backofentür halb bis Backofentür auf ein zur ersten weiches Tuch auf Raststellung. einer stabilen Fläche. Anschließend ziehen Sie sie nach vorn aus der Halterung heraus.
Montage, dass sich der Glasscheibenrahmen an den bedruckten Bereichen nicht rau anfühlt. WARNUNG! Stromschlaggefahr! Schalten Sie die Sicherung aus, bevor Sie die Lampe austauschen. Die Lampe und die Glasabdeckung der Lampe können heiß werden. Achten Sie darauf, die innere Glasscheibe richtig in die Aufnahmen einzusetzen.. 1. Schalten Sie das Gerät aus. 2. Entfernen Sie die Sicherungen aus dem Sicherungskasten, oder schalten Sie den Schutzschalter aus.
Servicedaten Wenn Sie das Problem nicht selbst lösen können, wenden Sie sich an den Händler oder einen autorisierten Kundendienst. befindet sich am Frontrahmen des Garraums. Entfernen Sie das Typenschild nicht vom Garraum. Die vom Kundendienst benötigten Daten finden Sie auf dem Typenschild. Das Typenschild Wir empfehlen, hier folgende Daten zu notieren: Modell (MOD.) ......................................... Produktnummer (PNC) ......................................... Seriennummer (S.N.) .........
Elektrischer Anschluss Der Hersteller haftet nicht für Schäden, die aufgrund der Nichtbeachtung der in den Sicherheitshinweisen beschriebenen Sicherheitsvorkehrungen entstehen. Das Gerät wird nur mit einem Netzkabel geliefert. Kabel Einsetzbare Kabeltypen für Montage oder Austausch: Gesamtleistung (W) Kabelquerschnitt (mm²) maximal 1380 3 x 0.75 maximal 2300 3x1 maximal 3680 3 x 1.
Warmhalten von Speisen Wählen Sie die niedrigste Temperatureinstellung, wenn Sie die Restwärme zum Warmhalten von Speisen nutzen möchten. Beträgt die Garzeit mehr als 30 Minuten, reduzieren Sie die Ofentemperatur je nach Gardauer 3 - 10 Minuten vor Ablauf des Garvorgangs auf die Mindesttemperatur. Durch die Restwärme des Backofens werden die Speisen weiter gegart. Nutzen Sie die Restwärme, um andere Speisen aufzuwärmen.
www.zanussi.
867324334-C-352016 www.zanussi.