EN User Manual Oven ZZB25602XV
Contents Safety information Safety instructions Product description Before first use Daily use Clock functions Using the accessories 2 3 5 5 6 8 8 Additional functions Hints and tips Care and cleaning Troubleshooting Installation Energy efficiency 9 9 15 17 17 19 Subject to change without notice. Safety information Before the installation and use of the appliance, carefully read the supplied instructions.
• • • • • • • • • WARNING: The appliance and its accessible parts become hot during use. Care should be taken to avoid touching heating elements. Children less than 8 years of age shall be kept away unless continuously supervised. Always use oven gloves to remove or put in accessories or ovenware. Before maintenance cut the power supply. Ensure that the appliance is switched off before replacing the lamp to avoid the possibility of electric shock. Do not use a steam cleaner to clean the appliance.
• • • • • • • • must be carried out by our Authorised Service Centre. Do not let mains cables touch or come near the appliance door, especially when the door is hot. The shock protection of live and insulated parts must be fastened in such a way that it cannot be removed without tools. Connect the mains plug to the mains socket only at the end of the installation. Make sure that there is access to the mains plug after the installation. If the mains socket is loose, do not connect the mains plug.
• • • Clean the appliance with a moist soft cloth. Only use neutral detergents. Do not use abrasive products, abrasive cleaning pads, solvents or metal objects. If you use an oven spray, obey the safety instructions on the packaging. Do not clean the catalytic enamel (if applicable) with any kind of detergent. The type of light bulb or halogen lamp used for this appliance is only for household appliances. Do not use it for house lighting. WARNING! • Risk of injury or suffocation.
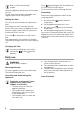
Refer to "Care and cleaning" chapter. Clean the appliance and the accessories before first use. Put the accessories and the removable shelf supports back to their initial position. Setting the time You must set the time before you operate the oven. The indicator for the Time of day function flashes when you connect the appliance to the electrical supply, when there was a power cut or when the timer is not set. or button to set the correct Press the time.
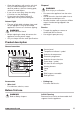
Oven function Application Off position The appliance is off. Fan Cooking To roast or roast and bake food with the same cooking temperature on more than 1 shelf position, without flavour transference. Top / Bottom Heat To bake and roast food on 1 shelf position. Bottom Heat To bake cakes with crispy bottom and to preserve food. Turbo Grilling To roast larger meat joints or poultry with bones on 1 shelf position. Also to make gratins and to brown. Grilling To grill flat food and to toast bread.
Clock functions Clock functions table Clock function Application Time of day To set, change or check the time of day. Minute Minder To set countdown time. This function has no effect on the operation of the appliance. Duration To set the cooking time of the oven. End To set the time of day when the oven should deactivate. You can use the functions Duration and End at the same time to set the time for how long the appliance should operate and when the appliance should deactivate.
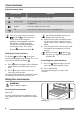
Push the baking tray between the guide bars of the shelf support. All accessories have small indentations at the top of the right and left side to increase safety. The indentations are also anti-tip devices. The high rim around the shelf is a device which prevents cookware from slipping. Wire shelf and baking tray together: Push the baking tray between the guide bars of the shelf support and the wire shelf on the guide bars above.
• change the baking results and cause damage to the enamel. Baking cakes • Do not open the oven door before 3/4 of the set cooking time is up. If you use two baking trays at the same time, keep one empty level between them. • Cooking meat and fish • Use a deep pan for very fatty food to prevent the oven from stains that can be permanent. Leave the meat for approximately 15 minutes before carving so that the juice does not seep out.
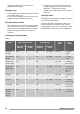
Food Top / Bottom Heat Temperature (°C) Shelf position Fan Cooking Temperature (°C) Time (min) Comments Shelf position Christmas cake / Rich fruit cake 170 2 160 2 50 - 60 In a 20 cm cake mould Plum cake1) 170 2 165 2 20 - 30 In a bread tin Small cakes 170 3 166 3 (1 and 3) 25 - 35 In a baking tray Biscuits1) 150 3 140 3 (1 and 3) 30 - 35 In a baking tray Meringues 100 3 115 3 35 - 40 In a baking tray Buns1) 190 3 180 3 80 - 100 In a baking tray Choux1) 190
Food Top / Bottom Heat Temperature (°C) Shelf position Fan Cooking Temperature (°C) Time (min) Comments Shelf position Pizza1) 190 1 190 1 20 - 30 On a deep pan Scones1) 200 3 190 2 10 – 20 In a baking tray 1) Preheat the oven for 10 minutes.
Food Top / Bottom Heat Temperature (°C) Shelf position Fan Cooking Temperature (°C) Time (min) Comments Shelf position English roast beef rare 210 2 200 2 44 - 50 On a wire shelf and a deep pan English roast beef medium 210 2 200 2 51 - 55 On a wire shelf and a deep pan English roast beef well done 210 2 200 2 55 - 60 On a wire shelf and a deep pan Shoulder of pork 180 2 170 2 120 - 150 On a deep pan Shin of pork 180 2 160 2 100 - 120 2 pieces on a deep pan Lamb 19
Grilling Preheat the empty oven for 10 minutes before cooking.
Food Quantity Pieces Temperature (°C) (g) Time (min) 1st side Shelf position 2nd side Vegetable gratin - - 200 20 - 25 - 3 Scallops - - 200 15 - 20 - 3 Mackerel 2-4 - 200 15 - 20 10 - 15 3 Fish slices 4-6 800 200 12 - 15 8 - 10 3 Care and cleaning WARNING! Refer to Safety chapters. Notes on cleaning • • • • • • Clean the front of the appliance with a soft cloth with warm water and a cleaning agent. To clean metal surfaces, use a dedicated cleaning agent.
Clean the glass panel with water and soap. Dry the glass panel carefully. When the cleaning is completed, install the glass panel and the oven door. Do the above steps in the opposite sequence. 1 Open the door fully and hold the two door hinges. 2 Lift and turn the levers on the two hinges. 3 Close the oven door 4 Put the door on a soft halfway to the first cloth on a stable opening position. surface. Then pull forward and remove the door from its seat.
Troubleshooting WARNING! Refer to Safety chapters. What to do if... Problem Possible cause Remedy The oven does not heat up. The oven is deactivated. Activate the oven. The oven does not heat up. The clock is not set. Set the clock. The oven does not heat up. The necessary settings are not set. Make sure that the settings are correct. The oven does not heat up. The fuse is blown. Make sure that the fuse is the cause of the malfunction.
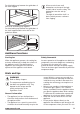
Securing the appliance to the cabinet Building In 21 540 6 B 114 19 20 600 A 558 min. 550 min. 560 589 570 Electrical installation 594 The manufacturer is not responsible if you do not follow the safety precautions from the Safety chapters. 6 3 This appliance is supplied without a main plug and a main cable. To access the electrical connections unscrew the 2 T20 screws on the rear panel top and take the panel out. Applicable types of cables for Europe: 540 21 min.
Energy efficiency Product Fiche and information according to EU 65-66/2014 Supplier's name Zanussi Model identification ZZB25602XV Energy Efficiency Index 103.8 Energy efficiency class A Energy consumption with a standard load, conventional mode 0.83 kWh/cycle Energy consumption with a standard load, fan-forced mode 0.82 kWh/cycle Number of cavities 1 Heat source Electricity Volume 57 l Type of oven Built-In Oven Mass 27.
867324069-A-172016 www.zanussi.