User Manual GETTING STARTED? EASY.
SAFETY INFORMATION Before the installation and use of the appliance, carefully read the supplied instructions. The manufacturer is not responsible for any injuries or damage that are the result of incorrect installation or usage. Always keep the instructions in a safe and accessible location for future reference.
• • • • • • • Before carrying out any maintenance, disconnect the appliance from the power supply. WARNING: Ensure that the appliance is switched off before replacing the lamp to avoid the possibility of electric shock. Do not use the appliance before installing it in the built-in structure. Do not use a steam cleaner to clean the appliance. Do not use harsh abrasive cleaners or sharp metal scrapers to clean the glass door since they can scratch the surface, which may result in shattering of the glass.
ELECTRICAL CONNECTION WARNING! Risk of fire and electric shock. • All electrical connections should be made by a qualified electrician. The appliance must be earthed. Make sure that the parameters on the rating plate are compatible with the electrical ratings of the mains power supply. Always use a correctly installed shockproof socket. Do not use multi-plug adapters and extension cables. Make sure not to cause damage to the mains plug and to the mains cable.
• • • • • – do not keep moist dishes and food in the appliance after you finish the cooking. – be careful when you remove or install the accessories. Discoloration of the enamel or stainless steel has no effect on the performance of the appliance. Use a deep pan for moist cakes. Fruit juices cause stains that can be permanent. This appliance is for cooking purposes only. It must not be used for other purposes, for example room heating. Always cook with the oven door closed.
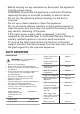
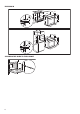
BUILDING IN 540 21 600 min. 550 20 558 19 114 min. 560 9 589 598 570 3 594 540 21 min. 550 590 20 558 19 114 min.
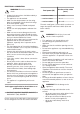
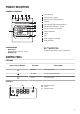
PRODUCT DESCRIPTION GENERAL OVERVIEW 1 2 3 4 5 1 Control panel 2 Power lamp / symbol 6 7 12 3 Knob for the heating functions 4 Display 5 Control knob (for the temperature) 6 Temperature indicator / symbol 4 8 9 3 10 7 Air vents for the cooling fan 8 Heating element 11 9 Lamp 10 Fan 11 Shelf support, removable 2 1 12 Shelf positions ACCESSORIES • Wire shelf For cookware, cake tins, roasts. • Baking tray • For cakes and biscuits.
BEFORE FIRST USE WARNING! Refer to Safety chapters. To set the Time of day refer to "Clock functions" chapter. INITIAL CLEANING Remove all accessories and removable shelf supports from the oven. Refer to "Care and cleaning" chapter. Clean the oven and the accessories before first use. Put the accessories and the removable shelf supports back to their initial position. PREHEATING Preheat the empty oven before first use. 1. Set the function .Set the maximum temperature. 2. Let the oven operate for 1 hour. 3.
Oven function Moist Fan Baking Application This function is designed to save energy during cooking. For the cooking instructions refer to "Hints and tips" chapter, Moist Fan Baking. The oven door should be closed during cooking so that the function is not interrupted and to ensure that the oven operates with the highest energy efficiency possible. When you use this function, the temperature in the cavity may differ from the set temperature. The heating power may be reduced.
SETTING THE DURATION 1. Set an oven function and temperature. 3. Press 2. Press flash. again and again until 5. Press 3. Press or The display shows starts to to set the DURATION time. . 4. When the time ends, flashes and an acoustic signal sounds. The appliance deactivates automatically. 5. Press any button to stop the acoustic signal. 6. Turn the knob for the oven functions and the knob for the temperature to the off position. SETTING THE END 1. Set an oven function and temperature. 2.
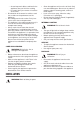
Wire shelf and baking tray / deep pan together: Push the baking tray / deep pan between the guide bars of the shelf support and the wire shelf on the guide bars above. Small indentation at the top increase safety. The indentations are also antitip devices. The high rim around the shelf prevents cookware from slipping of the shelf. ADDITIONAL FUNCTIONS COOLING FAN When the oven operates, the cooling fan turns on automatically to keep the surfaces of the oven cool.
BAKING AND ROASTING TABLE Cakes Top / Bottom Heat Fan Cooking Food Time (min) Comments Temperature Shelf posi- Temperature Shelf posi(°C) tion (°C) tion 12 Whisked recipes 170 2 165 2 (1 and 3) 45 - 60 In a cake mould Shortbread dough 170 2 160 2 (1 and 3) 20 - 30 In a cake mould Butter-milk cheese cake 170 1 165 2 70 - 80 In a 26 cm cake mould Apple cake (Apple pie) 170 1 160 2 (1 and 3) 80 - 100 In two 20 cm cake moulds on a wire shelf Strudel 175 2 150 2 60 - 80 I
Top / Bottom Heat Fan Cooking Food Time (min) Comments Temperature Shelf posi- Temperature Shelf posi(°C) tion (°C) tion Meringues 100 3 115 3 35 - 40 In a baking tray Buns1) 190 3 180 3 80 - 100 In a baking tray Choux1) 190 3 180 3 (1 and 3) 15 - 20 In a baking tray Plate tarts 180 3 170 2 25 - 35 In a 20 cm cake mould Victoria sandwich 180 1 or 2 170 2 45 - 70 Left + right in a 20 cm cake mould Rich fruit cake 160 1 150 2 110 - 120 In a 24 cm cake mould Victo
Top / Bottom Heat Fan Cooking Food Time (min) Comments Temperature Shelf posi- Temperature Shelf posi(°C) tion (°C) tion Pizza1) 190 1 190 1 20 - 30 On a deep pan Scones1) 200 3 190 2 10 – 20 In a baking tray 1) Preheat the oven for 10 minutes.
Top / Bottom Heat Fan Cooking Food Time (min) Comments Temperature Shelf posi- Temperature Shelf posi(°C) tion (°C) tion Veal 190 2 175 2 90 - 120 On a wire shelf and a deep pan English roast beef rare 210 2 200 2 44 - 50 On a wire shelf and a deep pan English roast beef medium 210 2 200 2 51 - 55 On a wire shelf and a deep pan English roast beef well done 210 2 200 2 55 - 60 On a wire shelf and a deep pan Shoulder of pork 180 2 170 2 120 - 150 On a deep pan Shin of p
Fish Top / Bottom Heat Fan Cooking Food Time (min) Comments Temperature Shelf posi- Temperature Shelf posi(°C) tion (°C) tion Trout / Sea bream 190 2 175 2 (1 and 3) 40 - 55 3-4 fishes Tuna fish / Salmon 190 2 175 2 (1 and 3) 35 - 60 4 - 6 fillets GRILLING Preheat the oven for 10 minutes. Use the third position. Set the temperature to 250 °C. Quantity Time (min) Food Pieces 1st side 2nd side Fillet steaks 4 0.8 12 - 15 12 - 14 Beef steaks 4 0.
Quantity Time (min) Food Pieces (kg) 1st side 2nd side Rolled joints (turkey) 1 1 30 - 40 20 - 30 Chicken (cut in two) 2 1 25 - 30 20 - 30 Chicken drumsticks 6 - 15 - 20 15 - 18 Quail 4 0.5 25 - 30 20 - 25 Vegetable gratin - - 20 - 25 - Scallops - - 15 - 20 - Mackerel 2-4 - 15 - 20 10 - 15 Fish slices 4-6 0.8 12 - 15 8 - 10 MOIST FAN BAKING For best results follow suggestions listed in the table below.
Food Temperature (°C) Accessories Time (min) Whole fish, 0.2 kg baking tray or dripping pan 180 3 35 - 45 Fish fillet, 0.3 kg pizza pan on wire shelf 180 3 35 - 45 Pouched meat, 0.25 kg baking tray or dripping pan 200 3 40 - 50 Shashlik, 0.
Accesso- Shelf Temperaries position ture (°C) Food Function Time (min) Comments Small cake Conventional Cooking Baking tray 3 170 20 - 30 Put 20 small cakes per one baking tray. Apple pie Conventional Cooking Wire shelf 1 170 80 - 120 Use 2 tins (20 cm diameter), diagonally shifted. Sponge cake Conventional Cooking Wire shelf 2 170 35 - 45 Use a cake mould (26 cm diameter). Short bread Conventional Cooking Baking tray 3 150 20 - 35 Preheat the oven for 10 minutes.
CLEANING THE DOOR GASKET Regularly do a check of the door gasket. The door gasket is around the frame of the oven cavity. Do not use the oven if the door gasket is damaged. Contact an Authorised Service Centre. To clean the door gasket, refer to the general information about cleaning. REMOVING THE SHELF SUPPORTS To clean the oven, remove the shelf supports. CAUTION! Be careful when you remove the shelf supports. 1. Pull the front of the shelf support away from the side wall. 2.
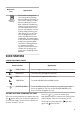
8. Clean the glass panels with water and soap. Dry the glass panels carefully. Do not clean the glass panels in the dishwasher. When the cleaning is completed, install the glass panel and the oven door. When installed correctly the door trim clicks. Make sure that you install the internal glass panel in the seats correctly. A 5. Release the locking system to remove the internal glass panel. REPLACING THE LAMP WARNING! Risk of electric shock. The lamp can be hot. 6.
TROUBLESHOOTING WARNING! Refer to Safety chapters. WHAT TO DO IF... Problem Possible cause Remedy The oven does not heat up. The oven is deactivated. Activate the oven. The oven does not heat up. The clock is not set. Set the clock. The oven does not heat up. The necessary settings are not set. Make sure that the settings are correct. The oven does not heat up. The fuse is blown. Make sure that the fuse is the cause of the malfunction.
Use metal dishes to improve energy saving. When possible, do not preheat the oven before you put the food inside. When the cooking duration is longer than 30 minutes, reduce the oven temperature to minimum 3 - 10 minutes before the end of the cooking time, depending on the duration of the cooking. The residual heat inside the oven will continue to cook. Use the residual heat to warm up other dishes. Keep breaks between baking as short as possible when you prepare few dishes at one time.
INFORMATION SUR LA SÉCURITÉ Avant d'installer et d'utiliser cet appareil, lisez soigneusement les instructions fournies. Le fabricant ne pourra être tenu pour responsable des blessures et dégâts résultant d'une mauvaise installation ou utilisation. Conservez toujours les instructions dans un lieu sûr et accessible pour vous y référer ultérieurement.
• • • • • • • • • AVERTISSEMENT : L'appareil et ses parties accessibles deviennent chauds pendant son fonctionnement. Veillez à ne pas toucher les éléments chauffants. Utilisez toujours des gants de cuisine pour retirer ou enfourner des accessoires ou des plats allant au four. Avant d'effectuer une opération de maintenance, débranchez l'appareil de la prise secteur.
579 mm Largeur de l’avant de l’appareil 594 mm Largeur de l’arrière de l’appareil 558 mm • Profondeur de l'appareil 561 mm • Profondeur d’encastrement de l’appareil 540 mm Profondeur avec porte ouverte 1007 mm Dimensions minimales de l’ouverture de ventilation. Ouverture placée sur la partie inférieure de la face arrière 560x20 mm Longueur du câble d’alimentation secteur.
• • • • • • • • • • Assurez-vous que les orifices de ventilation ne sont pas bouchés. Ne laissez jamais l'appareil sans surveillance pendant son fonctionnement. Éteignez l'appareil après chaque utilisation. Soyez prudent lors de l'ouverture de la porte de l'appareil lorsque celui-ci est en fonctionnement. De l'air brûlant peut s'en échapper. N'utilisez jamais cet appareil avec les mains mouillées ou lorsqu'il est en contact avec de l'eau. N'exercez jamais de pression sur la porte ouverte.
• MISE AU REBUT AVERTISSEMENT! Risque de blessure ou d'asphyxie. • • Débranchez l'appareil de l'alimentation électrique. Coupez le câble d'alimentation au ras de l'appareil et mettez-le au rebut. Retirez le dispositif de verrouillage du hublot pour empêcher les enfants et les animaux de s'enfermer dans l'appareil. INSTALLATION AVERTISSEMENT! Reportez-vous aux chapitres concernant la sécurité. ENCASTREMENT 540 21 600 min. 550 20 558 19 114 min. 560 9 589 598 570 3 594 540 21 min.
DESCRIPTION DE L'APPAREIL VUE D'ENSEMBLE 1 2 3 4 5 1 Bandeau de commande 2 Voyant/symbole de mise sous tension 6 7 12 4 8 9 3 10 2 11 1 3 Manette de sélection des modes de cuisson 4 Affichage 5 Thermostat 6 Indicateur / symbole de température 7 Orifices d'aération du ventilateur de refroidissement 8 Résistance 9 Éclairage 10 Ventilateur 11 Support de grille amovible 12 Position des grilles ACCESSOIRES • Grille métallique Permet de poser des plats à rôti, à gratin et des moules à gâteau/pâti
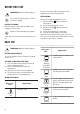
AFFICHAGE A B C A. Fonctions de l'horloge B. Minuteur C. Fonction de l'horloge AVANT LA PREMIÈRE UTILISATION AVERTISSEMENT! Reportez-vous aux chapitres concernant la sécurité. Pour modifier l'heure, reportez-vous au chapitre « Fonctions de l'horloge ». PREMIER NETTOYAGE Retirez les supports de grille amovibles et tous les accessoires du four. Reportez-vous au chapitre « Entretien et nettoyage ». Nettoyez le four et les accessoires avant de les utiliser pour la première fois.
Fonction du four Sole Turbo Gril Gril Fort Utilisation Pour cuire des gâteaux à fond croustillant et pour stériliser des aliments. Pour rôtir de grosses pièces de viande ou de la volaille sur un seul niveau. Également pour gratiner et faire dorer. Pour griller des aliments peu épais en grandes quantités et pour griller du pain. Pour faire griller des aliments peu épais et du pain. Gril Chaleur Tournante Humide Cette fonction est conçue pour économiser de l'énergie en cours de cuisson.
FONCTIONS DE L'HORLOGE TABLEAU DES FONCTIONS DE L'HORLOGE Fonction de l'horloge Utilisation HEURE Pour régler, modifier ou vérifier l'heure du jour. DURÉE Pour régler la durée de fonctionnement de l'appareil. FIN Pour régler l'heure à laquelle l'appareil s'éteint. DÉPART DIFFÉRÉ Pour combiner les fonction DURÉE et FIN. MINUTEUR Pour régler un décompte. Cette fonction est sans effet sur le fonctionnement de l'appareil.
L'appareil s'allume automatiquement plus tard, fonctionne pendant la DURÉE réglée, et s'arrête à l'heure de FIN choisie. Lorsque la durée définie s'est écoulée, un signal sonore retentit. 7. L'appareil s'éteint automatiquement. Appuyez sur n'importe quelle touche pour arrêter le signal sonore. 8. Tournez la manette des fonctions du four et la manette du thermostat sur la position Arrêt. La MINUTERIE se met en marche automatiquement au bout de 5 secondes. 3.
FONCTIONS SUPPLÉMENTAIRES VENTILATEUR DE REFROIDISSEMENT Lorsque le four fonctionne, le ventilateur de refroidissement se met automatiquement en marche pour refroidir les surfaces du four. Si vous éteignez le four, le ventilateur de refroidissement continue à fonctionner jusqu'à ce que le four refroidisse. surchauffe dangereuse. Pour éviter cela, le four dispose d'un thermostat de sécurité interrompant l'alimentation électrique.
TABLEAU DE RÔTISSAGE ET DE CUISSON DES GÂTEAUX Gâteaux Voûte Chaleur tournante Plat Durée (min) Remarques Température Positions Température Positions (°C) des grilles (°C) des grilles Pâtes à gâteaux 170 2 165 2 (1 et 3) 45 - 60 Dans un moule à gâteau Pâte sablée 170 2 160 2 (1 et 3) 20 - 30 Dans un moule à gâteau Gâteau au fromage (au babeurre) 170 1 165 2 70 - 80 Dans un moule à gâteau de 26 cm Tarte aux pommes 170 1 160 2 (1 et 3) 80 - 100 Dans deux moules à gâteau de 20 cm
Voûte Chaleur tournante Plat Durée (min) Remarques Température Positions Température Positions (°C) des grilles (°C) des grilles Petits gâteaux 170 3 166 3 (1 et 3) 25 - 35 Sur un plateau de cuisson Biscuits/ Gâteaux secs1) 150 3 140 3 (1 et 3) 30 - 35 Sur un plateau de cuisson Meringues 100 3 115 3 35 - 40 Sur un plateau de cuisson Petits pains1) 190 3 180 3 80 - 100 Sur un plateau de cuisson Choux1) 190 3 180 3 (1 et 3) 15 - 20 Sur un plateau de cuisson Tourtes 180
Pain et pizza Voûte Chaleur tournante Plat Durée (min) Remarques Température Positions Température Positions (°C) des grilles (°C) des grilles Pain blanc1) 190 1 195 1 60 - 70 1 à 2 pièces, 500 g par pièce Pain de seigle 190 1 190 1 30 - 45 Dans un moule à pain Petits pains1) 190 2 180 2 (1 et 3) 25 - 40 6 à 8 petits pains sur un plateau de cuisson Pizza1) 190 1 190 1 20 - 30 Dans un plat à rôtir Scones1) 200 3 190 2 10 – 20 Sur un plateau de cuisson 1) Préchauffez le
Voûte Chaleur tournante Plat Durée (min) Remarques Température Positions Température Positions (°C) des grilles (°C) des grilles « Yorkshire puddings »1) 220 2 210 2 20 - 30 Moule pour 6 puddings 1) Préchauffez le four pendant 10 minutes.
Voûte Chaleur tournante Plat Durée (min) Remarques Température Positions Température Positions (°C) des grilles (°C) des grilles Rôti de bœuf, bien cuit 210 2 200 2 55 - 60 Sur la grille métallique et dans un plat à rôtir Épaule de porc 180 2 170 2 120 - 150 Dans un plat à rôtir Jarret de porc 180 2 160 2 100 - 120 2 pièces dans un plat à rôtir Agneau 190 2 190 2 110 - 130 Gigot Poulet 200 2 200 2 70 - 85 Entier Dinde 180 1 160 1 210 - 240 Entière Canard 175 2
Quantité Durée (min) Plat Morceaux Quantité (kg) 1re face 2e face Filet de bœuf 4 0.8 12 - 15 12 - 14 Steaks de bœuf 4 0.6 10 - 12 6-8 Saucisses 8 - 12 - 15 10 - 12 Côtelettes de porc 4 0.6 12 - 16 12 - 14 Poulet (coupé en deux) 2 1 30 - 35 25 - 30 Brochettes 4 - 10 - 15 10 - 12 Escalope de poulet 4 0.4 12 - 15 12 - 14 Steak haché 6 0.6 20 - 30 - Filet de poisson 4 0.
CHALEUR TOURNANTE HUMIDE Pour de meilleurs résultats, suivez les suggestions indiquées dans le tableau ci-dessous.
Température (°C) Positions des grilles Plat Accessoires Biscuits sablés, 20 biscuits Plateau de cuisson ou plat à rôtir 150 2 40 - 50 Tartelettes, 8 gâteaux Plateau de cuisson ou plat à rôtir 170 2 20 - 30 Légumes pochés, 0,4 kg Plateau de cuisson ou plat à rôtir 180 3 35 - 40 Omelette végétarienne plaque à pizza sur la grille métallique 200 3 30 - 45 Légumes méditerranéens, 0,7 kg Plateau de cuisson ou plat à rôtir 180 4 35 - 40 PIZZA Utilisez la fonction Sole pulsée.
Plat Fonction PosiAccessoi- tions Tempérares des gril- ture (°C) les Durée (min) Remarques Tourte aux pommes Convection naturelle Grille métallique 1 170 80 - 120 Utilisez 2 moules (20 cm de diamètre) placés en diagonale. Génoise/ Gâteau Savoie Convection naturelle Grille métallique 2 170 35 - 45 Utilisez un moule à gâteau (26 cm de diamètre). Biscuits sablés Convection naturelle Plateau de cuisson 3 150 20 - 35 Préchauffez le four pendant 10 minutes.
FOURS EN ACIER INOXYDABLE OU EN ALUMINIUM Nettoyez la porte uniquement avec une éponge ou un chiffon humides. Séchez-la avec un chiffon doux. N'utilisez jamais de produits abrasifs ou acides ni d'éponges métalliques car ils peuvent endommager la surface du four. Nettoyez le bandeau de commande du four en observant ces mêmes recommandations. NETTOYEZ LE JOINT D'ÉTANCHÉITÉ DE LA PORTE Vérifiez régulièrement le joint d'étanchéité de la porte.
90° 7. Soulevez doucement puis sortez le panneau de verre. 4. Déposez la porte sur une surface stable recouverte d'un tissu doux. 1 5. Désengagez le système de verrouillage pour retirer le panneau de verre intérieur. 2 8. Nettoyez les panneaux de verre avec de l'eau savonneuse. Séchez soigneusement les panneaux de verre. Les rails télescopiques ne passent pas au lave-vaisselle. Une fois le nettoyage terminé, remettez le panneau de verre et la porte du four en place.
2. Nettoyez le diffuseur en verre. 3. Remplacez l'ampoule par une ampoule adéquate résistant à une température de 300 °C . 4. Replacez le diffuseur en verre. DÉPANNAGE AVERTISSEMENT! Reportez-vous aux chapitres concernant la sécurité. EN CAS D'ANOMALIE DE FONCTIONNEMENT Problème Cause probable Solution Le four ne chauffe pas. Le four est éteint. Allumez le four. Le four ne chauffe pas. L'horloge n'est pas réglée. Réglez l'horloge. Le four ne chauffe pas.
RENDEMENT ÉNERGÉTIQUE ÉCONOMIE D'ÉNERGIE 10 minutes avant la fin de la cuisson, en fonction de la durée de la cuisson. La chaleur résiduelle à l'intérieur du four poursuivra la cuisson. Utilisez la chaleur résiduelle pour réchauffer d'autres plats. Lorsque vous cuisez plusieurs plats les uns après les autres, veillez à ne pas trop espacer les cuissons. Ce four est doté de caractéristiques qui vous permettent d'économiser de l'énergie lors de votre cuisine au quotidien.
867348242-B-172019 WWW.ZANUSSI.