User Manual GETTING STARTED? EASY.
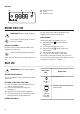
SAFETY INFORMATION Before the installation and use of the appliance, carefully read the supplied instructions. The manufacturer is not responsible for any injuries or damages that are the result of incorrect installation or usage. Always keep the instructions in a safe and accessible location for future reference.
• • • • • • Before carrying out any maintenance, disconnect the appliance from the power supply. Ensure that the appliance is switched off before replacing the lamp to avoid the possibility of electric shock. Do not use a steam cleaner to clean the appliance. Do not use harsh abrasive cleaners or sharp metal scrapers to clean the glass door since they can scratch the surface, which may result in shattering of the glass.
• This appliance complies with the E.E.C. Directives. • USE WARNING! Risk of injury, burns and electric shock or explosion. • • • • • • • • • • • • This appliance is for household use only. Do not change the specification of this appliance. Make sure that the ventilation openings are not blocked. Do not let the appliance stay unattended during operation. Deactivate the appliance after each use. Be careful when you open the appliance door while the appliance is in operation. Hot air can release.
• • Disconnect the appliance from the mains supply. Cut off the mains electrical cable close to the appliance and dispose of it. • Remove the door catch to prevent children or pets from becoming trapped in the appliance.
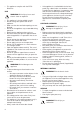
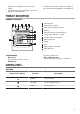
DISPLAY A B C A. Clock functions B. Timer C. Clock function BEFORE FIRST USE WARNING! Refer to Safety chapters. To set the Time of day refer to "Clock functions" chapter. INITIAL CLEANING Remove all accessories and removable shelf supports from the oven. Refer to "Care and cleaning" chapter. Clean the oven and the accessories before first use. Put the accessories and the removable shelf supports back to their initial position. PREHEATING Preheat the empty oven before first use. 1. Set the function .
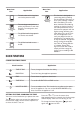
Oven function Application Oven function To bake cakes with crispy bottom and to preserve food. Moist Fan Baking Bottom Heat Turbo Grilling To roast larger meat joints or poultry with bones on one shelf position. To make gratins and to brown. To grill flat food in large quantities and to toast bread. Fast Grilling To grill flat food and to toast bread. Grilling Application This function is designed to save energy during cooking.
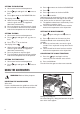
SETTING THE DURATION 1. Set an oven function and temperature. 3. Press 2. Press flash. again and again until 5. Press 3. Press or The display shows starts to to set the DURATION time. . 4. When the time ends, flashes and an acoustic signal sounds. The appliance deactivates automatically. 5. Press any button to stop the acoustic signal. 6. Turn the knob for the oven functions and the knob for the temperature to the off position. SETTING THE END 1. Set an oven function and temperature. 2.
Wire shelf and baking tray / deep pan together: Push the baking tray / deep pan between the guide bars of the shelf support and the wire shelf on the guide bars above. Small indentation at the top increase safety. The indentations are also antitip devices. The high rim around the shelf prevents cookware from slipping of the shelf. ADDITIONAL FUNCTIONS COOLING FAN When the oven operates, the cooling fan turns on automatically to keep the surfaces of the oven cool.
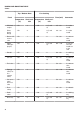
BAKING AND ROASTING TABLE Cakes Top / Bottom Heat Fan Cooking Food Time (min) Comments Temperature Shelf posi- Temperature Shelf posi(°C) tion (°C) tion 10 Whisked recipes 170 2 165 2 (1 and 3) 45 - 60 In a cake mould Shortbread dough 170 2 160 2 (1 and 3) 20 - 30 In a cake mould Butter-milk cheese cake 170 1 165 2 70 - 80 In a 26 cm cake mould Apple cake (Apple pie) 170 1 160 2 (1 and 3) 80 - 100 In two 20 cm cake moulds on a wire shelf Strudel 175 2 150 2 60 - 80 I
Top / Bottom Heat Fan Cooking Food Time (min) Comments Temperature Shelf posi- Temperature Shelf posi(°C) tion (°C) tion Meringues 100 3 115 3 35 - 40 In a baking tray Buns1) 190 3 180 3 80 - 100 In a baking tray Choux1) 190 3 180 3 (1 and 3) 15 - 20 In a baking tray Plate tarts 180 3 170 2 25 - 35 In a 20 cm cake mould Victoria sandwich 180 1 or 2 170 2 45 - 70 Left + right in a 20 cm cake mould Rich fruit cake 160 1 150 2 110 - 120 In a 24 cm cake mould Victo
Top / Bottom Heat Fan Cooking Food Time (min) Comments Temperature Shelf posi- Temperature Shelf posi(°C) tion (°C) tion Pizza1) 190 1 190 1 20 - 30 On a deep pan Scones1) 200 3 190 2 10 – 20 In a baking tray 1) Preheat the oven for 10 minutes.
Top / Bottom Heat Fan Cooking Food Time (min) Comments Temperature Shelf posi- Temperature Shelf posi(°C) tion (°C) tion Veal 190 2 175 2 90 - 120 On a wire shelf and a deep pan English roast beef rare 210 2 200 2 44 - 50 On a wire shelf and a deep pan English roast beef medium 210 2 200 2 51 - 55 On a wire shelf and a deep pan English roast beef well done 210 2 200 2 55 - 60 On a wire shelf and a deep pan Shoulder of pork 180 2 170 2 120 - 150 On a deep pan Shin of p
Fish Top / Bottom Heat Fan Cooking Food Time (min) Comments Temperature Shelf posi- Temperature Shelf posi(°C) tion (°C) tion Trout / Sea bream 190 2 175 2 (1 and 3) 40 - 55 3-4 fishes Tuna fish / Salmon 190 2 175 2 (1 and 3) 35 - 60 4 - 6 fillets GRILLING Preheat the oven for 10 minutes. Use the third position. Set the temperature to 250 °C. Quantity Time (min) Food Pieces 1st side 2nd side Fillet steaks 4 0.8 12 - 15 12 - 14 Beef steaks 4 0.
Quantity Time (min) Food Pieces (kg) 1st side 2nd side Rolled joints (turkey) 1 1 30 - 40 20 - 30 Chicken (cut in two) 2 1 25 - 30 20 - 30 Chicken drumsticks 6 - 15 - 20 15 - 18 Quail 4 0.5 25 - 30 20 - 25 Vegetable gratin - - 20 - 25 - Scallops - - 15 - 20 - Mackerel 2-4 - 15 - 20 10 - 15 Fish slices 4-6 0.8 12 - 15 8 - 10 MOIST FAN BAKING For best results follow suggestions listed in the table below.
Food Temperature (°C) Accessories Time (min) Whole fish, 0.2 kg baking tray or dripping pan 180 3 35 - 45 Fish fillet, 0.3 kg pizza pan on wire shelf 180 3 35 - 45 Pouched meat, 0.25 kg baking tray or dripping pan 200 3 40 - 50 Shashlik, 0.
Accesso- Shelf Temperaries position ture (°C) Food Function Time (min) Comments Small cake Conventional Cooking Baking tray 3 170 20 - 30 Put 20 small cakes per one baking tray. Apple pie Conventional Cooking Wire shelf 1 170 80 - 120 Use 2 tins (20 cm diameter), diagonally shifted. Sponge cake Conventional Cooking Wire shelf 2 170 35 - 45 Use a cake mould (26 cm diameter). Short bread Conventional Cooking Baking tray 3 150 20 - 35 Preheat the oven for 10 minutes.
CLEANING THE DOOR GASKET Regularly do a check of the door gasket. The door gasket is around the frame of the oven cavity. Do not use the oven if the door gasket is damaged. Contact an Authorised Service Centre. To clean the door gasket, refer to the general information about cleaning. REMOVING THE SHELF SUPPORTS To clean the oven, remove the shelf supports. CAUTION! Be careful when you remove the shelf supports. 1. Pull the front of the shelf support away from the side wall. 2.
8. Clean the glass panels with water and soap. Dry the glass panels carefully. Do not clean the glass panels in the dishwasher. When the cleaning is completed, install the glass panel and the oven door. When installed correctly the door trim clicks. Make sure that you install the internal glass panel in the seats correctly. A 5. Release the locking system to remove the internal glass panel. REPLACING THE LAMP WARNING! Risk of electric shock. The lamp can be hot. 6.
TROUBLESHOOTING WARNING! Refer to Safety chapters. WHAT TO DO IF... Problem Possible cause Remedy The oven does not heat up. The oven is deactivated. Activate the oven. The oven does not heat up. The clock is not set. Set the clock. The oven does not heat up. The necessary settings are not set. Make sure that the settings are correct. The oven does not heat up. The fuse is blown. Make sure that the fuse is the cause of the malfunction.
BUILDING IN ELECTRICAL INSTALLATION The manufacturer is not responsible if you do not follow the safety precautions from the Safety chapters. 540 21 min. 550 20 600 558 19 114 This appliance is supplied only with a main cable. min. 560 589 598 570 594 9 3 CABLE Cable types applicable for installation or replacement: H07 RN-F, H05 RN-F, H05 RRF, H05 VV-F, H05 V2V2-F (T90), H05 BB-F For the section of the cable refer to the total power on the rating plate.
ENERGY EFFICIENCY ENERGY SAVING 3 - 10 minutes before the end of the cooking time, depending on the duration of the cooking. The residual heat inside the oven will continue to cook. Use the residual heat to warm up other dishes. Keep breaks between baking as short as possible when you prepare few dishes at one time. The oven contains features which help you save energy during everyday cooking. General hints Cooking with fan Make sure that the oven door is closed properly when the oven operates.
867348238-A-492018 WWW.ZANUSSI.