Miza Rack 12-16
Thank you for choosing a piece of Zaor studio furniture, which will hopefully make your life easier, more ergonomic and improve the looks of your workspace. Before you can enjoy the comfort of your new acquisition you need to assemble it. We have tried to give you as much detail as needed and as little as possible. Should you run into any difficulty with this assembly you can get in touch with us via sales@zaorstudiofurniture.com to set up a Skype session or phone call.
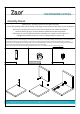
8 6 2 5 4 1 3 7 Part Left side panel Part Right side panel 1 Part Cable trough 6 Part Base plate 2 Part Front plate 9 Part Rack floor 4 3 Part Top Part Stabiliser Part Drawer 7 8 9 5
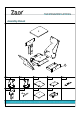
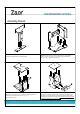
5 6 4 3 6 1 5 PHASE 1 t rt flat on the floor lower down part Assemble using the pins and holes provided. PHASE 2 t rt flat on a soft floor Put system bolts in sockets. Lower down parts and previously assembled and parts and Tighten with excenters 8 2 2 7 1 6 1 PHASE 3 4 3 Place parts on side panel Gradually lower side panel fitted with system bolts onto parts Tighten with excenters. PHASE 4 4 9 Lower down the top fitted with system bolts and tighten with excenters.