Content Safety Instruction .............................................................................................................................................................. 2 Minimum System Requirement & Product Feature .......................................................................................................... 4 Main Page ................................................................................................................................................................
User Manual Safety Instruction Before you use this product This product has been designed with safety in mind. However, the electrical products can cause fires which may lead to serious body injury if it is not used properly. To avoid such accidents, be sure to heed the following. Legal Caution Video and audio surveillance can be forbidden by laws that vary from country to country. Check the laws in your local region before using this product for surveillance purposes.
• If the unit emits smoke or an unusual smell, • If water or other foreign objects enter the cabinet. • If you drop the unit or damage the cabinet:1 Disconnect the cable and the connecting cables. 2 Contact your authorized dealer or the store where you purchased the product. Transportation When transporting the camera, repack it as originally packed at the factory or in materials of equal quality. Ventilation To prevent heat buildup, do not block air circulation around the device.
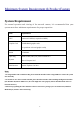
Minimum System Requirement & Product Feature System Requirement For normal operation and viewing of the network camera, it’s recommended that your system meet these minimum requirements for proper operation: Item Requirements CPU Pentium 4 2.8GHz (or equivalent AMD) Graphic Card 256 MB RAM graphic cards (or equivalent on-board graphic cards) RAM 2 GB RAM Operating System Window 2000, 2003, XP, Vista or Windows 7 Web Browser Mac OS Leopard 10.5 Internet Explorer 8 or later Note: 1.
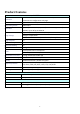
Product Features SYSTEM Resolutions 4 resolutions from 1280x720 to 160x120 via API, 4 selections via configuration web page Screen Resolution Higher than 1024 * 720 pixels Compressing format Motion JPEG Frame Rate Up to 10 fps at 1280x720; Up to 30 fps at 640x480; Up to 30 fps at 320x240; Up to 30 fps at 160x120 Brightness / Contrast / Saturation / Sharpness Image settings Backlight compensation White balance: Fluorescent / Incandescent / Sunny / Cloudy Image snapshot Yes Video Recording Yes F
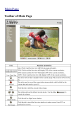
Main Page Toolbar of Main Page 6
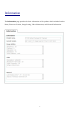
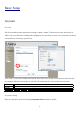
Information The Information page provides the basic information of the product which includes Product Name, Firmware Version, Image Setting, Video Information, and Network Information.
Basic Setup Account Account The device default account and password setting is “admin / admin”. That means everyone who knows IP address can access the device including all configuration. It is necessary to create a new password if the device is intended to be accessed by specific ones. Click “Add” to create the accounts to the specific users. There are 1 default account and 9 accounts that you may assign 3 different viewer modes as you wish.
Network TCP/IP Internet Protocol Version 4 (TCP/IPv4) Obtain an IP address automatically (DHCP): If a DHCP server is installed on the network, to select this while the IP address is assigned by the DHCP server. Obtain DNS server address automatically: Select this to obtain the address of DNS server automatically. Use the following IP address: Select this option when the fixed IP address is set. IP address: Enter the IP address of the device. Subnet mask: Enter the subnet mask.
in the Setup Program, access the device by typing the IP address of the device on the web browser as follows: Example: when HTTP port number is set to 2000 http://192.168.1.100:2000/ Note: Reboot the IP Camera after the network setting has been made. Note: If you connect the IP Camera with your computer directly, the default network domain of camera is 192.168.1.xx PPPoE If your ISP provides Dynamic IP with authentication by username and password, type all PPPoE information in this part.
Use the following DNS server address: Select this when you set the fixed address as the IP address of DNS server. Primary DNS server: Enter the IP address of the primary DNS server. Secondary DNS server: Enter the IP address of the secondary DNS server. Note : 1. PPPoE (Point-to-Point Protocol over Ethernet): PPPoE is a network protocol for encapsulating Point-to-Point Protocol frames insider Ethernet frames.
most common use for DDNS is allowing an internet domain name to be assigned to a computer with a varying / dynamic IP Address. This makes it possible for other sites on the internet to establish connection to the machine without needing to track the IP Address themselves. Server name: Choose the DDNS Server from the list. User ID: Enter the user ID for authentication necessary for DDNS connections. Type it up to 64 characters.
Wireless (F1105) The wireless network can be selected as Enable or Disable. WPS (F1105) WPS (Wi-Fi Protected Setup) also known as a standard for easy and secure establishment of a wireless home network. Enable it when wireless is turned on, and you will see the wireless IP and MAC of this IP camera. Configuration via PBC – Select to start WPS configuration. PIN – Select and click Generate new PIN to generate a new PIN code and start WPS configuration.
Image Setting The image setting can be enhanced by adjusting the setting values as below: Brightness: The image brightness can be adjusted in the range 0-100, the a higher value produces a brighter image. Saturation: Adjust the saturation in the range 0-100, the higher value gets more colorful image. Contrast: Adjust the image's contrast by raising or lowering the value in the range 0-100. Sharpness: Controls the sharpness applied to the image in the range 0-100.
Resolution: There are four resolutions could be selected, including 1280x720 / 640x480 / 320x240 / 160x120. Maximum Frame Rate: The maximum frame rate can be selected from 30 / 20 /15 /10 / 7 / 5 / 1. Light Frequency: The default setting of lighting environment is Auto. However, you may select 50 or 60 Hz upon the lighting environment of your country. Streaming Authentication: It’s default Enable for avoiding video stream accessible to anyone who typed in the correct net address.
Events Motion Detection There are three different detecting zones to set for this function. Select one and enable it, then Threshold and Sensitivity inputs can be adjusted as your requirement. Motion Detection function can support to FTP and SMTP. E-mail(SMTP) Set the SMTP menu when you want to send an image or video clip via e-mail. By using Mail (SMTP) function, you can send a mail with attached file which has been shot linked with the built-in motion detection function.
SMTP Server Name: Type the SMTP server name up to 64 characters, or the IP address of the SMTP server. SMTP Server Port: You can set port number from 1~65535 according to your mail server. The default value is 25. SSL: Tick SSL box if the mail server you use has security restriction. Note: If you use g-mail as your mail server, you should set 25 as your port number and tick SSL box. Authentication: Select the authentication required when you send an email.
Note:When you set to On, be sure to select either or both SMTP or / and POP before SMTP. POE Sever Name: It is necessary when the POP before SMTP is selected in Authentication. Type the POP (receiving mail) server name up to 64 characters, or type the IP address of the POP server. This setting is necessary when the SMTP server which sends e-mails performs authentication using the POP user account. User Name, Password: Type the user name and Password of the user who has the mail account.
Schedule Selection: Select SMTP or FTP to specify the schedule you want to set. Mon (Monday) to Sun (Sunday): The time period on the right of the checked day is the effective period of the schedule. Start Time, End Time: Specify the Start Time and the End Time. Use the same time schedule every day: When this is checked, the Start Time and End Time set to Mon (Monday) are applied to all days. In this case, the Start Time and End Time of the other days than Mon (Monday) cannot be input.
the same characters as you typed in the Password box. Passive mode: Set whether you use the passive mode of FTP server or not when connecting to FTP server. Select On to connect to FTP server using the passive mode. Effective Period: Set the period when the periodical sending is effective. Always: The periodical sending is always effective. Schedule: You can specify the period when the periodical sending is effective in the Schedule setting in the other section.
Firmware Upgrade Current Version: It shows the current version of device firmware. Firmware Upgrade: Update the device software. Click “Browse” and select the file for updating. A confirmation dialogue will appear. Click “OK” to start. This IP Camera will reboot upon completion. Upload Language Pack: Clicking “Browse” and selecting the file for updating, the list of Language menu built-in 8 languages will be added the 9th one. Date Time The Date/ Time screen displays all options of time setting.
Current Date/Time Current date/time: It shows the current date/time of the device. PC Clock: It shows the date/time of PC. Date/time format: You can click the pull down box to select different time display formats. Synchronization Method There are 4 Methods selected, including Keep current setting / Synchronize with PC / Manual setting / Synchronize with NTP. Note: The NTP server (Network Time Protocol) is the time server which is an Internet standard protocol built on the top of TCP / IP.
computer clock times in a network of computers. Time Zone Time zone: Select the Time Zone format of Greenwich Mean Time among different cities. The time display will be the same as the current date / time option. Daylight Saving Time: There are two modes to choose for setting up daylight saving time. By Date: Set the start and end time by select month, day, hour, and minute. By Week Number: Set the start and end time by select month, week, hour, and minute.
FCC statement in User’s Manual (for class B) “Federal Communications Commission (FCC) Statement This Equipment has been tested and found to comply with the limits for a class B digital device, pursuant to Part 15 of the FCC rules. These limits are designed to provide reasonable protection against harmful interference in a residential installation.