
Owner`s manual


10
Deva IV and Deva V Owner’s Manual
Chapter 2
You can continue toggling the Mic/Line option to each channel as required without pressing the Mic/Line
Level button each time, simply press the channel you want power applied to while the LED flashes on the
Mic/Line Level button
Toggling Phantom Power (48 VDC)
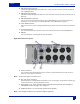
1. Press the 48 Volts button.
The red LED on the 48V button flashes red indicating it is active.
2. Press the channel you want phantom power applied to.
48 V on the button turns red and changes to 48 V On to indicate 48 VDC is applied to that channel.
You can continue toggling the power option to each channel as required without pressing the 48 Volt but-
ton each time, simply press the channel you want power a
pplied to while the LED flashes on the 48 Volts
button.
Note: T
o protect equipment from damage, the DEVA will not allow you to apply power to any channel set as a Line input.
Toggling the High Pass Filter (HPF)
1. Press the High Pass Filter button.
2. Press the channel you want the High Pass Filter applied to.
HPF indicator on the button changes to la
st HPF frequency used.
3. Press Hi
gh Pass Frequency button to change the frequency at which the HPF should be applied.
A dialog appears requesting the high pass frequency.
4. Enter the HPF using the numeric keys.
The valid frequency range is 30 Hz to 240 Hz. Any valu
e outside this range is place closest to most
valid number with this range.
5. Press the enter key on the front of the DEVA to finish entering the HPF cutoff.
You can continue toggling the High Pass
Filter option to each channel as required without pressing the High
Pass Filter button each time, simply press the channel you want HPF applied to while the LED flashes on
the High Pass Filter button. The last frequency used, is used for the new channel. You can change this by
repeating steps 3 through 5.
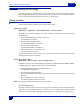
Adjusting the Trim
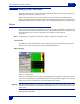
1. Press the Adjust Trim button.
The Analog Trim Screen appears.
2. Press Trim above the channel you want to adjust.
When a channel is activated, Tri
m changes from black to Blue.
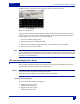
3. Either Less gain or More gain to adjust a channel.
A range of -20 dB to +25 dB can be applie
d to any channel including the Slate Mic.
Repeat steps 1 through 3 for each channel.
All Trim settings can be reset to 0 dB by pressing the
Clear Trim button. A dialog appears after pressing the
Clear Trim button requesting confirmation that you want to clear all the trim settings.
Note: If all c
hannels are going to be set at the same level, you can save time by changing them at the same time. Press the
Select All button, then any change made to the levels are applied to all channels at the same time.
Pressing either the STOP button in the upper right corner of the screen or us
ing the Menu key on the
keypad exits the Adjust Analog Trim screen and brings you back to the Analog Input Control screen.