
Owner`s manual


Deva IV and Deva V Owner’s Manual
Chapter 2
11
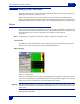
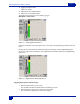
Adjusting The Delay
1. Press the Adjust Delay button.
The Adjust Delay Screen Appears. You can adjust dela
y on both Analog and Digital inputs.
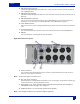
2. Press the Channel you want to add delay into.
The button changes to white.
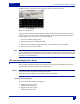
3. Press More delay to add delay.
If Delay has been added to a channel, the Less Delay bu
tton is active and can be used to reduce the
amount of delay.
A maximum of 40 ms of delay can be added to each channel.
Repeat Steps 1 through 3 for each channel as required.
As an alternative to pressing the More Delay or Less
Delay buttons, you can press the Enter Delay and
manually enter the delay using the keypad.
Hint: Wireless microphones typically require 3 ms of delay to avoid phasing associated with them.
Pressing either the STOP button in the upper right corner of the screen or using the Menu key on the key-
pad exits the Adjust Delay screen and brings you back to the Analog Input Control screen.
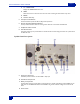
Digital Inputs
The DEVA comes with an AES Digital Input cable. This cable gets connected on the left side of the DEVA,
see Left Side Panel Descriptions on page 5 for the location of this connector.
The AES cable fans out to 8 separate XLR style inputs.
You can use any combination of these inputs with
your DEVA. The input number is written on each cable. You can assign these inputs to any channel or com-
binations of channels.
No special settings other than delay is available for digital inputs. See “Adjusting The Delay”.to learn how to
adjust the delay.