Table of Contents OVERVIEW........................................................................................................................................................................... 3 SYSTEM FEATURES ........................................................................................................................................................................3 KNOWING YOUR ZFR200 / 300 ....................................................................................................
Jamming TC with a Cable ..................................................................................................................................................22 Continuously Jamming TC from ZaxNet ............................................................................................................................22 Transmitting TC and Audio from the ZFR ..........................................................................................................................
Zaxcom ZFR 200 / 300 Manual___________________ _________________Overview Overview The Zaxcom ZFR (Zaxcom Flash Recorder) is the same size as Zaxcom wireless transmitter and can accept standard lavaliere microphones. A stereo ZFR can accept two lavaliere microphones, two unbalanced The ZFR can be used as an easy way to record ISO tracks on multiple talent with no fears of being out of range or having to deal with RF issues. On power up the ZRF will jam time code via the ZaxNet 2.
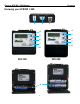
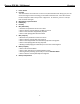
Zaxcom ZFR 200 / 300 Manual___________________ _________________Overview Knowing your ZFR200 / 300 1 2 3 4 4 5 5 6 6 7 7 8 8 ZFR 200 ZFR 300 9 4
Zaxcom ZFR 200 / 300 Manual___________________ _________________Overview 1. Power Switch 2. Card Slot This slot holds the micro SD card. To insert a card, with the ZFR screen facing you, turn the card so the finger contacts are facing you and down toward the slot. Insert the card into the slot and press it down until you here a slight click. To remove it, press it in until you hear the same click again. 3. Microphone / Input Connector 4. LCD Display 5. Card Key 6.
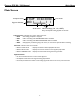
Zaxcom ZFR 200 / 300 Manual___________________ _______ Main Menu Main Screen Transport Status Segment Number STOP 01:02:30:00 003 1 1 1 1 Audio Level Time Code Meter Markings (-20, -10, 0 dBFS) They correspond to the graphics on the case.
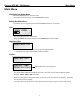
Zaxcom ZFR 200 / 300 Manual___________________ _______ Main Menu Main Menu Navigating the Main Menu • Press the MENU Button to enter the menu. • To advance to the next menu press the MENU Button again. Exiting the Main Menu • To exit the menu at any time press and hold the MENU button for 1.5 seconds Gain GAIN GAIN20dB 20dB This menu adjusts the microphone gain. Using the INC key will increase the gain and the DEC key will reduce the gain.
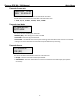
Zaxcom ZFR 200 / 300 Manual___________________ _______ Main Menu Timecode Frame-rate TIMECODE 23.98 GEN 01:02:34:01 This menu sets the Timecode frame-rate that will be recorded. The ZFR will lock to and record all standard Timecode frame rates. • 23.98, 24, 25, 29.97DF, 29.97DF, 30 DF, 30 NDF Timecode Jam Mode TC JAM MODE: AUTO-JAM This menu sets how the ZFR jams Timecode. MANUAL (OFF) –This setting is not used in the ZFR AUTO-JAM – Continuously jams timecode.
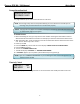
Zaxcom ZFR 200 / 300 Manual___________________ _______ Main Menu Format Recording Card PRESS UP KEY 5X TO ERASE CARD This page will allow you to erase and format the micro SD card. NOTE: Even though many cards are sold preformatted, you must reformat it in the ZFR prior to recording. Only cards formatted in the unit will work properly. NOTE: This page will only appear if a card was inserted prior to booting up the ZFR. Also if the card is removed this page will not appear. To Format a Card: 1.
Zaxcom ZFR 200 / 300 Manual___________________ _______ Main Menu Lock Page LOCK 5 LOCKED 01:02:34:01 Countdown clock starting at 5 seconds After ZFR locks This page enables a lock function to prevent any accidentally setting changes. When you land on this page the countdown clock will begin will begin. After the 5 seconds the ZFR will lock and the display will indicated LOCKED. If you exit this screen before the 5 seconds is up the ZFR will not lock.
Zaxcom ZFR 200 / 300 Manual____ _______________ ___ ___Extended Menu Extended Menu Navigating the Extended Menu • Press and hold the MENU key while powering up the unit. • Pressing the MENU key will advance you to the next menu item. Exiting the Extended Menu • Cycle the power Or • Hold down the MENU key to get back to the EXTENDED MENU home page then press the INC key. High Pass Filter HIGH PASS: HIGH PASS: OFF OFF This menu allows you to adjust the frequency for the high pass filter.
Zaxcom ZFR 200 / 300 Manual____ _______________ ___ ___Extended Menu IFB Voting Enable – this menu will not appear if the IFB settings allow the ZFR to go into transmit mode. IFB VOTING NORMAL (OFF) This menu allows you to enable / disable the IFB Voting function. The purpose of the voting is to allow the ZFR to choose and switch to the stronger signal from two different ZaxNet transmitters.
Zaxcom ZFR 200 / 300 Manual____ _______________ ___ ___Extended Menu ZaxNet IFB Receive Frequency RXFREQ: 2.403 When the ZFR is receiving a ZaxNet signal you will also see: RXFREQ: 2.403 RX SIGNAL: 28 ZaxNet signal is being received A signal strength meter Signal strength This is where you set the ZaxNet receive frequency. This frequency: • Is what the ZFR will receive its timecode and ZaxNet commands on.
Zaxcom ZFR 200 / 300 Manual____ _______________ ___ ___Extended Menu IFB Receive Pulse – this menu will only appear if IFB is set to go into transmit mode. IFB RX RX PULSE: IFB PULSE: NEVER NEVER The TRX will stay in transmit mode and never go into receive mode.
Zaxcom ZFR 200 / 300 Manual____ _______________ ___ ___Extended Menu Time Code Jam Mode TC TCJAM JAM MODE MODE: AUTO-JAM AUTO-JAM This menu sets how the ZFR jams timecode. • MANUAL (OFF) –This setting is not used in the ZFR • AUTO-JAM – continuously jams timecode. • AUTO-LOAD – The ZFR will start and stop the recording, when the ZFR receives record run timecode it will go into record and when the timecode stops the ZFR will stop recording.
Zaxcom ZFR 200 / 300 Manual____ _______________ ___ ___Extended Menu Expander page EXPANDER EXPANDER EXPANDER PARMS EXPANDER PARMS ON ON Expander OFF When the Parameters are ON you can adjust the Expander Menu The Expander can be used to “Expand” the dynamic range of the audio signal. The Expander will be used to make the quiet sounds even quieter by reducing the level of the signal that falls below what the threshold is set at which will essentially reducing the noise floor.
Zaxcom ZFR 200 / 300 Manual____ _______________ ___ ___Extended Menu Dynamics page DYNAMICS DYNAMICS Dynamics OFF DYNAMICS PARMS PARMS DYNAMICS ON ON When the Parameters are ON you can adjust the Dynamic Menu The Dynamics is a soft knee compressor that in the signal path is post analog to digital converter. The Dynamics will limit the dynamic range to prevent clipping it will decrease the gain at loud points. Dynamics is comprised of both a compressor and an expander, which operate jointly.
Zaxcom ZFR 200 / 300 Manual____ _______________ ___ ___Extended Menu Battery Type BATTERY TYPE: NIMH This menu adjusts the ZFR’s battery type to display the remaining battery capacity. The settings are NIMH, Lithium and Alkaline. NOTE: In the menu you will see “ENG” and “QRX” options for these battery types as well. This is for cross compatibility with our wireless transmitters and how the battery level is received by the wireless receivers. You can ignore these settings when using the ZFR.
Zaxcom ZFR 200 / 300 Manual____ _______________ ___ ___Extended Menu Low Battery Stop LOW BATT STOP: NEVER STOP LOW BATT STOP: 5 MINUTES This menu sets the amount of time after a low battery warning the ZFR will close the current file and stop recording. This is to prevent possible file corruption if the battery becomes low. • NEVER STOP - the ZFR will not stop till you stop it.
Zaxcom ZFR 200 / 300 Manual____ _______________ ___ ___Extended Menu Encryption Menu ENCRYPTION MENU: ENCRYPTION MENU: HIDDEN HIDDEN This hides the Encryption Menu. • HIDDEN the encryption menu doesn’t appear when you cycle through the menu settings. • ON the Encryption will appear. Encryption Code page ID1:000 ID1:000 ID0:000 ID0:000 If you set an encryption code the transmitted audio will be encrypted and can only be listened to if the receiver has the matching encryption code entered.
Zaxcom ZFR 200 / 300 Manual___________________ Media Recording Media While any size card will work we recommend using a 4GB micro SD card. We also recommend that you buy a brand name card such as Transcend, SanDisk, or Delkin. You should also buy your cards from a reputable dealer because counterfeit cards exist and can cause recording issues. We also recommend that you test your card before taking them out into the field. Here is a testing procedure to determine if the card will function correctly: 1.
Zaxcom ZFR 200 / 300 Manual___________________ Operations Operations Jamming TC with a Cable Timecode can be jammed into the ZFR by connecting the timecode source to the microphone input. When timecode is connected, it will take the ZFR approximately three (3) seconds to recognize the TC input. The screen displays TIMECODE followed shortly by JAMMED when it is recognized. When the word JAMMED disappears, the timecode input source can be disconnected and normal operation can be resumed.
Zaxcom ZFR 200 / 300 Manual___________________ Operations Playing Back and Segment Navigation • • • • • • Pressing the CARD key and the MENU/PLAY key simultaneously will put the ZFR into play mode. Pressing the INC key while stopped will also play the section that is displayed in the home screen. Pressing the INC key while in play mode will fast forward. Pressing the DEC key while playing back will stop the playback. Holding the DEC key while playing back will take you to the start of that segment.
Zaxcom ZFR 200 / 300 Manual____________ Inputting Audio/Wiring Diagrams Inputting Audio The ZFR200 / ZFR300 use an unbalanced microphone input via a 3-pin micro-LEMO connector. You can use an unbalanced dynamic microphone or a powered lavaliere. You can use a line-level input though an inline pad is required on the standard dynamic microphone input cable (XLR-3 to 3-pin micro-LEMO).
Zaxcom ZFR 200 / 300 Manual____________ Stereo microphone configuration Balanced Line Level and timecode input Stereo Line Level 25 Inputting Audio/Wiring Diagrams
Zaxcom ZFR 200 / 300 Manual_________________ Updating Firmware Firmware Each unit is shipped with the latest firmware version installed. As newer firmware becomes available, it can be downloaded from the Zaxcom website: http://www.zaxcom.com/software-updates Each time a unit is powered up, the firmware version number is displayed briefly on the LCD screen. Pressing the DEC key during the boot up will slow down the screen to allow easier viewing of the information. Upgrading ZFR Firmware 1. 2. 3. 4. 5.
Zaxcom ZFR 200 / 300 Manual_________________ ZFR Specifications Recorder Audio Dynamic Range Distortion Frequency Response Mic Power Mic Connector Input Range Impedance ADC Bit-depth ADC Sampling-rate Time code Reader/Generator Clock Accuracy Time code Type Time code Frame-rates Recording Media File Format Recording Time IFB Receiver / Transmitter RF Frequency Range RF Modulation RF Frequency Step RF Bandwidth Channel Separation 103 dB 0.001% 20 Hz to 16 kHz 3.
Zaxcom ZFR 200 / 300 Manual_________________ Warranty Zaxcom Warranty Policy and Limitations Zaxcom Inc. values your business and always attempts to provide you with the very best service. No limited warranty is provided by Zaxcom unless your Zaxcom Digital Miniature Recorder System Component (“Product”) was purchased from an authorized distributer or authorized reseller. Distributers may sell Product to resellers who then sell Product to end users.