MN000879A01B.
MN000879A01B.fm Page 2 Thursday, July 10, 2014 11:01 AM 2 AP-7522 Access Point MOTOROLA SOLUTIONS and the Stylized M Logo are registered in the US Patent & Trademark Office. © Motorola Solutions, Inc. 2014. All rights reserved.
MN000879A01B.fm Page 3 Thursday, July 10, 2014 11:01 AM Installation Guide 1.0 Introduction . . . . . . . . . . . . . . . . . . . . . . . . . . . . . . . . . . . . . . . . . . . . . . . 5 1.1 Document Conventions . . . . . . . . . . . . . . . . . . . . . . . . . . . . . . . . . . . . . 5 1.2 Warnings . . . . . . . . . . . . . . . . . . . . . . . . . . . . . . . . . . . . . . . . . . . . . . . . 6 1.3 Site Preparation . . . . . . . . . . . . . . . . . . . . . . . . . . . . . . . . . . . . . . . . . . .
MN000879A01B.fm Page 4 Thursday, July 10, 2014 11:01 AM 4 AP-7522 Access Point 5.3.2 Potentially Hazardous Atmospheres - Fixed Installations . . . . . . 35 5.3.3 Safety in Hospitals . . . . . . . . . . . . . . . . . . . . . . . . . . . . . . . . . . . 35 5.4 RF Exposure Guidelines . . . . . . . . . . . . . . . . . . . . . . . . . . . . . . . . . . . . 36 5.4.1 Safety Information . . . . . . . . . . . . . . . . . . . . . . . . . . . . . . . . . . . . 36 5.4.2 International . . . . . . . . . . . . . . . .
MN000879A01B.fm Page 5 Thursday, July 10, 2014 11:01 AM Installation Guide 1 5 Introduction The AP-7522 external antenna and internal antenna Access Point’s are mid-tier Access Point’s with a relatively small footprint which supports functionality for dependable and efficient network performance.The AP-7522 is a 2x2:2 802.11ac Access Point utilizing one 2.4 GHz 802.11n radio and one 5 GHz 802.11ac radio. The Access Point housing is Plenum-rated (UL2043).
MN000879A01B.fm Page 6 Thursday, July 10, 2014 11:01 AM 6 AP-7522 Access Point 1.2 Warnings • • • • Read all installation instructions and site survey reports, and verify correct equipment installation before connecting the AP-7522 Access Point. Remove jewelry and watches before installing this equipment. Verify any device connected to this unit is properly wired and grounded. Verify there is adequate ventilation around the device, and that ambient temperatures meet equipment operation specifications.
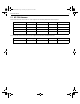
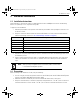
MN000879A01B.fm Page 7 Thursday, July 10, 2014 11:01 AM Installation Guide 7 1.5 AP-7522 Antennas An AP-7522 external antenna Access Point supports the following dual band antenna options: Part Number Antenna Type 2.4 GHZ Gain (dBi) 5 GHZ Gain (dBi) Impdance (Ohms) ML-2452-APA2-01 Dipole 3.17 4.6 50 ML-2452-HPA5-036 Dipole 3 5 50 ML-2452-APAG2A1-01 Dipole 2.7 1.7 50 ML-2452-PNA5-01R Panel 5.
MN000879A01B.fm Page 8 Thursday, July 10, 2014 11:01 AM 8 AP-7522 Access Point 2 Hardware Installation 2.1 Installation Instructions An AP-7522 Access Point mounts either on a wall (with M 3.5 x 0.6 x 23 MM pan head screws and mounting bracket- or equivalent) or on a suspended ceiling T-bar. To prepare for the installation: 1. Match the part number on the purchase order with the part numbers in the packing list and on the case of the Access Point. 2.
MN000879A01B.fm Page 9 Thursday, July 10, 2014 11:01 AM Installation Guide 9 2.3 Access Point Placement For optimal performance, install the Access Point away from transformers, heavy-duty motors, fluorescent lights, microwave ovens, refrigerators and other industrial equipment. Signal loss can occur when metal, concrete, walls or floors block transmission. Install the Access Point in an open area or add Access Points as needed to improve coverage. Antenna coverage is analogous to lighting.
MN000879A01B.fm Page 10 Thursday, July 10, 2014 11:01 AM 10 AP-7522 Access Point The Motorola Access Point Power Supply (Part No. PWRS-14000-54R) is not included with the Access Point and is orderable separately as an accessory. If the Access Point is provided both POE power and PWRS-14000-54R power concurrently, the Access Point will source power from the PWRS-14000-54R supply only.
MN000879A01B.fm Page 11 Thursday, July 10, 2014 11:01 AM Installation Guide 11 The Power Injector can be installed free standing, on an even horizontal surface or wall mounted using the power injector’s wall mounting key holes. The following guidelines should be adhered to before cabling the Power Injector to an Ethernet source and an Access Point: • • • ! ! Do not block or cover airflow to the Power Injector. Keep the Power Injector away from excessive heat, humidity, vibration and dust.
MN000879A01B.fm Page 12 Thursday, July 10, 2014 11:01 AM 12 AP-7522 Access Point 2.5.1 Wall Mount Procedure - New Installation This section describes a new AP-7522 installation with no previous Access Point existing on the intended wall surface. 1. Place the mounting bracket against the wall. 2. Mark the screw hole locations depending on the intended deployment orientation of the unit. NOTE When pre-drilling a hole the recommended hole size is 4mm (0.16in.). 3.
MN000879A01B.fm Page 13 Thursday, July 10, 2014 11:01 AM Installation Guide 13 For Motorola Power Injector installations: a. Connect a RJ-45 CAT5e (or CAT6) Ethernet cable between the Power Injector Data & Power Out connector and the Access Point’s GE1/POE port. b. Connect a RJ-45 CAT5e (or CAT6) Ethernet cable between the network data supply (host) and the Power Injector Data In connector. c.
MN000879A01B.fm Page 14 Thursday, July 10, 2014 11:01 AM 14 AP-7522 Access Point 2.6 Suspended Ceiling T-Bar Mount Instructions Ceiling mount requires holding the AP-7522 up against a T-bar of a suspended ceiling grid and twisting the unit on to the T-bar. If deploying the AP-7522 on a sculpted ceiling T-Bar, the Access Point mounting kit (Part No. KT-135628-01) can optionally be used as well. 1.
MN000879A01B.fm Page 15 Thursday, July 10, 2014 11:01 AM Installation Guide 15 a. Connect a RJ-45 CAT5e (or CAT6) Ethernet cable between the network data supply (host) and the Power Injector Data In connector. b. Connect a RJ-45 CAT5e (or CAT6) Ethernet cable between the Power Injector Data & Power Out connector and the Access Point’s GE1/POE port. c. Ensure the cable length from the Ethernet source (host) to the Power Injector and Access Point does not exceed 100 meters (333 ft).
MN000879A01B.fm Page 16 Thursday, July 10, 2014 11:01 AM 16 AP-7522 Access Point 8. Rotate the Access Point chassis 45 degrees counter-clockwise. The clips click as they fasten to the T-bar. 9. The Access Point is ready to configure.
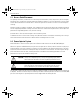
MN000879A01B.fm Page 17 Thursday, July 10, 2014 11:01 AM Installation Guide 17 2.7 LED Indicators The AP-7522 LED activity indicators are located on the front of the housing and are visible through the enclosure.
MN000879A01B.fm Page 18 Thursday, July 10, 2014 11:01 AM 18 AP-7522 Access Point The LEDs provide a status display indicating error conditions, transmission, and network activity for the 5 GHz 802.11ac (amber) radio and the 2.4 GHz 802.11n (green) radio. Task 5 GHz Activity LED (Amber) 2.
MN000879A01B.fm Page 19 Thursday, July 10, 2014 11:01 AM Installation Guide 3 19 Basic Access Point Configuration Once the AP-7522 is installed and powered on, complete the following steps to get the Access Point up and running and access management functions: 1. The Access Point’s IP address is optimally provided using DHCP. A zero config IP address can also be derived if DHCP resources are unavailable.
MN000879A01B.fm Page 20 Thursday, July 10, 2014 11:01 AM 20 AP-7522 Access Point 3. Enter the default username admin in the Username field. 4. Enter the default password motorola in the Password field. 5. Click the Login button to load the management interface. NOTE When logging in for the first time, you’re prompted to change the password to enhance device security in subsequent logins.
MN000879A01B.fm Page 21 Thursday, July 10, 2014 11:01 AM Installation Guide NOTE 21 The Initial Setup Wizard displays the same pages and content for each Access Point type supported. The only difference being the number of radios configurable by Access Point type, as an AP7131 Access Point can support up to three radios, AP6522, AP6532, AP6562, AP8132 and AP7161 Access Points support two radios and AP6511 and AP6521 Access Points support a single radio.
MN000879A01B.fm Page 22 Thursday, July 10, 2014 11:01 AM 22 AP-7522 Access Point 7. Select Save/Commit within each page to save the updates made to that page's configuration. Select Next to proceed to the next page listed in the Navigation Panel without saving your updates. NOTE While you can navigate to any page in the navigation panel, you cannot complete the Initial AP Setup Wizard until each task in the Navigation Panel has a green checkmark.
MN000879A01B.fm Page 23 Thursday, July 10, 2014 11:01 AM Installation Guide 23 10. Select an Access Point Type from the following options: • Virtual Controller AP - When more than one Access Point is deployed, a single Access Point can function as a Virtual Controller AP. Up to 24 Access Points can be connected to, and managed by, a single Virtual Controller AP of the same Access Point type. These connected Access Points must be the same type as the Virtual Controller AP.
MN000879A01B.fm Page 24 Thursday, July 10, 2014 11:01 AM 24 AP-7522 Access Point 13. The Typical Setup Wizard displays the Network Topology screen to define how the Access Point handles network traffic. 14. Select an Access Point Mode from the available options. • Router Mode -In Router Mode, the Access Point routes traffic between the local network (LAN) and the Internet or external network (WAN). Router mode is recommended in a deployment supported by just a single Access Point.
MN000879A01B.fm Page 25 Thursday, July 10, 2014 11:01 AM Installation Guide 25 15. Select Next. The Typical Setup Wizard displays the LAN Configuration screen to set the Access Point's LAN interface configuration. 16. Set the following DHCP and Static IP Address/Subnet information for the LAN interface: • Use DHCP - Select the checkbox to enable an automatic network address configuration using the Access Point’s DHCP server.
MN000879A01B.fm Page 26 Thursday, July 10, 2014 11:01 AM 26 AP-7522 Access Point • DNS Forwarding - Select this option to allow a DNS server to translate domain names into IP addresses. If this option is not selected, a primary and secondary DNS resource must be specified. DNS forwarding is useful when a request for a domain name is made but the DNS server, responsible for converting the name into its corresponding IP address, cannot locate the matching IP address.
MN000879A01B.fm Page 27 Thursday, July 10, 2014 11:01 AM Installation Guide 27 19. Select Next. The Typical Setup Wizard displays the RADIUS Server Configuration screen if required. Otherwise, the Typical Setup Wizard displays the Summary and Commit screen. 20. Use the Radius Server Configuration screen to configure the users for the onboard RADIUS server. Use the screen to add, modify and remove RADIUS users.
MN000879A01B.fm Page 28 Thursday, July 10, 2014 11:01 AM 28 AP-7522 Access Point 21. Select Add User to display the dialog to enter user information to add to the RADIUS server user database. 22. Enter the following user information: • Username - Provide a user name used to authenticate the user. • Password - Provide a password used to authenticate the user. • Confirm Password - Confirm the password by entering the same password as entered in the Password field.
MN000879A01B.fm Page 29 Thursday, July 10, 2014 11:01 AM Installation Guide 29 28. Select Next. The Typical Setup Wizard displays the Summary and Commit screen to summarize the screens (pages) and settings updated using the Typical Setup Wizard. No user intervention or additional settings are required. Its an additional means of validating the Access Point’s updated configuration before it’s deployed.
MN000879A01B.fm Page 30 Thursday, July 10, 2014 11:01 AM 30 4 AP-7522 Access Point AP-7522 Access Point Specifications 4.1 Electrical Characteristics An AP-7522 Access Point has the following electrical characteristics: Operating Current & Voltage 12VDC, 1A (AUX input voltage) 12VDC PWRS-14000-54R power supply 48VDC, 0.375A (POE) 802.3at AP-PSBIAS-2P3-ATR Power Injector 4.2 Physical Characteristics An AP-7522 Access Point has the following physical characteristics: Dimensions 7.1 in. L x 6.5 in.
MN000879A01B.fm Page 31 Thursday, July 10, 2014 11:01 AM Installation Guide 31 4.3 Radio Characteristics The AP-7522 Access Point has the following radio characteristics: Data Rates Supported 802.11b/g: 1,2,5.5,11,6,9,12,18,24,36,48 and 54 Mbps 802.11a: 6,9,12,18,24,36,48, and 54 Mbps 802.11a/n: MCS 0-23 up to 300 Mbps 802.11ac: MCS 0-9 up to 866.7 Gbps Turbo Mode (256QAM) on 2.
MN000879A01B.fm Page 32 Thursday, July 10, 2014 11:01 AM 32 5 AP-7522 Access Point Regulatory Information 5.1 Regulatory Information This device is approved under Motorola Solutions, Inc. This guide applies to the following Model Numbers: AP-7522, AP-7522I. All Motorola Solutions devices are designed to be compliant with rules and regulations in locations they are sold and will be labeled as required. Local language translations are available at the following website: https://portal.motorolasolutions.
MN000879A01B.fm Page 33 Thursday, July 10, 2014 11:01 AM Installation Guide 33 5.2.1 Country Selection Select only the country in which you are using the device. Any other selection will make the operation of this device illegal. Some Access Points are specifically designed to operate in certain countries (Example; -US for the United States, -EU for the European Union). Country Roaming This device incorporates the International Roaming feature (IEEE802.
MN000879A01B.fm Page 34 Thursday, July 10, 2014 11:01 AM 34 AP-7522 Access Point 5.3 Health and Safety Recommendations Ergonomic Recommendations Caution: In order to avoid or minimize the potential risk of ergonomic injury follow the recommendations below. Consult with your local Health & Safety Manager to ensure that you are adhering to your company's safety programs to prevent employee injury.
MN000879A01B.fm Page 35 Thursday, July 10, 2014 11:01 AM Installation Guide 35 Safety on the Road Do not take notes or use the device while driving. Jotting down a "to do" list or flipping through your address book takes attention away from your primary responsibility, driving safely. When driving a car, driving is your first responsibility - Give full attention to driving. Check the laws and regulations on the use of wireless devices in the areas where you drive. Always obey them. 5.3.
MN000879A01B.fm Page 36 Thursday, July 10, 2014 11:01 AM 36 AP-7522 Access Point 5.4 RF Exposure Guidelines 5.4.1 Safety Information Reducing RF Exposure - Use Properly Only operate the device in accordance with the instructions supplied. 5.4.2 International The device complies with internationally recognized standards covering human exposure to electromagnetic fields from radio devices.
MN000879A01B.fm Page 37 Thursday, July 10, 2014 11:01 AM Installation Guide 37 Remote and Standalone Antenna Configurations To comply with FCC RF exposure requirements, Antennas that are mounted externally must be professionally installed at a fixed location and operate with a minimum distance of 25cm from all persons. To comply with FCC Antenna requirements, the Antenna must be adjusted such that the RF emission lobes are below 30 degrees elevation. 5.
MN000879A01B.fm Page 38 Thursday, July 10, 2014 11:01 AM 38 AP-7522 Access Point This device complies with RSS 210 of Industry Canada. Operation is subject to the following two conditions: (1) this device may not cause harmful interference and (2) this device must accept any interference received, including interference that may cause undesired operation. Le présent appareil est conforme aux CNR d'Industrie Canada applicables aux appareils radio exempts de licence.
MN000879A01B.fm Page 39 Thursday, July 10, 2014 11:01 AM Installation Guide 39 5.8 Statement of Compliance Motorola hereby, declares that this device is in compliance with the essential requirements and other relevant provisions of Directive 1999/5/EC. A Declaration of Conformity may be obtained from http://www.motorolasolutions.com/doc. 5.9 Japan (VCCI) - Voluntary Control Council for Interference Class B ITE 5.10 Korea Warning Statement for Class B ITE 5.
MN000879A01B.fm Page 40 Thursday, July 10, 2014 11:01 AM 40 AP-7522 Access Point Este dispositivo está em conformidade com as diretrizes de exposição à radiofrequência quando posicionado pelo menos 25 centímetros de distância do corpo. Para maiores informações, consulte o site da Anatel Chile Este equipo cumple con la Resolución No 403 de 2008, de la Subsecretaria de telecomunicaciones, relativa a radiaciones electromagnéticas. China Mexico Restrict Frequency Range to: 2.450 – 2.4835 GHz. S.
MN000879A01B.fm Page 41 Thursday, July 10, 2014 11:01 AM Installation Guide 41 5.12 Waste Electrical and Electronic Equipment (WEEE) English: For EU Customers: All products at the end of their life must be returned to Motorola Solutions for recycling. For information on how to return product, please go to: http://www.motorolasolutions.com/recycling/weee. Français: Clients de l'Union Européenne: Tous les produits en fin de cycle de vie doivent être retournés à Motorola Solutions pour recyclage.
MN000879A01B.fm Page 42 Thursday, July 10, 2014 11:01 AM 42 AP-7522 Access Point Dansk: Til kunder i EU: Alle produkter skal returneres til Motorola Solutions til recirkulering, når de er udtjent. Læs oplysningerne om returnering af produkter på: http://www.motorolasolutions.com/recycling/weee. Ελληνικά: Για πελάτες στην Ε.Ε.: Όλα τα προϊόντα, στο τέλος της διάρκειας ζωής τους, πρέπει να επιστρέφονται στην Motorola Solutions για ανακύκλωση.
MN000879A01B.fm Page 43 Thursday, July 10, 2014 11:01 AM Installation Guide 6 43 Motorola Solutions Support Center If you have a problem with your equipment, contact support for your region. Contact information is available at: https://portal.motorolasolutions.
MN000879A01B.
MN000879A01B.
MN000879A01B.
MN000879A01B.
MN000879A01B.fm Page 48 Thursday, July 10, 2014 11:01 AM Motorola Solutions, Inc. 1301 E. Algonquin Rd. Schaumburg, IL 60196-1078, U.S.A. http://www.motorolasolutions.com MOTOROLA, MOTO, MOTOROLA SOLUTIONS and the Stylized M Logo are trademarks or registered trademarks of Motorola Trademark Holdings, LLC and are used under license. All other trademarks are the property of their respective owners. © 2014 Motorola Solutions, Inc. All Rights Reserved.