
User Guide


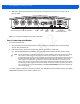

Table Of Contents
- Warranty
- Revision History
- About This Guide
- Quick Start
- Getting Started
- Installation and Communication
- Administrator Console
- Introduction
- Connecting to the Reader
- Administrator Console Login
- Reader Administrator Console
- Status
- Reader Statistics
- Configure Reader
- Read Tags
- Communication Settings
- System Time Management
- IPV6 IP Sec
- Change Password
- GPIO
- Applications
- Reader Profiles
- Firmware Version/Update
- Commit/Discard
- System Log
- Reader Diagnostics
- Shutdown
- Wi-Fi Configuration
- Application Development
- Firmware Upgrade
- Troubleshooting
- Technical Specifications
- Static IP Configuration
- RF Air Link Configuration
- Connecting Wi-Fi and Bluetooth Dongles
- Copying Files To and From the Reader
- Data Protection

CHAPTER 1 QUICK START
Introduction
This chapter provides a Quick Start setup demonstration.
Quick Start Demonstration
The Quick Start demonstration offers a simple, temporary way to quickly set up the reader and read tags. The
demonstration includes:
•
Step 1, Setup on page 1-1
•
Step 2, Connecting to the Reader on page 1-2
•
Step 3, First Time / Start-Up Login on page 1-3
•
Step 4, Set Region on page 1-4
•
Step 5, Read Tags on page 1-6
Step 1, Setup
For information on complete component kits available from Zebra, see Appendix A, Technical Specifications.
1. Unpack the reader. See Unpacking the Reader on page 3-1.
2. Set up the reader and tags on a desktop.
3. Connect the antenna to antenna Port 1. See Figure 1-1.
4. Connect the Ethernet cable to the Ethernet port. See Figure 1-1.
Connecting the reader to a subnet that supports DHCP is recommended. This Quick Start procedure is not
guaranteed to work if DHCP is disabled in the reader and if the reader is connected directly to a PC.
5. Connect the AC power supply to a power outlet and connect to the power port. See Figure 1-1.
NOTE This step is not required for networks supporting Power-over-Ethernet (POE).
Draft 2