
User Guide
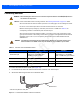
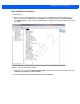
Table Of Contents
- Warranty
- Revision History
- About This Guide
- Quick Start
- Getting Started
- Installation and Communication
- Administrator Console
- Introduction
- Connecting to the Reader
- Administrator Console Login
- Reader Administrator Console
- Status
- Reader Statistics
- Configure Reader
- Read Tags
- Communication Settings
- System Time Management
- IPV6 IP Sec
- Change Password
- GPIO
- Applications
- Reader Profiles
- Firmware Version/Update
- Commit/Discard
- System Log
- Reader Diagnostics
- Shutdown
- Wi-Fi Configuration
- Application Development
- Firmware Upgrade
- Troubleshooting
- Technical Specifications
- Static IP Configuration
- RF Air Link Configuration
- Connecting Wi-Fi and Bluetooth Dongles
- Copying Files To and From the Reader
- Data Protection

Installation and Communication 3 - 5
Communications Connections
Use a standard Ethernet connection, a standard POE, or POE + Ethernet connection to connect the FX7500
reader to a host or network.
Ethernet Connection
The reader communicates with the host using an Ethernet connection (10/100Base-T Ethernet cable). This
connection allows access to the
Administrator Console, used to change reader settings and control the reader.
With a wired Ethernet connection (10/100Base-T cable), power the FX7500 reader using either the reader
Zebra AC power supply, or by Power-Over-Ethernet through the Ethernet cable.
Ethernet: Power through AC Outlet
The FX7500 reader communicates to the host through a 10/100Base-T Ethernet cable and receives power
through a Zebra AC power supply.
1. Route the Ethernet cable.
2. Route the power cable.
3. Terminate the Ethernet cable according to Table A-2 on page A-4.
4. Connect the Ethernet cable to the LAN port on the FX7500 reader. See Figure 2-4 on page 2-4.
5. Connect the other end of the Ethernet cable to the host system LAN port.
6. Connect the Zebra AC power supply to a wall outlet.
7. Insert the power supply barrel connector into the FX7500 reader power port. See Figure 2-4 on page 2-4.
8. Verify that the unit booted properly and is operational. See System Start-up/Boot LED Sequence on page
3-11.
9. On a networked computer, open an internet browser and connect to the reader. See Connecting to the
Reader on page 4-3.
10. Log in to the Administrator Console. See Administrator Console Login on page 4-6.
Ethernet: Power through Standard POE or POE+
The POE installation option allows the FX7500 reader to communicate and receive power on the same
10/100Base-T Ethernet cable.
1. Insert the POE Ethernet connector on the RJ45 Ethernet cable into the reader 10/100BaseT Ethernet port.
See Figure 2-4 on page 2-4.
2. Connect the other end of the cable to an Ethernet network with POE capability.
3. Verify that the reader booted properly and is operational. See System Start-up/Boot LED Sequence on
page 3-11.
4. On a networked computer, open an internet browser and connect to the reader. See Connecting to the
Reader on page 4-3.
5. Log in to the Administrator Console. See Administrator Console Login on page 4-6.
CAUTION Do not connect to PoE networks outside the building.
Draft 2